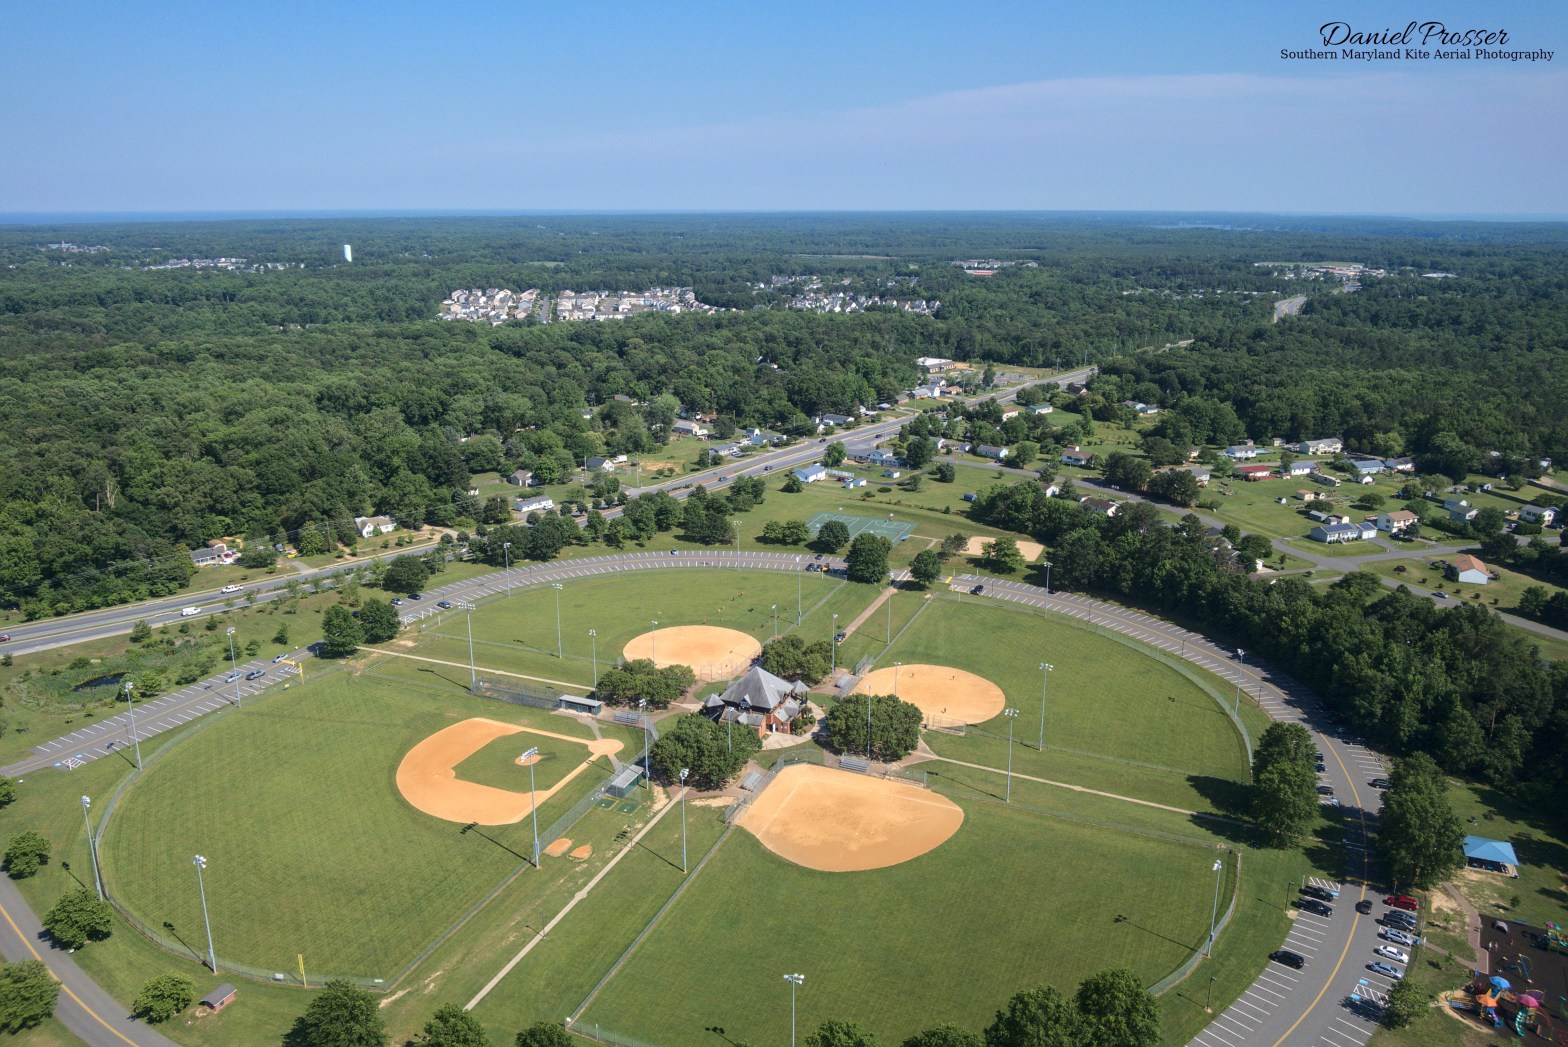
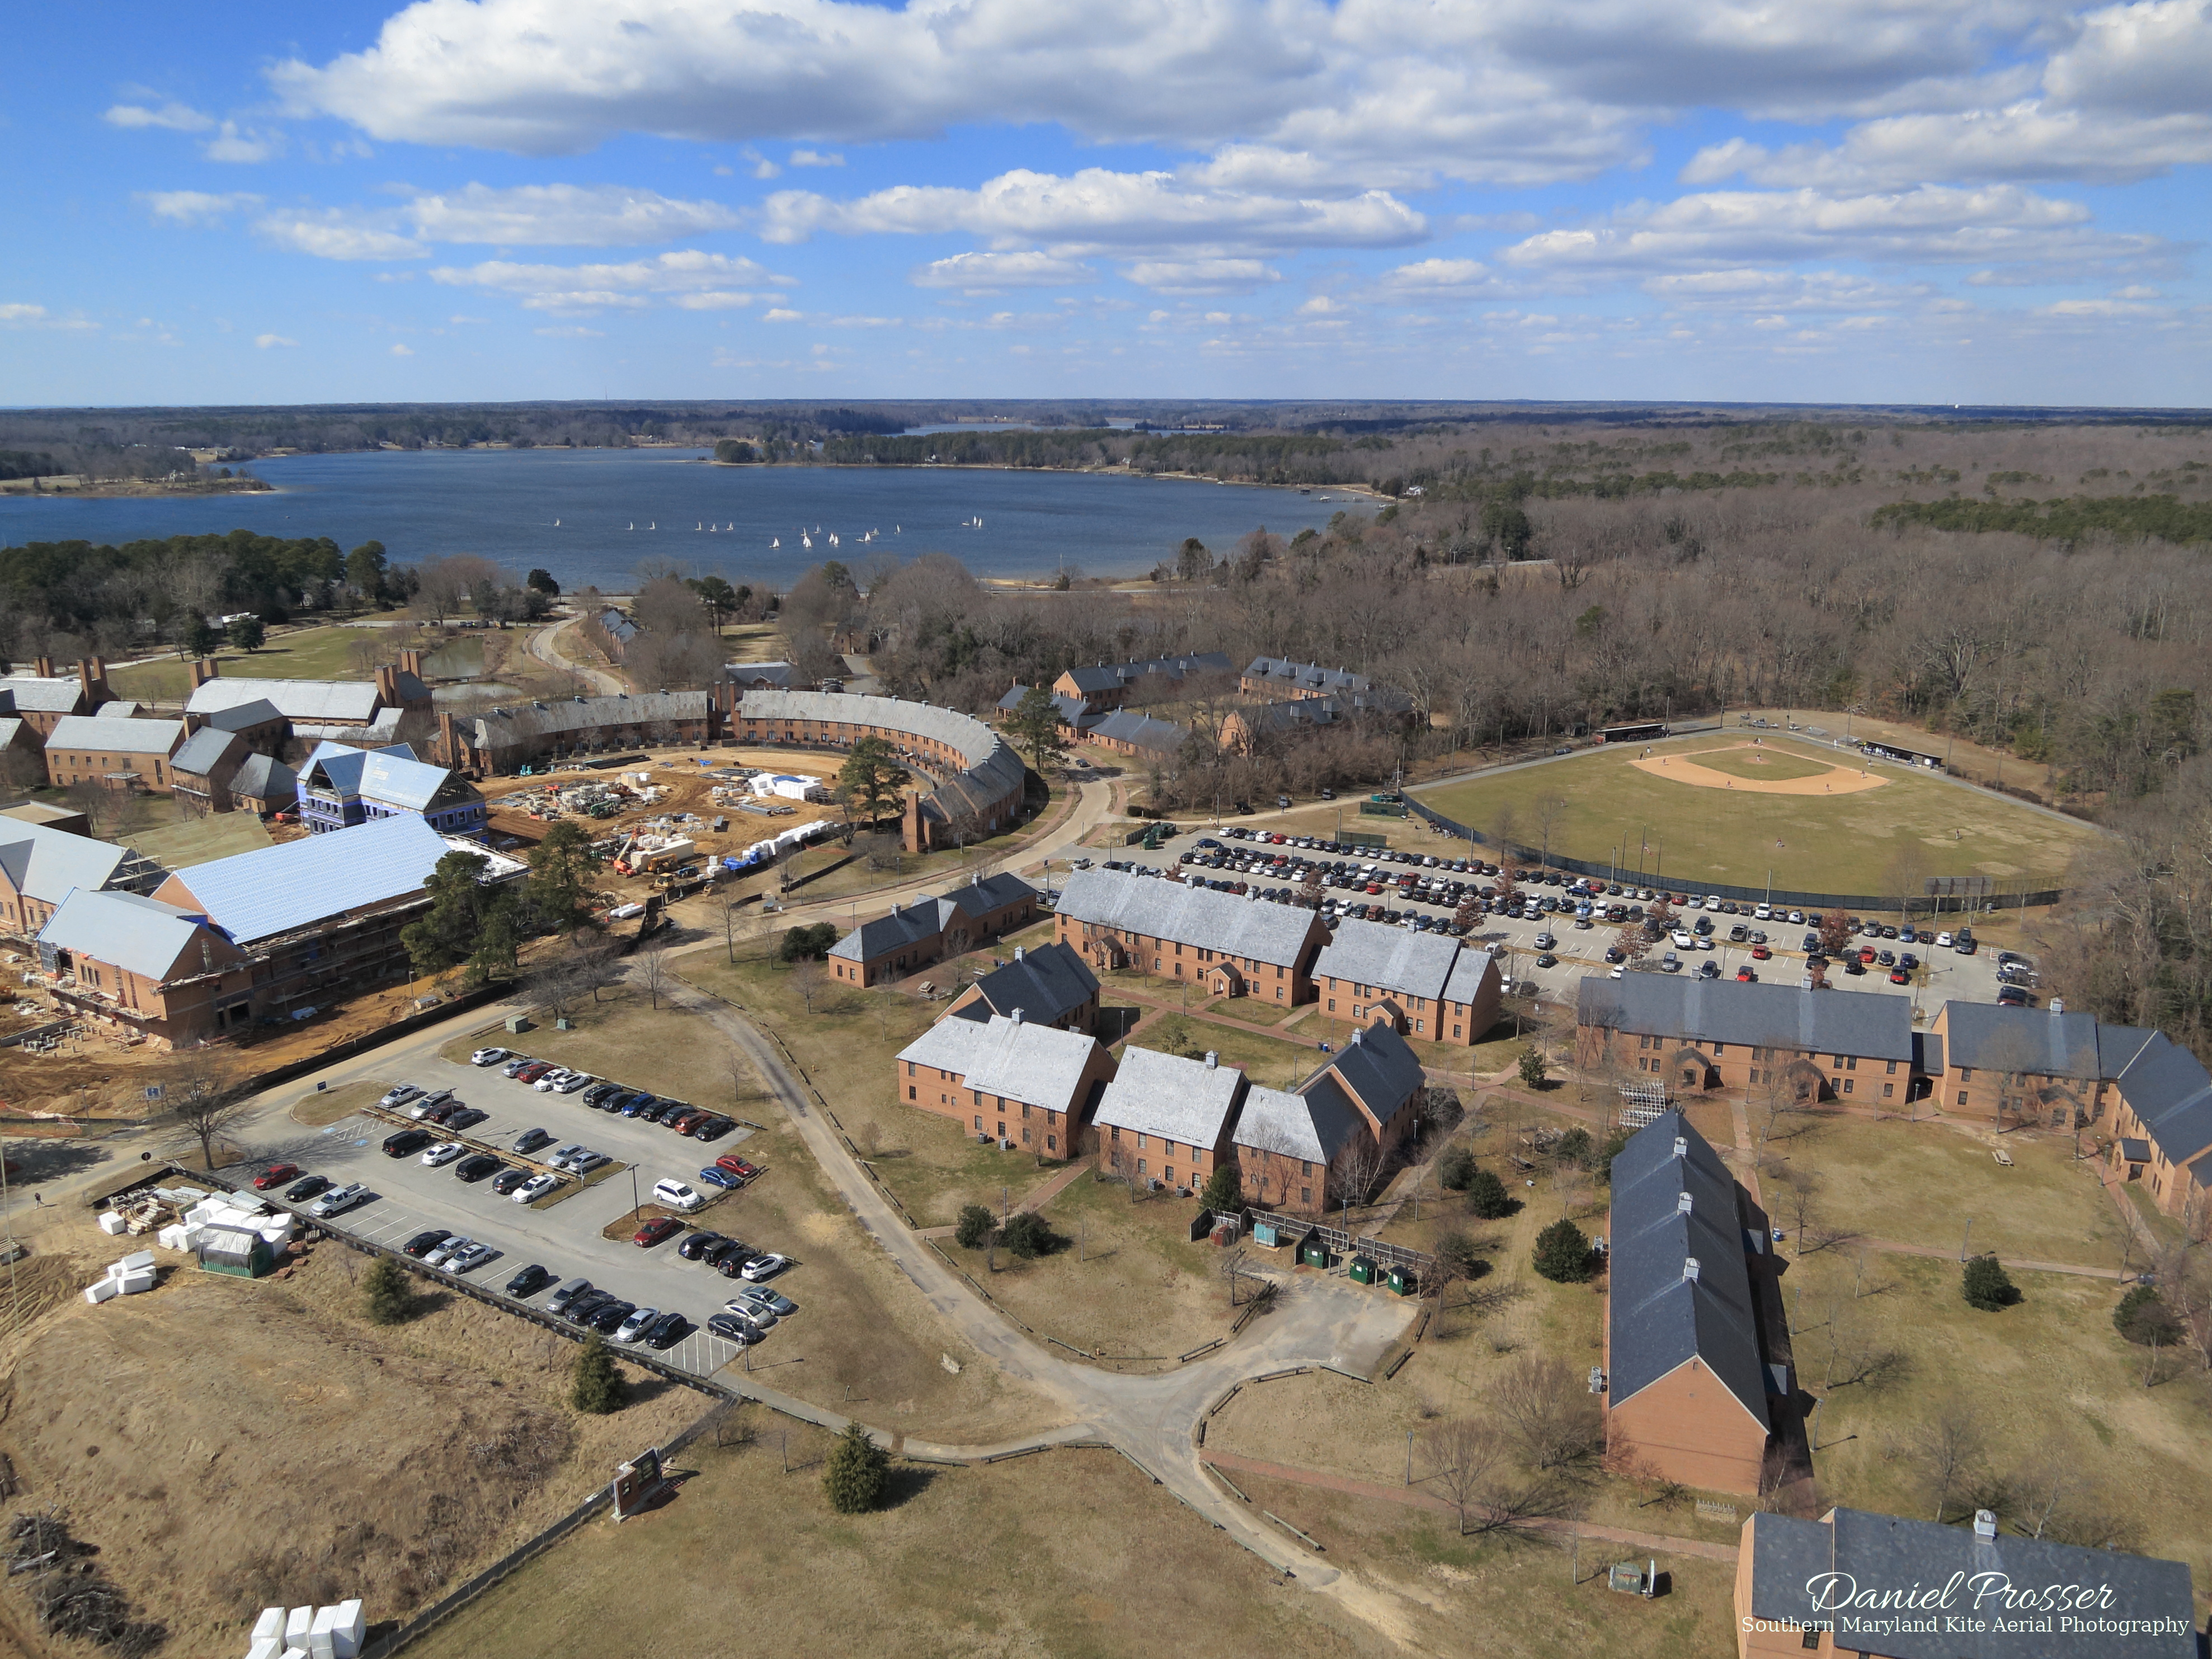
It was a hot afternoon with a steady breeze, and I had a couple hours available, so I decided to head to Chancellors Run Park. It is a site I have flown at many times before, but I haven’t taken good aerial photos there recently. The last time was with my old PowerShot SD1400IS, which is a decent camera, but far below the image quality of my new Sony RX0. So it seemed like a good time to go back to this park and try to get some photos of the Lexington Park and California, MD area from nice and high.
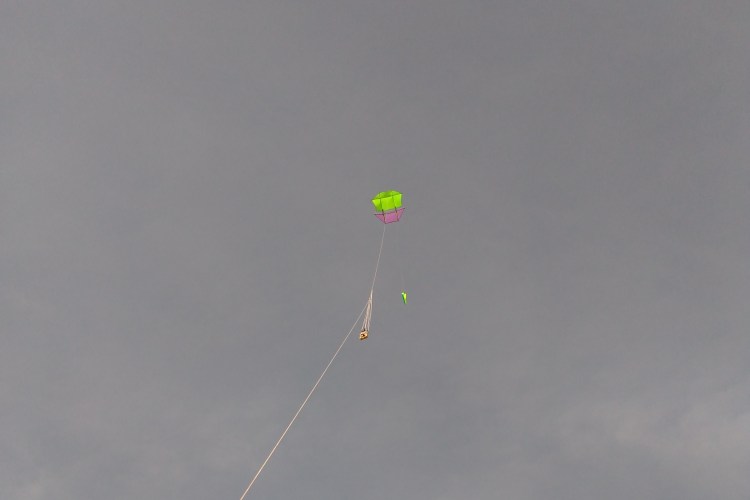
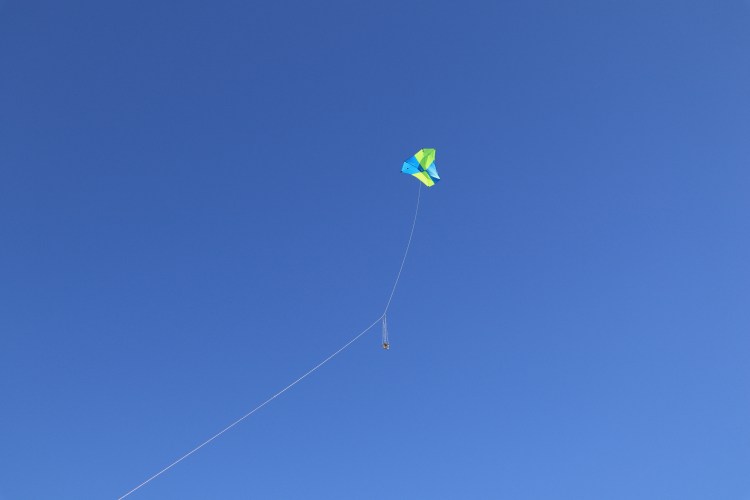
Since the wind was on the lighter side, it was definitely time for another session with the venerable (albeit new) Rokker kite. Rather than flying from my normal spot at this park — one of the four baseball fields right in the middle — I decided to fly from a soccer field in the corner. The goal was partly just to get a new vantage point, and partly because the I intended to photograph the areas north of the park rather than the park itself. However, the wind in this corner was swirling all around, which made the launch more challenging than expected. After a couple attempts, the kite was flying high enough that I could attach the winder to a stake, attach the KAP rig to the line, turn everything on, and…watch as the kite came back down again. And just to make it more frustrating, the kite line got tangled up with the picavet suspension for the rig, forcing me to take more time to untangle it. The next attempt met a similar fate, except that the lines didn’t get tangled this time. Finally, the third time was the charm, and the kite and camera were finally up and away.
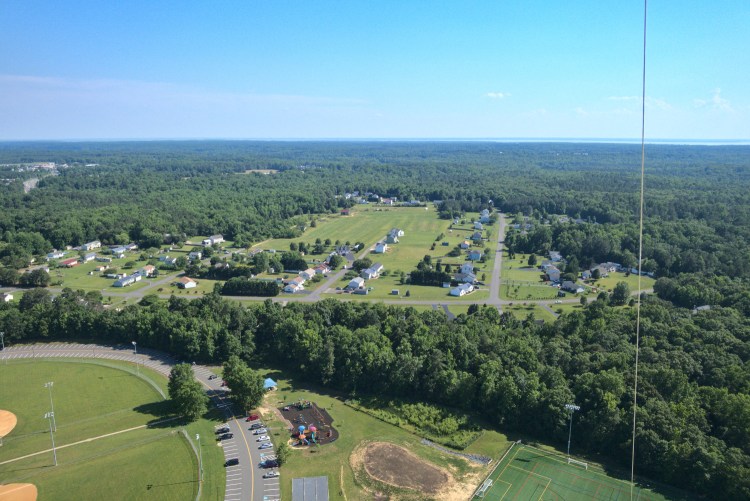
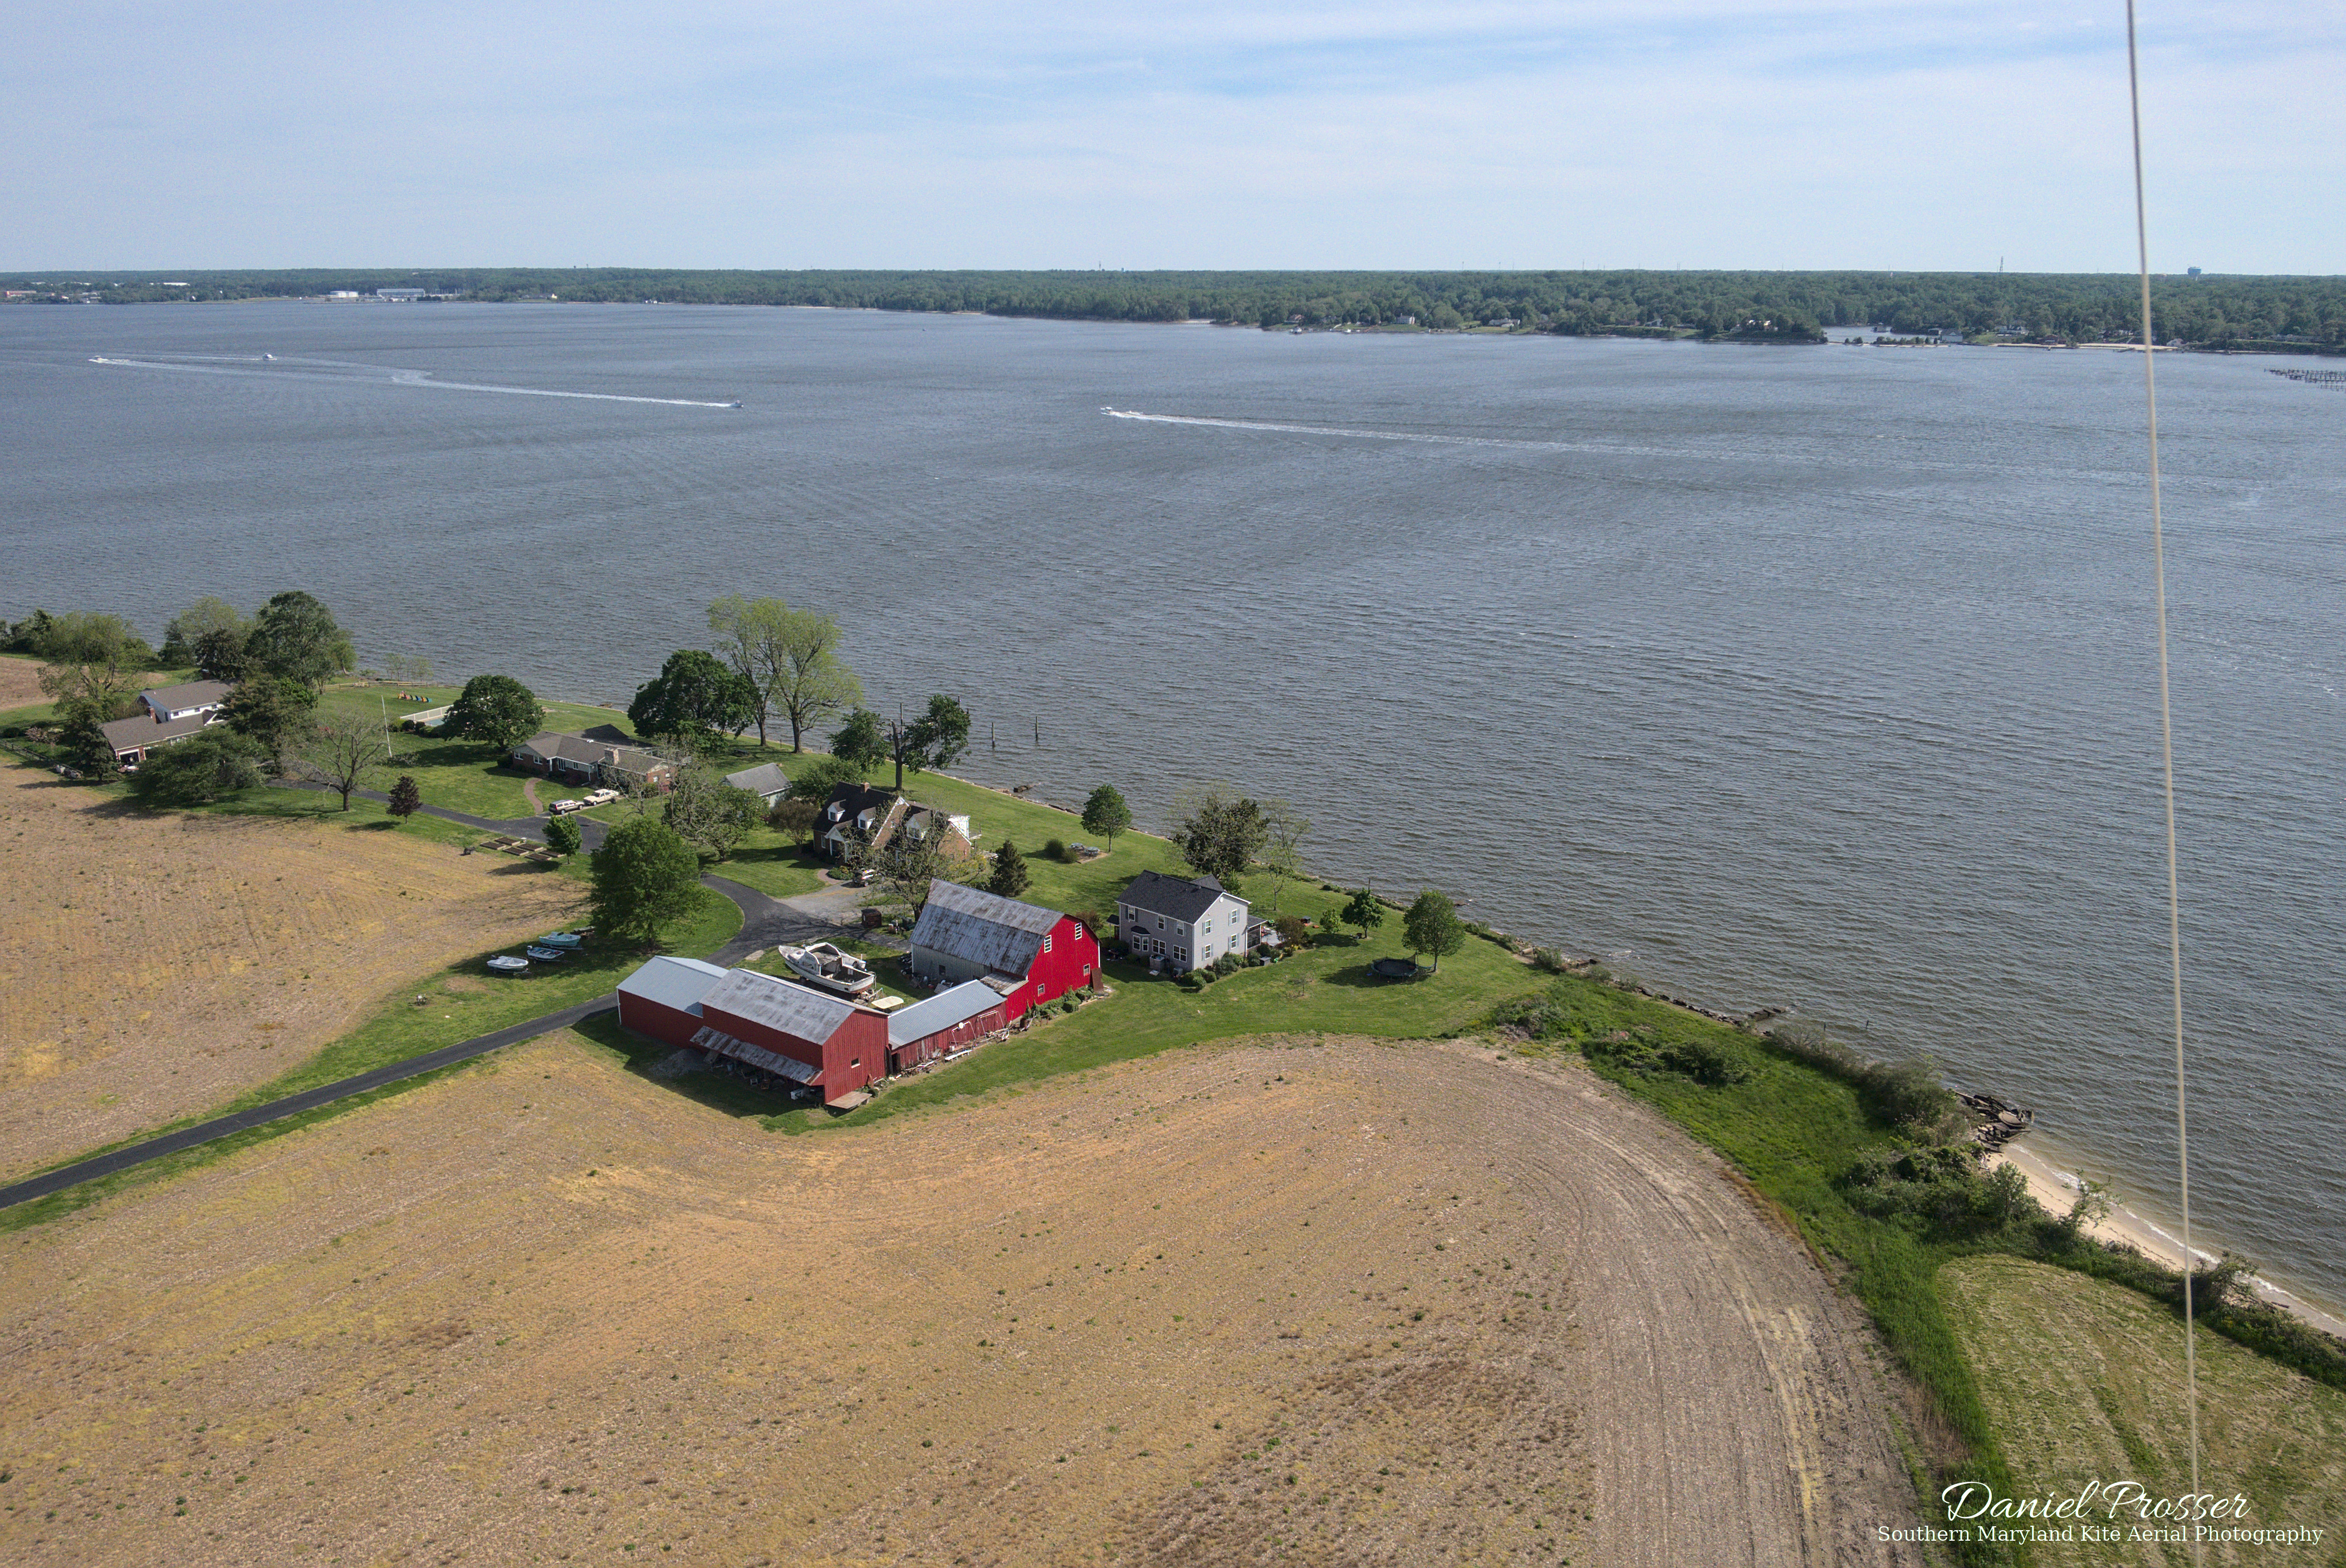
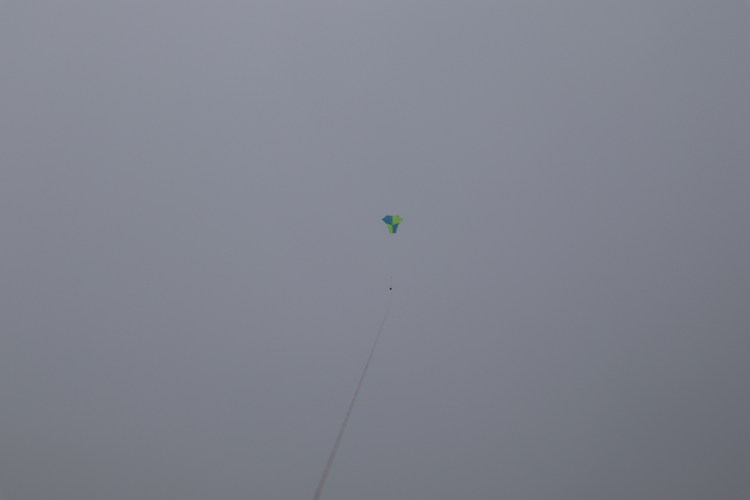
The rest of the flight went pretty smoothly. There were moments with lulls and stronger gusts, but the Rokker handled them with ease. This kite is supremely stable and inspires confidence, even when flying over trees like I was doing on this day. About halfway through the flight, with almost all 700 ft of line already out, it got into a strong thermal, taking it very high and almost directly overhead. The picture below was a result of that thermal. This was the view that I had in mind for the session, with parts of Lexington Park and California, as well as the Governor Thomas Johnson Bridge and Calvert County, visible several miles away. Actually, if you zoom in on the full size image, you can even make out land 15 miles away on the other side of the Chesapeake Bay. Thermals are always a little bit nerve-wracking since there is the possibility of the kite over-flying and/or the line going slack at the end of it, but this time it just gently floated downwind and continued flying normally after several minutes. (If the picture looks blurry in the preview, click to view it full size instead.)
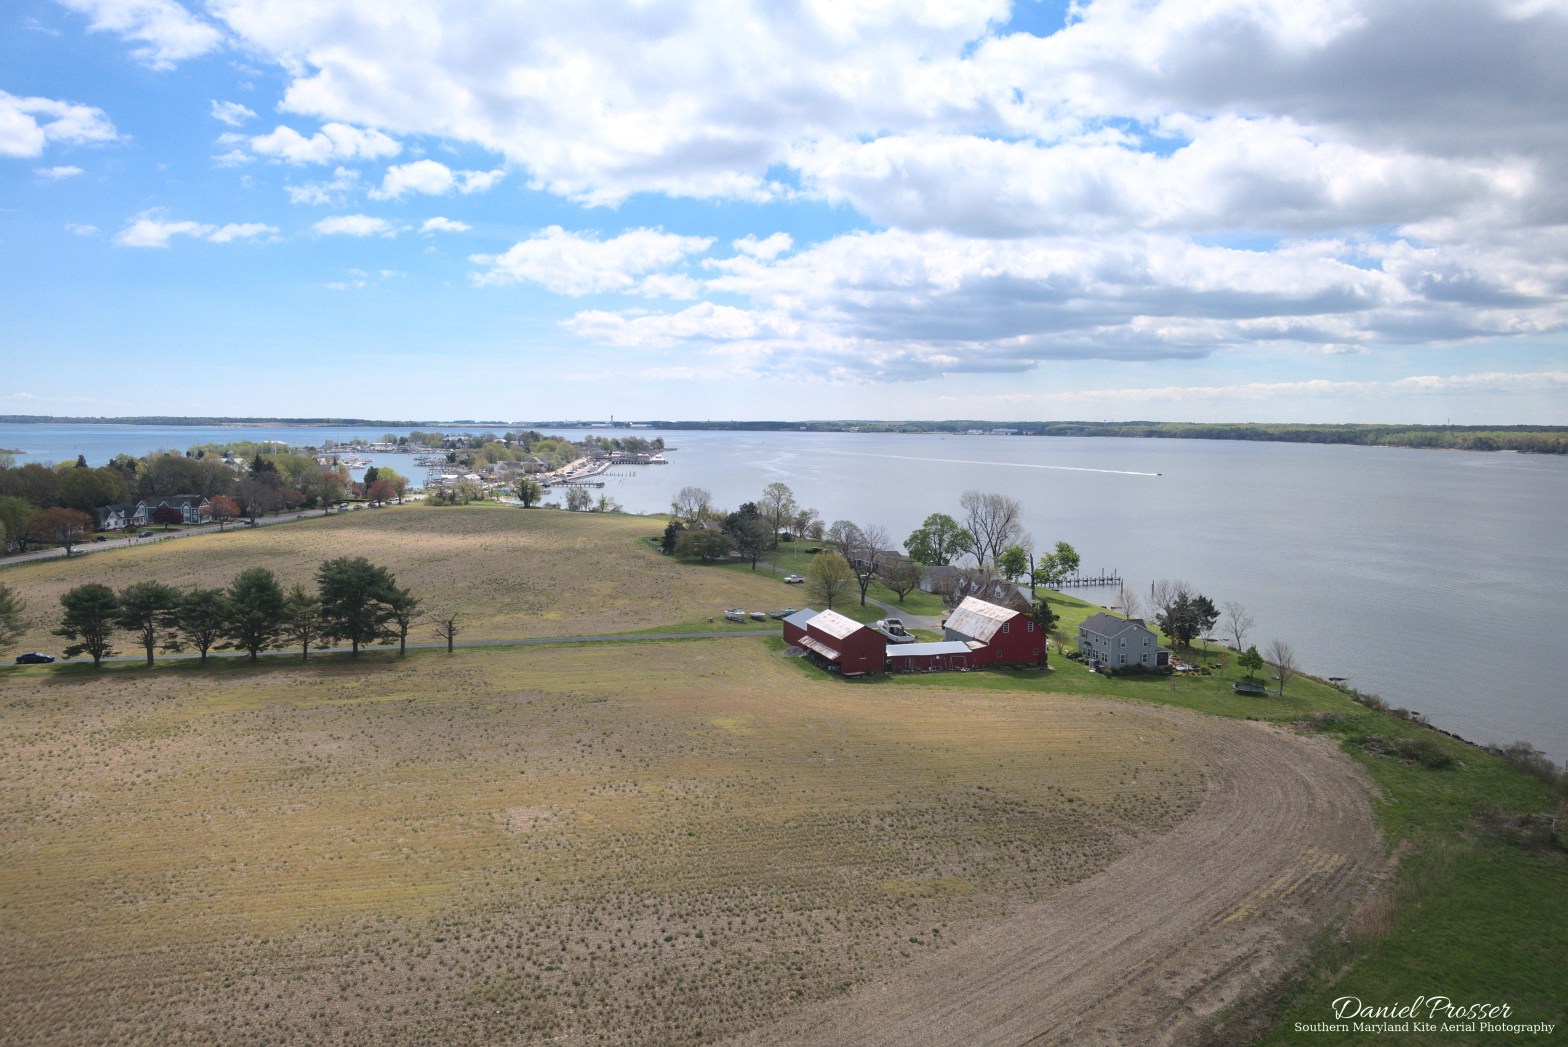
It’s kind of a toss-up for me which picture I like best, either this one or the one at the top of the page showing the park. Both are interesting to me since the show my local area, but of course they’re not as picturesque as some other areas in Southern Maryland. Here are a couple more images below that I found interesting. The first one is one that I normally wouldn’t have kept, since it is focused on the line rather than the landscape, but this time the line was so close to the camera that the background was quite blurred, which made for what I think is a kind of cool effect and an aerial photo that is unique to kites. The next one just shows another view of the park and an adjacent neighborhood. You can see all my pictures taken from this location at the Chancellors Run Park Aerial Photo Gallery.
Bringing the kite back down was no problem, since the wind was not that strong and actually decreasing in strength. As is often the case, winding the kite in quickly pulled it up to a high line angle. I think it happened to get into another small thermal around the time I removed the camera from the line, because it ended up just floating straight down from 100 ft to end the flight. Another successful KAP session in the books! Next time I’ll try to find another more scenic location, maybe a new one or one that I’ve only photographed in the winter.
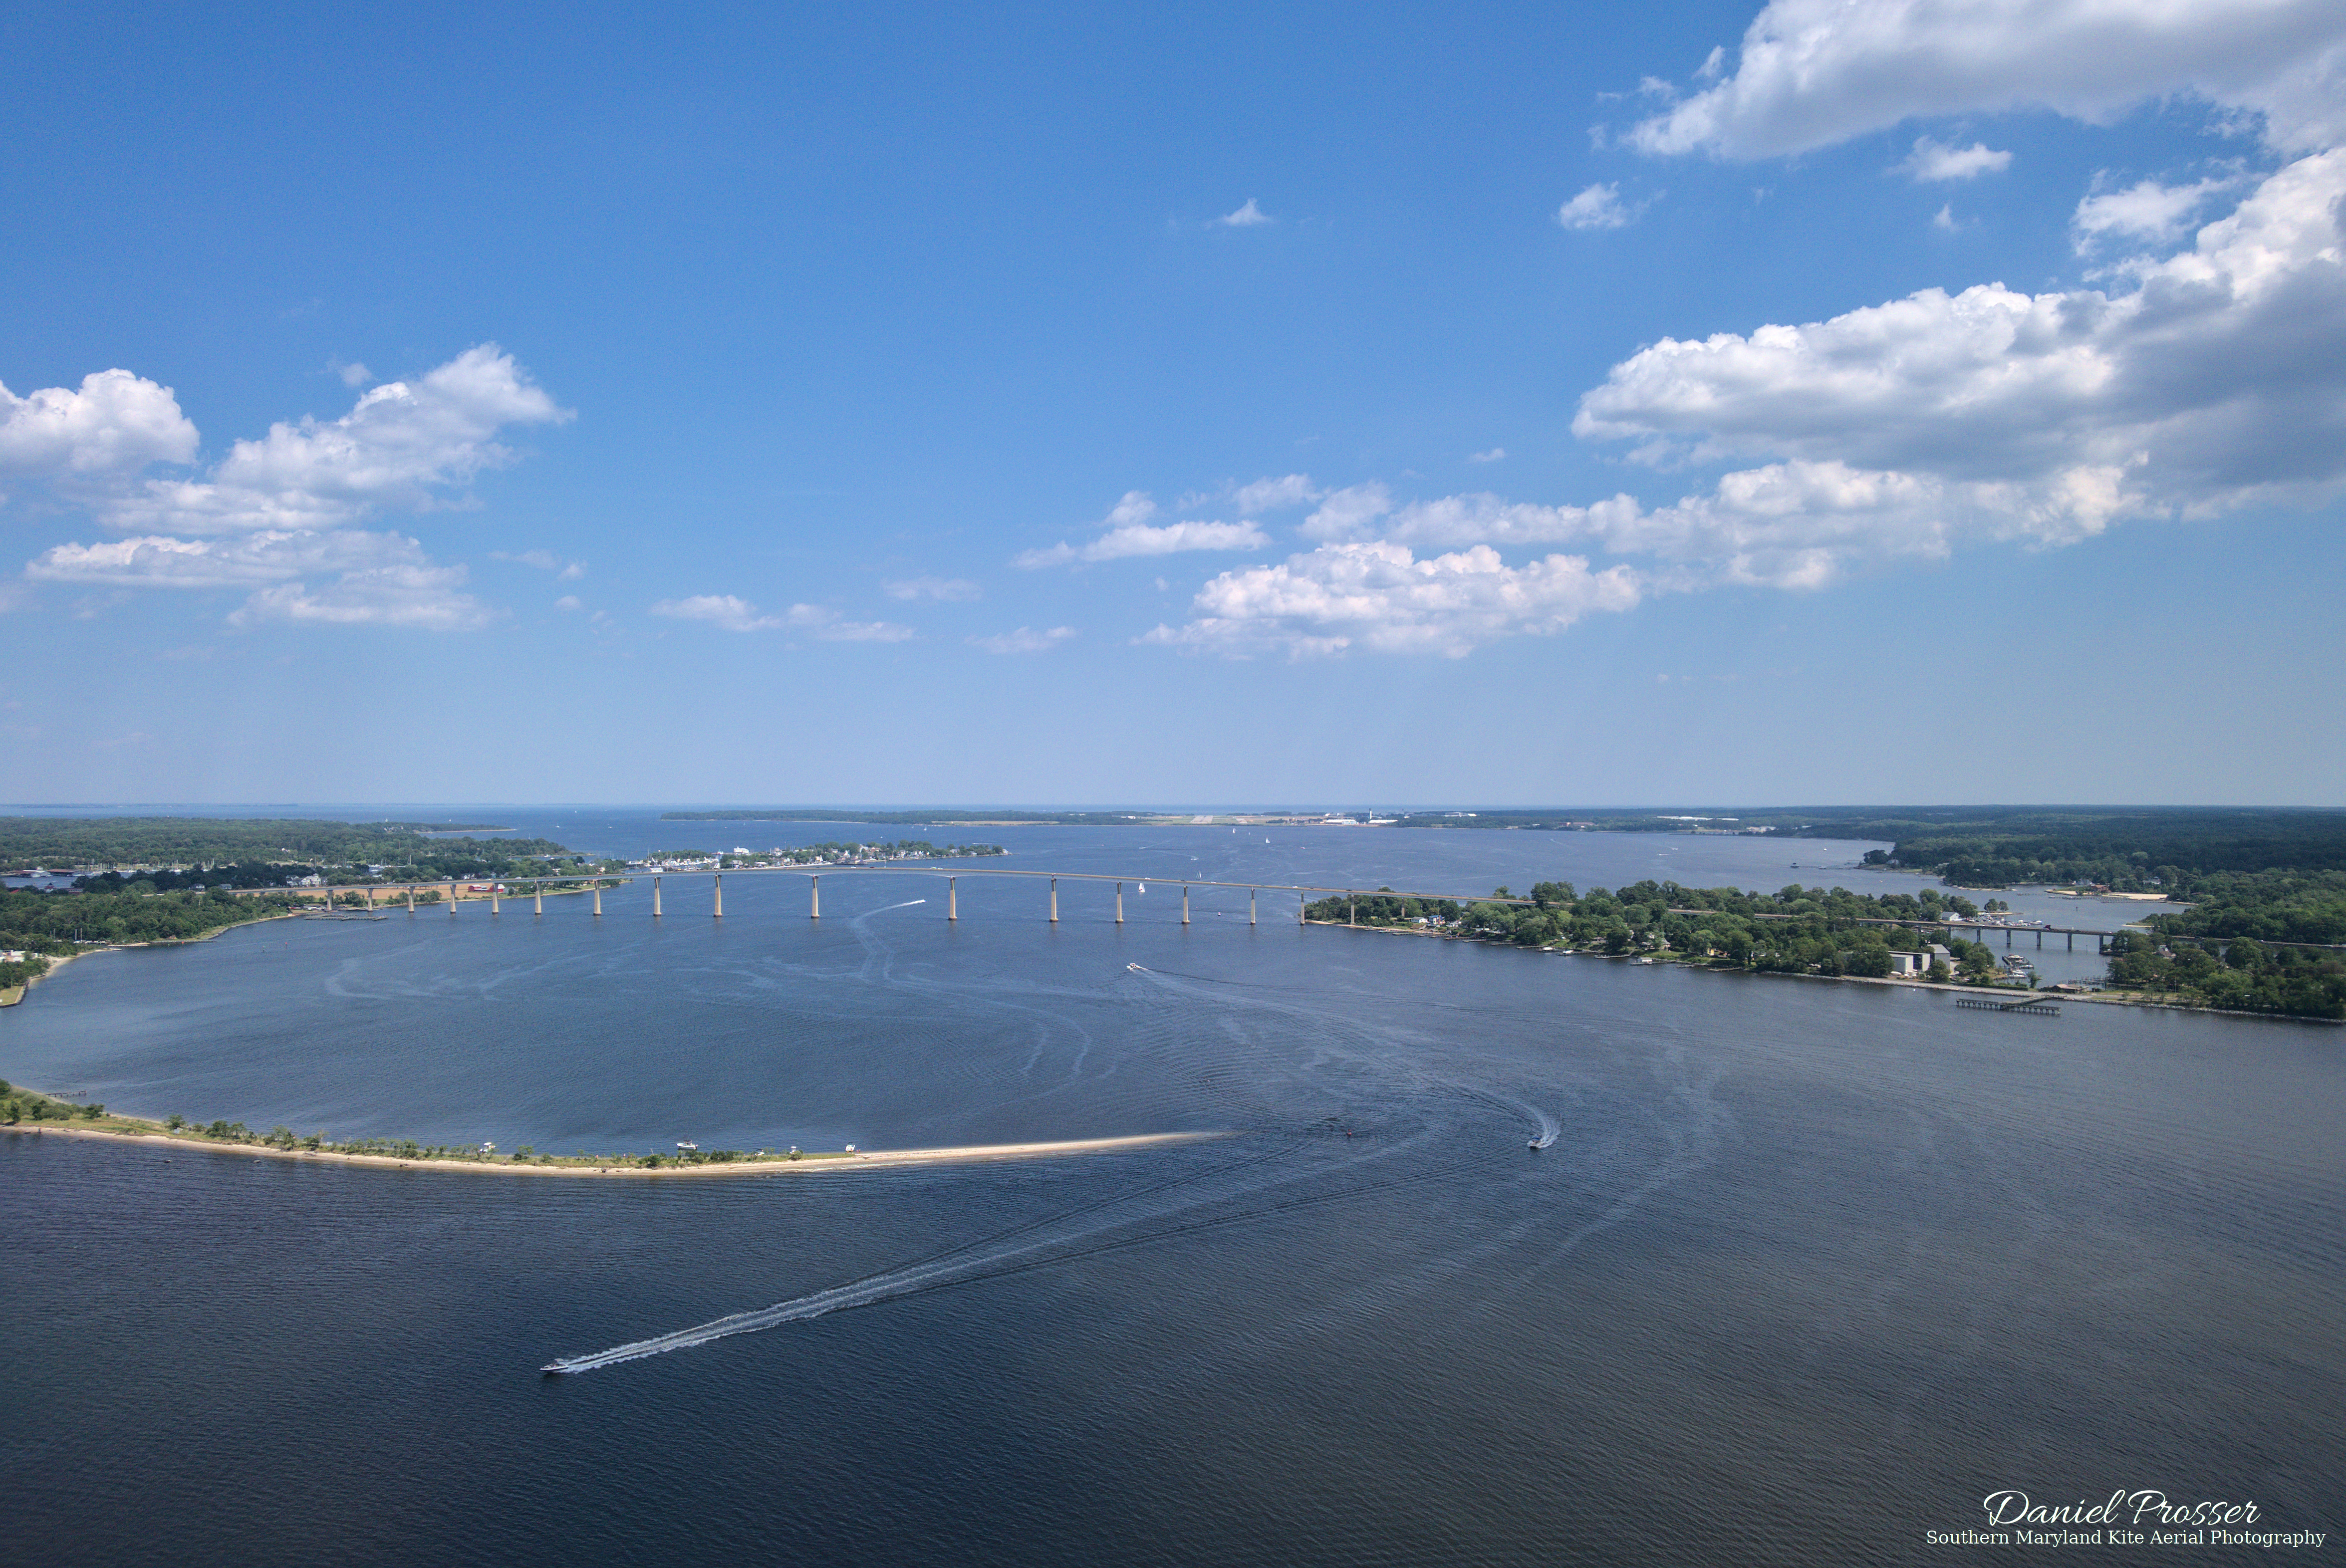
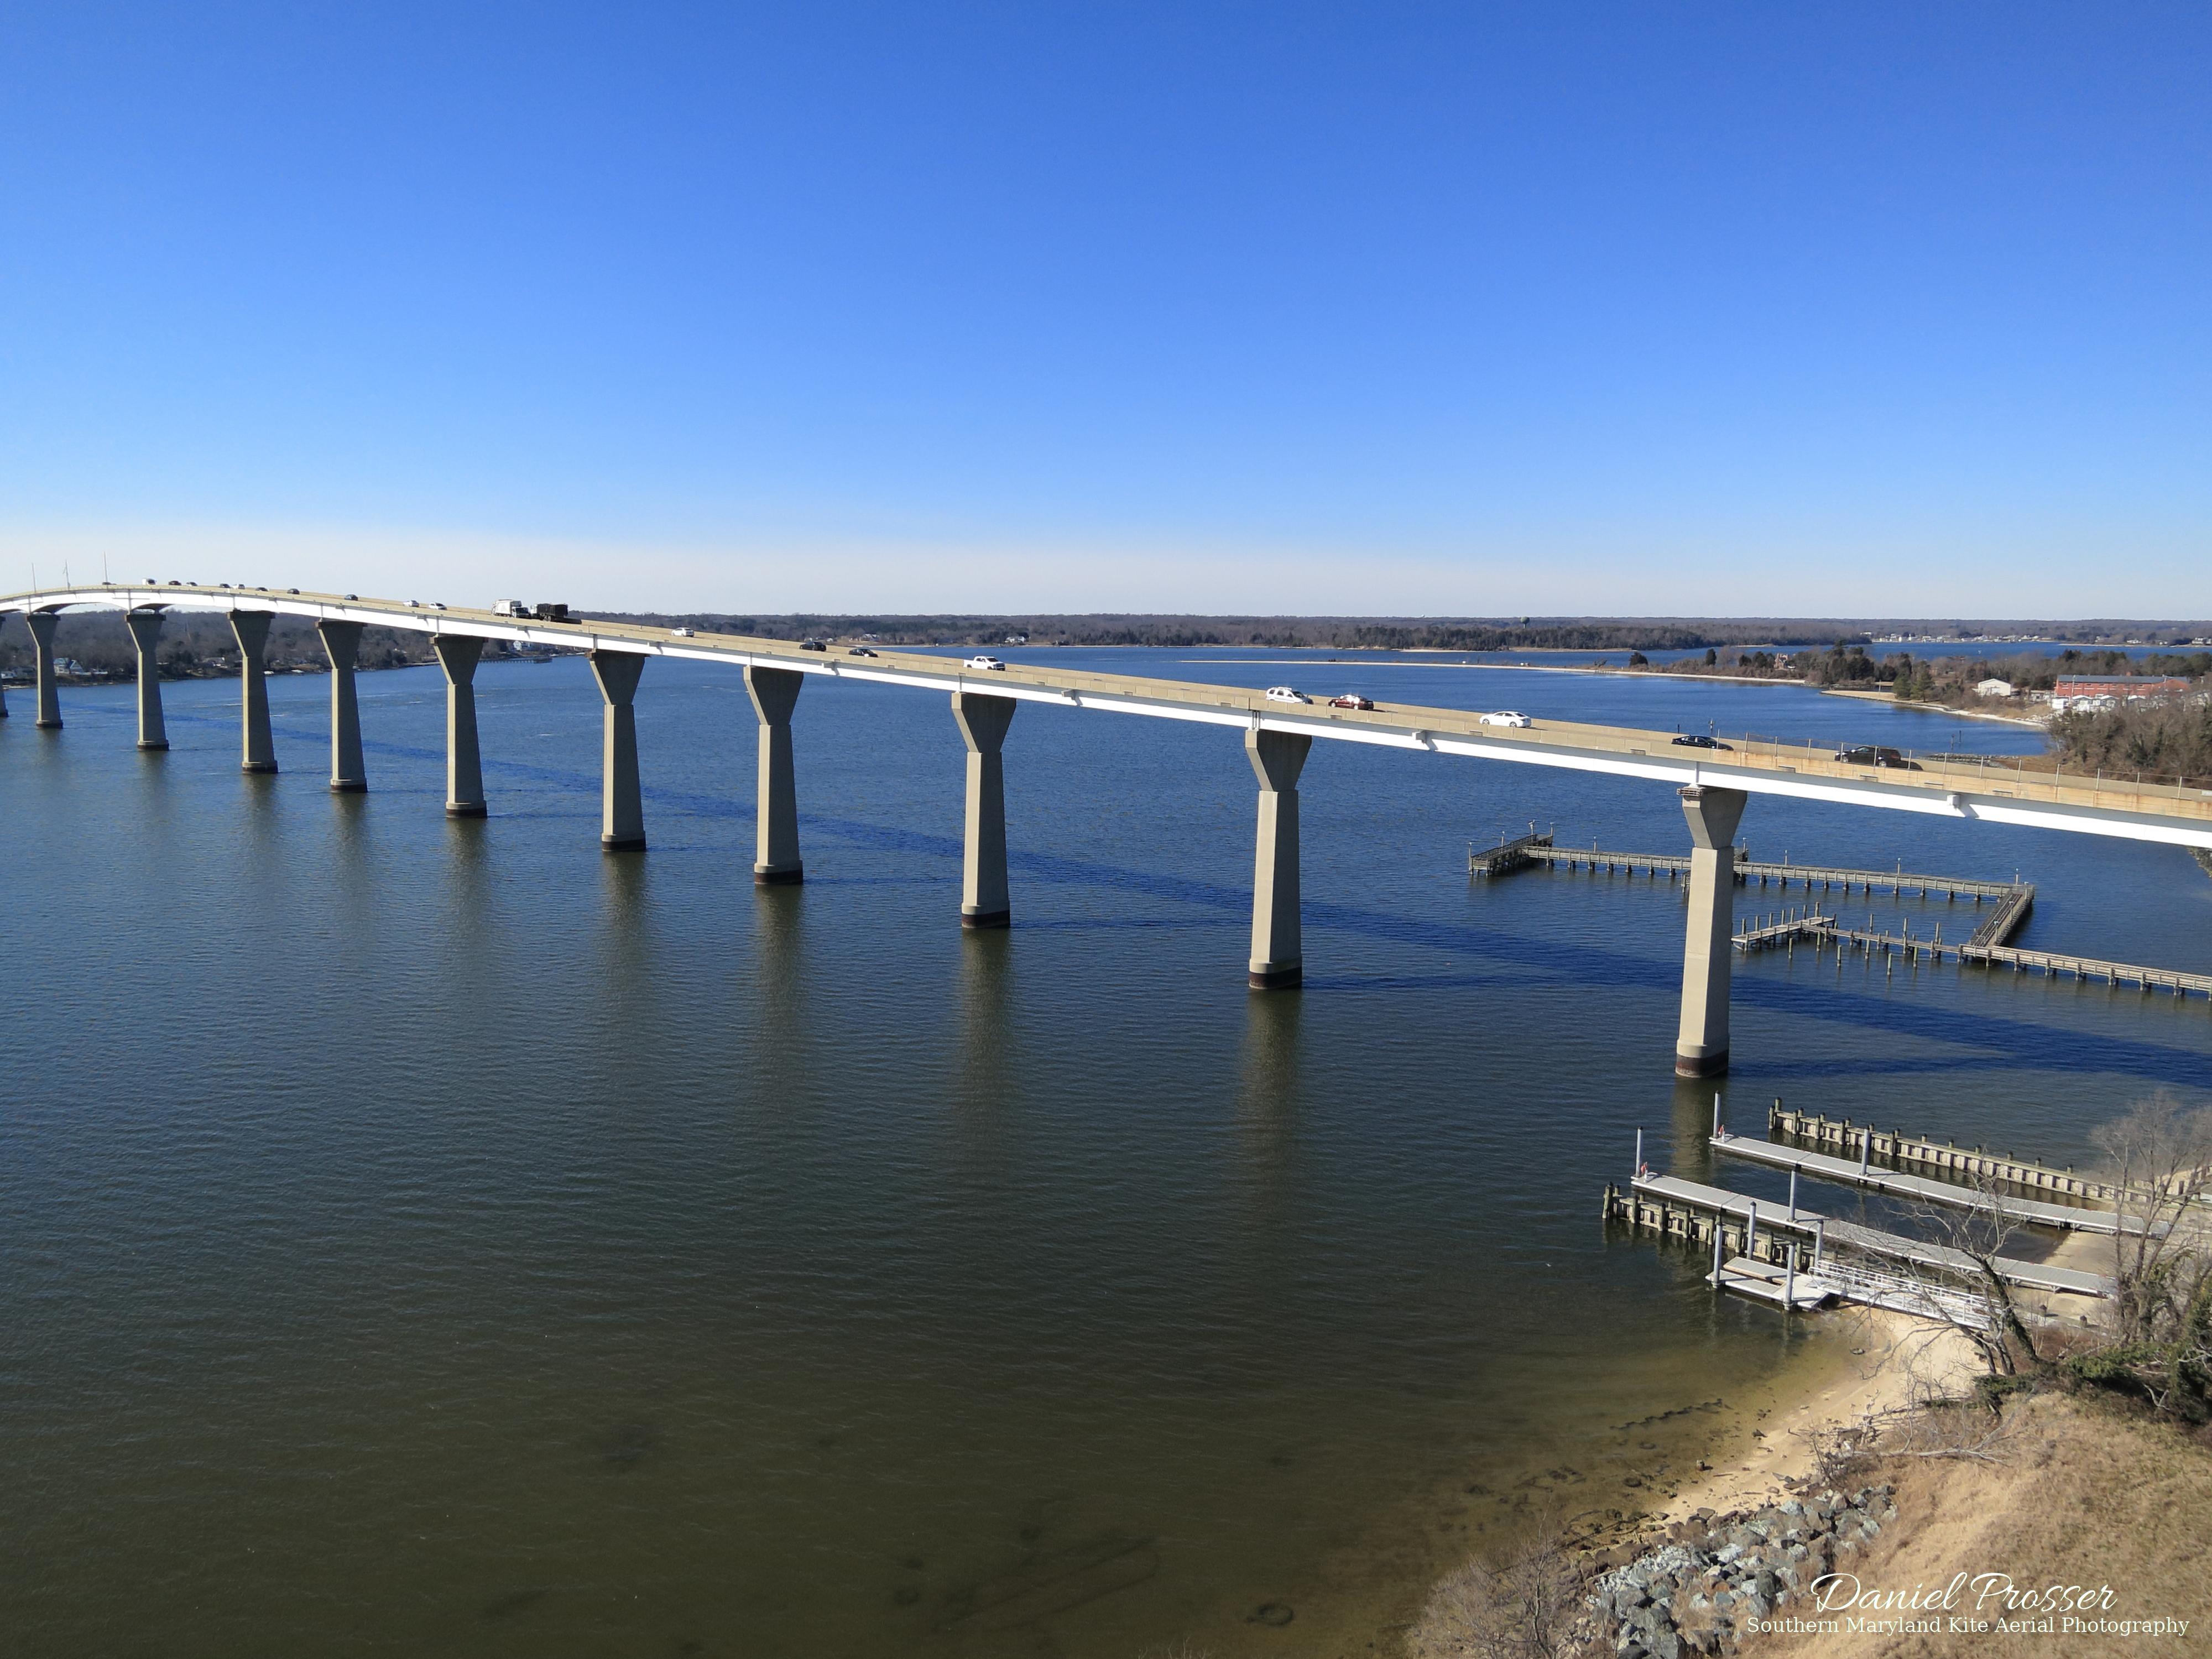
Myrtle Point Park is a public area with walking trails and a small beach on the Patuxent River in St. Mary’s County. It is just about a mile away from the Governor Thomas Johnson Bridge, which connects St. Mary’s County and Calvert County. At the entrance, I was a little surprised to find out that daily park fee was $7 for county residents. Nothing like putting some pressure on me to get some good pictures! In the end it worked out fine, but maybe next time I’ll bring a bathing suit too just in case the kite doesn’t work out.
After about a half mile walk from my car, I reached the beach. It wasn’t completely crowded, but there were people lining the whole edge of the beach, which made me a little nervous about lifting the camera over them with a kite. Of course, safety is always the most important goal, and I didn’t want to risk hitting someone with it. The other issue was that, even though trees along the drive seemed to indicate there should be enough wind (as did the weather report), there didn’t seem to be as much near the ground on the beach. I brought both the Mini Dopero and the Rokker, but the wind conditions definitely seemed to signal that the Rokker would be the right one for the job. After a few minutes it was set up, and I was pleased to find that it wanted to fly out of my hand as I held the bridle to attach the kite line. After the line was attached, that steady breeze disappeared for a little while, but the kite was up in the air again after a few launch attempts.
View of the beach from my flying location
The next challenge was finding a good “home base” location for the KAP session. I had originally found a place near the edge of the water that seemed acceptable, but some families with young children moved in close to me, and I didn’t feel comfortable lifting the camera with the kite so close to them. Eventually, I spied a corner of the beach without many people where the sand narrowed and the grass and shrubs started encroaching — not a great place to relax on the beach, but fine for flying a kite. So, with the kite already flying 100 feet in the air or so, I gathered up all my gear and towed it over to that corner. Then I screwed my dog stake into the ground, which would be used to secure the kite line while I attached the KAP rig, testing to make sure it was screwed into a solid base of soil beneath the top layer of sand.
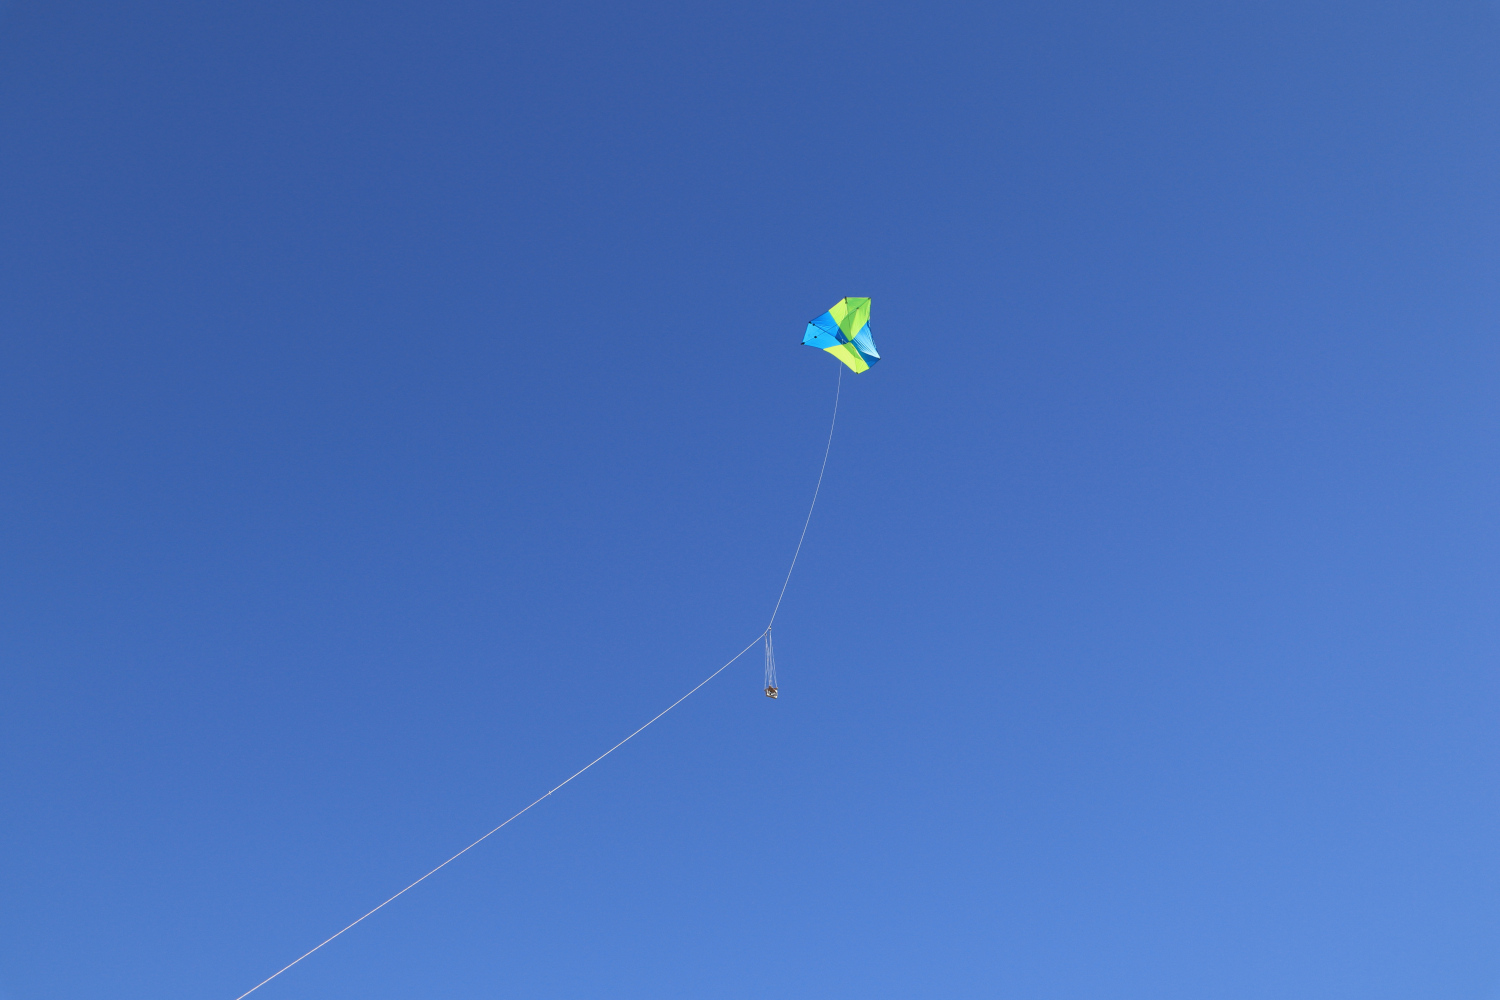
After a few more minutes of flying, I was feeling confident in the kite, conditions, and location, so I wrapped the winder around the dog stake, attached the KAP rig, turned it on, and started letting out line again. The conditions were somewhat challenging, with the wind varying from about 8 to 20 mph and plenty of strong thermals, but the Rokker handled it all with ease. I was really glad to have this kite, because the session may not have been possible without it. The Mini Dopero could have handled the gusts fine, but launching would have been a challenge with the lighter wind near the ground and lack of space on the beach. At least half the time, the wind was definitely too strong for the larger Barn Door kite. So the Rokker really proved its worth today. I even managed to capture a short video of the kite flying with the camera attached (best viewed in HD 1080p).
Rokker lifting the KAP rig at Myrtle Point Park
I ended up with lots of good pictures in all directions, but my favorites were the ones looking south towards the bridge, with Solomons Island and the Patuxent River Naval Air Station in clear view off in the distance (like the one at the top of the page). Plenty of boats and jet skis also served as nice elements in many of the pictures. Check them out below, and also in my Myrtle Point Park KAP gallery.
I was hoping to do the first test flight of a new kite I’ve been building (more on that later), but the wind was too strong. Actually, it seemed like it might be too strong for any of my kites, but I had a couple hours available, so I took the Mini Dopero over to Solomons Island again to give it a try. This would be my second attempt to KAP at this location, since the previous attempt was met by marginal winds and didn’t allow the kite to fly as high as I wanted.
This time, the wind was firmly above 15 mph and gusting up to 24 mph. If successful, this would be the strongest wind I’d KAPed in. I certainly wouldn’t have the problem of too little wind this time! In any case, I figured there was no harm in flying the kite on a short length of string just to see how it would respond. When setting up the kite, I put more bow in both spreaders than normal, attached a large drogue, and adjusted the tow point on the bridle as far up as it could go while maintaining stability. After a couple adjustments, the kite was flying smoothly, and, while it was pulling pretty hard most of the time, it was not more than I’ve experienced with it at other times. Looks like I’ve found the maximum wind speed for this kite! A nice large safety box at this location and a relatively smooth wind coming off the water helped inspire confidence too.
RX0 autoKAP rig ready to go
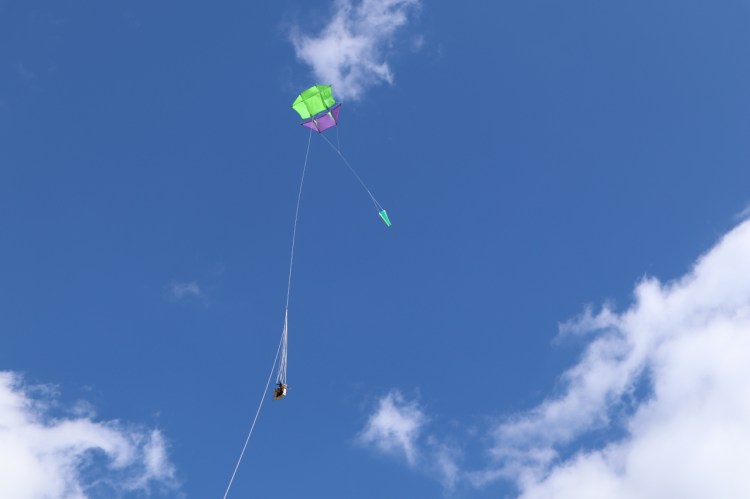
Flying in a fresh breeze (Bft 5)
After several minutes of flying, it was time to attach the KAP rig. Unfortunately, I seem to have lost my handy dog stake, so to anchor the line I had to resort to my old method of wrapping the winder a few times around the strap of a backpack full of rocks (it’s unwieldy, but it works well!). The Sony RX0 autoKAP rig was soon attached to the kite line and powered on. Since there was plenty of wind and the kite was flying well, it was possible to attach the rig only 50 ft below the kite. I didn’t have my good camera to take pictures from the ground, but I did snap a couple pictures of the kite and rig in flight with my phone, which you can see in the gallery above.
The next 45 minutes were an exercise in letting out the line quickly, letting it fly for a couple minutes at the highest altitude, and then bringing it back down again. When the wind is pulling strong like this, I don’t like to let it fly for too long, since that just gives more opportunity for something to go wrong. Nonetheless, there was no point where the kite took a dive or otherwise seemed in danger of crashing. The rig is programmed to wait 5 minutes, and then start rotating and taking pictures for 33 minutes more, giving a total of 400 pictures during that time. (Only the best of these are kept in the end.) My timing worked out just right so that the sequence finished just a couple minutes before I was ready to anchor the line and take the rig off the line again.
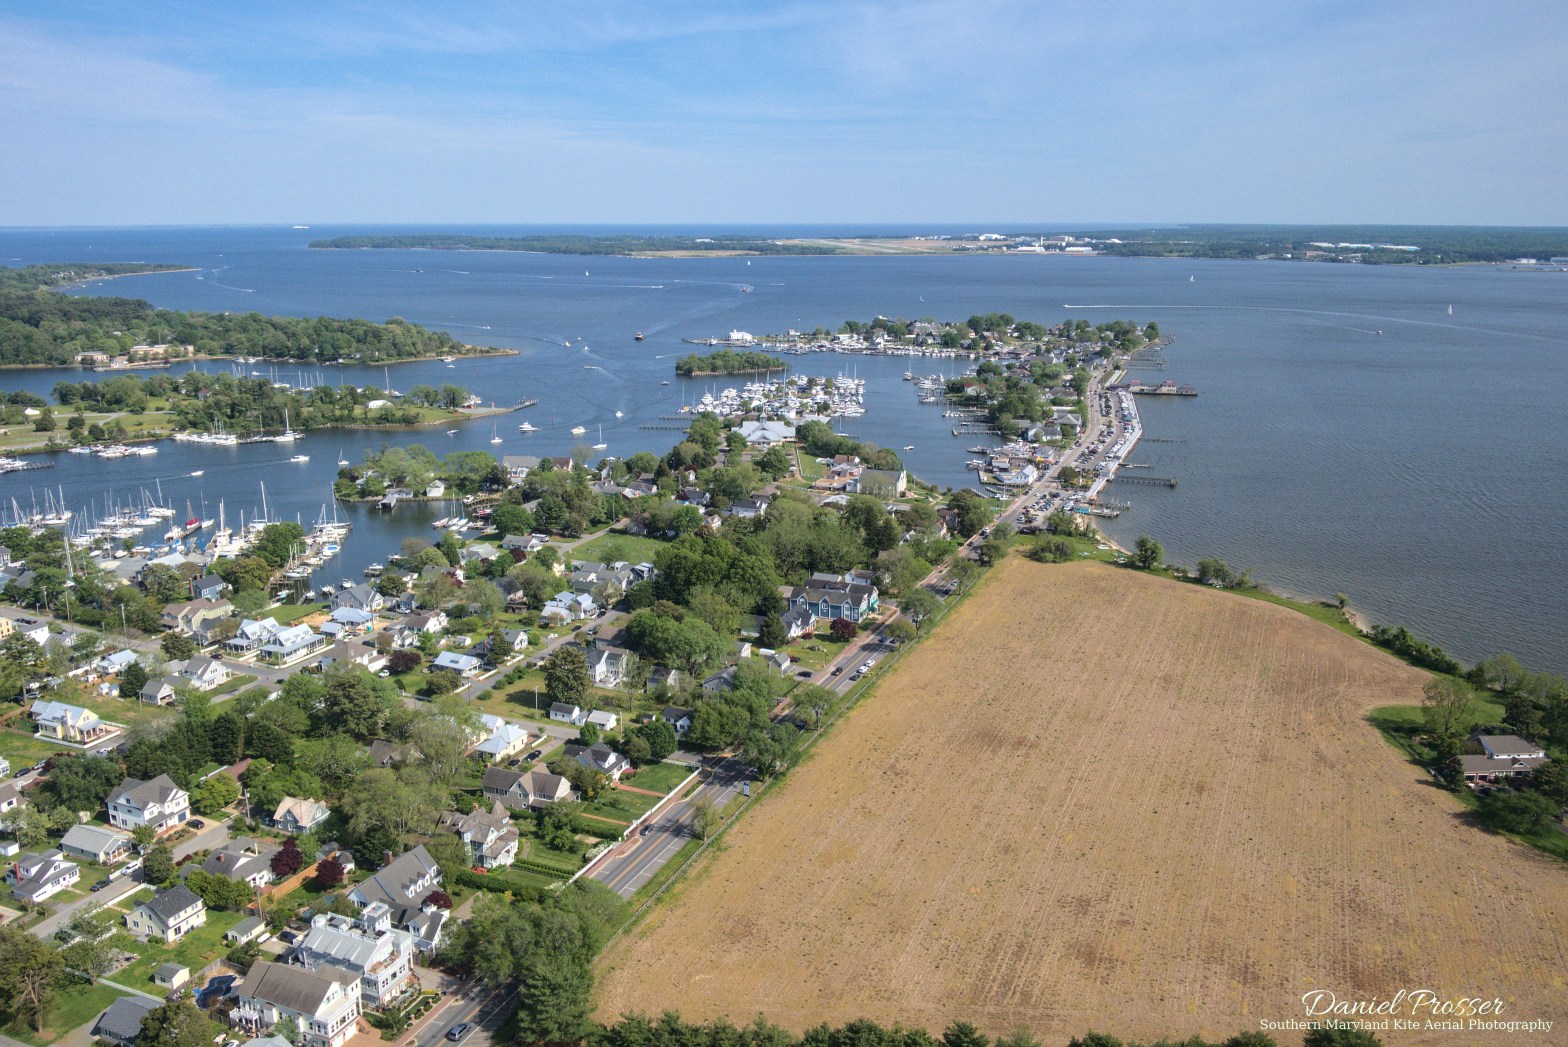
The results were just what I was hoping for: high-altitude images showing Solomons Island and Governor Thomas Johnson Bridge in great colors and clarity. I also kept a couple of the lower altitude shots. This is a new camera for me, and it is definitely living up to my expectations. Enjoy the pictures below! You can also find the rest of my pictures from this location at the Solomons Island Aerial Photo Gallery. A couple of these also made it into my list of favorites.
It feels good to get back in the air after a mishap. I just finished building and testing a new rotating AutoKAP rig to carry the Sony RX0 camera. The wind forecast seemed promising for today, and I was excited to go take some aerial photos of the new spring foliage at Solomons Island.
I returned to a site that I had flown at during the winter, which is a big empty field right next to the Governor Thomas Johnson Bridge. Arriving at the field, the wind still seemed plenty strong for my Mini Dopero kite. However, at the other end of the field where I was going to fly, the wind was much less noticeable. Strange, I thought, but it must still be strong enough up high, so I set it up and proceeded to attempt to launch it. Several attempts, a few bridle adjustments, and about 30 minutes later, the best I could manage was to get the rig attached to the line one time before the kite fell back down to the ground yet again. Frustrating! The wind was apparently not as strong or steady as it had seemed before.
It was time to unleash the big guns, the 8 ft by 7 ft Barn Door kite! To be honest, I didn’t intend to fly this one again, as it was responsible for a crash in the water my last time out, but since its replacement isn’t ready yet and the Mini Dopero wasn’t doing the trick today, there wasn’t much other choice. The site I was flying at also has a nice large safety box in almost all directions, so there wasn’t much risk. And, as I had already found out, the wind was not that strong today, so I wasn’t too worried about it getting pulled down. It still took me a few tries and bridle adjustments, but eventually this kite was flying steadily enough on 200 feet of line to attach the rig. Finally!
Even once it was in the air, it was challenging to gain altitude. Strong pulls were few and far between, and I found myself constantly having to work the line to gain altitude little by little. The flight ended up being short, and, while I probably managed to get about 400 feet of line out, the rig was 200 feet below it on the line and therefore never got as high as I would have liked. After about 20 minutes of flying and 150 images instead of the 400 I had planned, the kite came back down again, and that would be the end of the flight.
Oh well, dealing with unfavorable winds is part of life when you’re doing KAP. I still managed to take some good pictures, the best of which are in the gallery above. I am very pleased with the new camera, and based on these results, I’m sure it will produce some really stunning photos in future flights. The AutoKAP rig worked flawlessly, too. Here is a timelapse of all 150 images from the flight, speed up 30x. Be careful if spinning videos make you dizzy!
Well, this KAP session didn’t go as planned. Here is how it ended, with me fishing the kite and KAP rig out of the water:
How that happened is a little longer story…
The Mishap
The pictures above show Breton Bay, one of the many small bays and inlets in Southern Maryland. Leonardtown, Maryland sits next to the bay, and there is a small park there where I was flying my kite. This was actually my second attempt at flying here; the previous weekend had nice weather, but the wind died right around the time I was trying to get the kite in the air. This weekend marked the second attempt, and everything seemed good. It was a sunny day, with a north wind blowing out towards the bay. A north wind is needed to fly safely here, since there are apartments and power lines on the inland side.
The wind seemed just about perfect. It seemed to be about 8-10 mph most of the time, with gusts sometimes a few mph higher. Since there wasn’t room for a running launch, I decided on the Barn Door kite, which would have no problem getting in the air in this breeze. Soon after getting the kite set up, it was in the air. I flew it for a few minutes before bringing it down to adjust the bridle by a few centimeters. Then I let it up again, let out 150 feet of line, secured it to a stake in the ground, and observed flying by itself for a few minutes.
Being a nice, albeit somewhat chilly day, there were a few other people at the park. A few older teens were training, doing sprints and jogs. As a side note, one of the things I overheard them say was this, which was presumably supposed to be motivating, but I just found it kind of silly:
The Devil said to the warrior, Are you ready for the storm?The warrior replied, I am the storm!
I’m not sure who this warrior is supposed to be, or why he was talking to the Devil, but in any case, that little saying seemed to get them quite amped up. Other than those kids, there were several other people walking around, a couple of which were interested in the kite. They asked me why I had a remote control, so I gave a short explanation. They seemed quite impressed, and proceeded to snap some pictures of the kite and watch for a while.
The wind featured some small lulls and big thermals, but it didn’t seem like anything that the kite couldn’t handle, so I attached my radio-controlled KAP rig. This is where things started to go wrong. First, I forgot to turn on the PowerShot S100, which I didn’t realize until later. Next, once the rig was up a couple hundred feet in the air, I turned on the transmitter and monitor with the intention of taking a look at the video feed. The video transmitter (VTx) on the rig was off, but I could already see a picture in the monitor as soon as I turned it on. The only problem was, this wasn’t the video feed from the rig. It was kind of dark and distorted, but it seemed to be a picture or maybe a video feed showing a playground. I tried switching the VTx on, but there was no change in the picture. I then turned the monitor off and back on, and it showed something different, but still not the video from the kite. The VTx operates at 5.8 GHz, so there must have been something else nearby also broadcasting on the same frequency and causing interference. My VTx is only set to 25 mW, so it’s not too surprising if the signal was getting washed out by the other user of the frequency.
At this point, I figured all was not lost, since I could still control the rig itself, even though I couldn’t see which direction it was pointing. The rig was low enough that I could still verify that it rotated when I pushed the stick on the transmitter, so it looked like I would just be shooting blind today. I rotated the rig in the direction I thought was towards the town center and flipped the switch to take some pictures (still not realizing that the camera was off). However, right then the kite got caught in a powerful thermal, and I had to focus on flying it, as it was going straight overhead. It eventually overflew and then entered a shallow dive. Letting out some line leveled it out again, so that was no problem. With the variable wind conditions, though, this was clearly going to be a bit of an adventure.
Then the real trouble started. The wind strength picked up, which, as I’ve already noticed on several occasions, tends to pull this kite down. In the past, the kite has always recovered once the wind let up again. Typically, the wind is not as strong down low, so the kite may stay low for awhile in such conditions but eventually go back up. This time, I would have no such luck. I watched as it went down, down, down, not slowing much and eventually running out of space. Letting out line can help in this situation, but only if you can let it out very fast, and only if the wind eases up eventually. The kite and rig both went down hundreds of feet offshore. It was a major bummer, and also pretty embarrassing since people were watching.
Recovering the Kite and Rig
The worst part about it was that I didn’t know if I would get the kite back. My other KAP kite, the Mini Dopero, has also crashed in the water once. That occurred when I had it tied off on a short line without a rig attached, attempting to take pictures of it flying. In that instance, it was tough to wind it back, because the water was shallow and it got stuck. This time, there was an immediate positive sign, in that the kite was clearly floating, as can be seen in the first picture at the top. The second positive sign was that I was able to wind in the line without encountering any significant resistance, so apparently nothing was stuck.
After winding for five minutes or so, the rig emerged from the water. I pulled it out and realized my original mistake: the S100 was off. That could turn out to be serendipitous, since the chances of electronics surviving a water submergence are significantly higher if they are powered off. Several minutes of winding later, the kite emerged. I pulled it out of the water, packed it up, and decided I’d had enough punishment for one day.
Crash Analysis
So why did this happen? As I mentioned, I’ve previously noticed the problem that stronger gusts tend to pull this kite down. Now, it’s probably true that any kite will get pulled down to the ground at some wind speed, but this one seems particularly susceptible to it. I also have a smaller version of this kite made with wooden dowels and plastic painter’s cloth, and it does the same thing. Here’s what I think is happening.
When the wind speed picks up, the spars and sail deform. Since the spars are so long (97.5 inches each), they bend quite a lot under enough force.
The worst of the bending and billowing happens on the bottom half of the kite, since there is no horizontal spar there to help maintain the shape. When the wind is strong enough to pull the kite down, the sail appears very narrow on the lower part of the kite as a result, reducing the effective area of that half of the sail. The picture on the right gives an idea of this effect, although the wind was not strong enough for the kite to be pulled down when that picture was taken. It looks more extreme when the problem starts to occur, which I estimate is when the wind speed reaches Bft 4.
The reduced effective area on the lower part of the sail moves the center of pressure upwards towards the top of the kite, causing it to pitch up and increase the angle of attack. The increased angle of attack in turn further increases the aerodynamic force, exacerbating the problem. In the end, there is not much you can do once it reaches this state except hold on and hope the wind lets up. Again, letting out line can help somewhat, but only if you can do it fast enough and long enough for the wind strength to lessen.
So What’s Next?
First things first, I have to see if any components on the rig are salvageable. My greatest hope is for the S100, which was powered off for the entire flight. As I write this, it is sitting under a pile of rice along with the electronics from the rig. I will let it sit for several days before attempting to turn it on. If it works, I will still be able to use it with my fixed-angle AutoKAP rig. I don’t have much hope for the electronics from the rig, which were powered on when it hit the water.
Regarding the kite, though I’m glad to have gotten it back, I’ve decided not to use it for KAP anymore. To be honest, I have noticed the problem in enough of my flights that I was starting to get uneasy using it for KAP anyway. Its usable wind range ends up being quite narrow if you want to avoid the situation altogether. And unless there is a steady sea breeze, it is hard to fly in such a narrow wind range, because during the course of a flight there will either be lulls during which the lift is not enough to keep the rig in the air, or there will be stronger gusts that threaten to pull it down to the ground.
Having heard a lot of positive stories about Rokkakus, I think I will replace the Barn Door with one of those, or a derivative. Sandro Macchi, who goes by the handle smac on the KAP forum, has been testing vented Rokkakus and reports that the usable wind range is excellent. Rokkakus are legendary for their stability and high line angle, which are also great features for KAP. My current plan is to build one 7 feet tall, which would be in between the size of the Mini Dopero and Barn Door. I may also “splurge” on some very lightweight ripstop polyester sailcloth this time instead of the 0.75 oz ripstop nylon I used for the others, which should bring down the minimum usable wind speed close to the Barn Door’s. The shorter spar length should reduce bending, which, combined with the vents and just due to being a Rokkaku, should give a significantly higher upper wind range than the Barn Door. It will also be much easier to set up at the field, since I’ll be able to transport it with the horizontal spreaders in place. (The Barn Door needs to be fully set up each time, which takes me 10-20 minutes.) Here is a picture comparing the three kites.
Left: Barn Door; Center: 7-ft Rokkaku; Right: Mini Dopero
I am disappointed that the KAP session didn’t go as planned, and I’m definitely not looking forward to spending more money to replace whichever components got killed by being submerged in water. On the other hand, I’m excited to build and fly a new kite! And yes, I do plan to return and finally conquer this location! Mishaps happen; the important thing is to learn from them. Stay tuned for more information about the new kite as I start building it!
The first weekend after finishing the build of my R/C KAP rig, the wind was good enough to test it out. I decided to go to St. Mary’s College, which I’d KAPed one time before, but I hadn’t gotten pictures from quite the best angles. The new rig would allow me to see what the camera is pointing at, so I could be sure to get the desired composition. Plus, the wind was out of the west, which is ideal for this site.
The wind was gusty and near the upper limit of what my kites can handle: 15 mph with gusts to about 20. I had flown the Mini Dopero in wind like this several times before, though, so I knew it would be up to the task. The good thing about flying in a stronger wind is that it takes no effort to get the kite in the air, and this time was no exception. Apparently, I last flew this kite in similar winds, because it required no trimming once in the air, and the pull seemed reasonable for the wind speed (i.e., plenty but not too much).
Besides the rig, I was also experimenting with another new piece of equipment: a dog stake to hold the line while I set up and take down the rig. This stake replaced my big-ol’-bag-o’-rocks. It turns out it is much easier and more convenient than the bag. I think I will use it from now on any time there is suitable ground to put it in. Thanks to Kidafi Byer on the KAP Facebook page for the suggestion!
The winder wrapped around a dog stake a few times, with the KAP rig almost ready to be attached
I let the kite fly by itself with the winder attached to the stake for a few minutes to make sure it was stable. Then I attached the rig by wrapping the line about four times around each of the Brooxes Hangups at the ends of the picavet suspension, separated from each other by a few feet on the line. I plugged in the battery for the rig, turned on the PowerShot S100, grabbed the winder, and away it went! Here are a couple pictures of the rig attached to the line.
Another good thing about flying in a stronger wind is that the kite has no problem lifting the rig. This rig does weigh about 4 oz / 115 g more than my fixed one, which I imagine will make a difference on those days with barely enough wind to fly, but today the kite could have certainly lifted a lot more if it had to.
Since this was my first time flying an R/C rig, the process was a bit new to me too. When I wanted to take some pictures, here is what I had to do:
Turn on the transmitter. I leave it off when not taking pictures because that seems to put the receiver in a sort of standby mode, with the servos completely still and, I assume, consuming minimum power.
Turn on the FPV monitor.
Switch on the video downlink, which is controlled by the flaps switch. (The VTx is also left off when not in use to save the battery.)
Pan and tilt until the rig is facing approximately the desired direction, and then flip the switch to take a bunch of pictures. Hopefully some of them turn out well!
Turn off the VTx and the transmitter again and fly the kite some more!
The way the sticks and switches are arranged on my transmitter, and because it is attached around my neck with a strap, I can operate the rig completely with my left hand while holding onto the kite reel with my right hand. If the kite suddenly needs attention, the transmitter can be pushed aside so that I can focus on just flying the kite again.
Video downlink from the KAP rig
Above is a video showing what the video downlink looks like. It was a gusty day, and that definitely shows up in the video! (Remember, this video is not high quality nor stabilized, as the stills from the main camera are the “end product.” Its purpose is just to show me where the rig is pointed and what the general composition of the photo will be.) With all the bouncing around, taking pictures is definitely a somewhat approximate endeavor. For that reason, I leave the camera in continuous shooting mode and leave the switch down to take a bunch of pictures once the rig is pointing in the right direction. On less gusty days, I imagine things will be a lot smoother!
Despite all the gusts, I did manage to capture pretty much all the pictures I wanted from this session. The money shot is up above, and also at the end of the gallery below. I really like how that one turned out. The composition is just about perfect, with most of the school visible in the foreground, St. Mary’s River prominent in the background (with some sailboat racing going on), and a beautiful big blue sky. Also of note is the baseball field — which I didn’t even know existed until I saw it from the air — with a game in progress. There were several other good pictures too, taken from a variety of angles and heights. The straight-down image of the soccer field is something I never could do before!
The first time out with the R/C rig was definitely a smashing success. I’m sure I will still use the fixed rig sometimes, maybe on days with very light wind, but being able to see and control the camera is really fun and rewarding. Even though the video feed may be shaky, it still gave the results I was hoping for.
The one big mistake I made was accidentally stepping on my transmitter after I was done taking pictures and had put it on the ground. Woops! 😕 That happened due to a sudden lull in the wind, to which I responded by backing up quickly to keep the rig from falling to the ground. Then I heard that gut-wrenching CRACK! Thankfully, the only damage was a broken monitor mount, which can be fixed with some sanding and glue.
Here are some things I learned from this first session with the new rig:
The low power setting (25 mW) on the VTx seems to be plenty. I didn’t experience any problems with reception.
The 500 mah battery for the rig ended up about halfway expended after what I consider a pretty typical flight, so the capacity is fine. That would not have been the case if I didn’t have a way to turn on and off the VTx from the ground, so that is a very valuable feature. (The alternative is a much bigger and heavier battery.)
I will take more pictures next time. I came back with only 31, which resulted in plenty of “keepers,” but it wouldn’t have hurt to have more to choose from. Part of the reason for the small number is that the S100 is pretty slow in continuous shooting mode, especially when saving RAW images. Next time I’ll just hold down the shutter for longer each time. Still, it was nice only having to sift through 31 images instead of the 400 that I normally get with the fixed rig!
When putting down the transmitter, make sure it is far away from where you might step. I was lucky to get away with no damage to the electronics.
Well, this has been fun. I’m sure I will have many more adventures with this R/C rig in the future!
We had just gotten our second significant snowfall of the year. I was eager to do some KAP, since we don’t get that much snow here in Southern Maryland, and I’d never flown a kite or taken aerial photos in snow before. I missed the ideal time, which would have been during the afternoon of Friday, Feb. 12, but the forecast looked good for wind on Sunday morning.
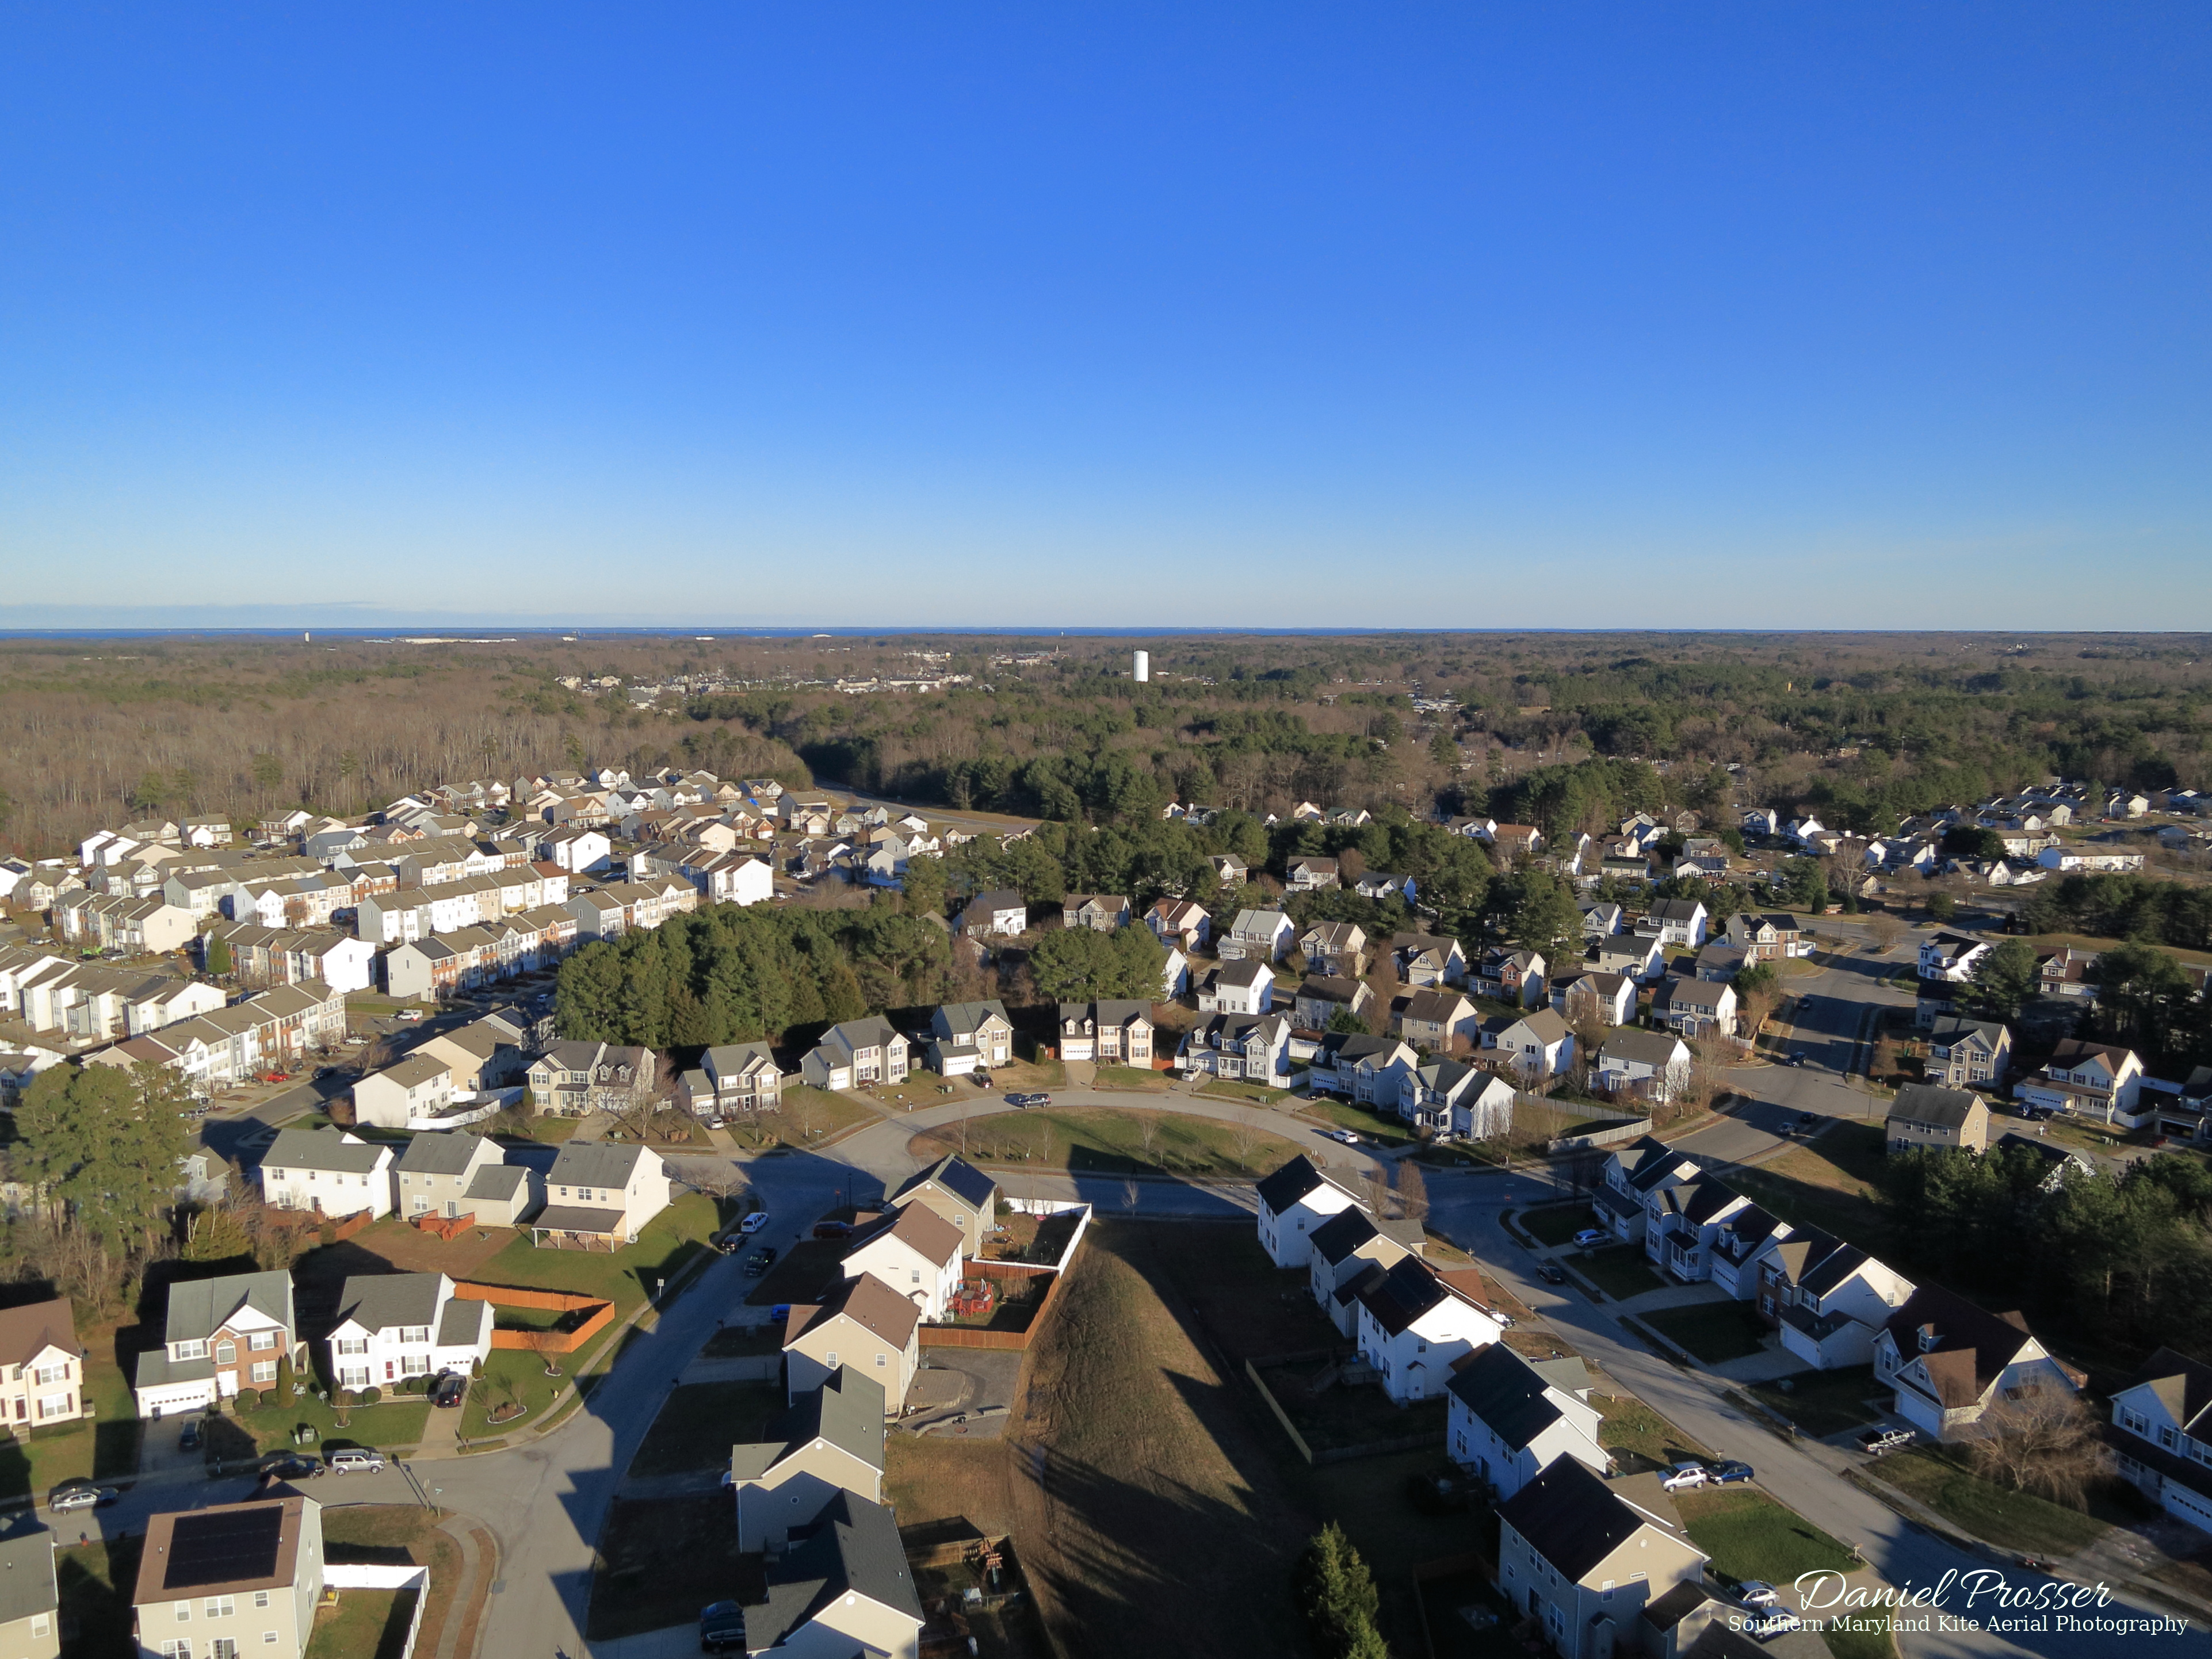
I packed up my gear and headed over to Chancellor’s Run Park, which is nearby my house and is known to have nice views of Lexington Park and California, MD when looking to the north. The cover photo on the home page of this website is one such example. I thought it would be nice to see what that landscape looks like when covered in snow. Since I’ve done KAP from this park several times before, I decided to switch it up a little bit and fly from a soccer field on the northwest side of the park, rather than the central baseball fields that I normally choose.
By this time, the temperature was well above freezing, and the ice and snow were melting. The ground was quite wet and soggy, and water was dripping from the stadium lights overhead. There was snow remaining on the ground, though, so there was still hope of capturing some nice frozen landscapes. The wind at ground level was light, so I set up the big Barn Door kite and did a running launch. It took a couple attempts and bridle adjustments, but eventually I got it flying and trimmed out well.
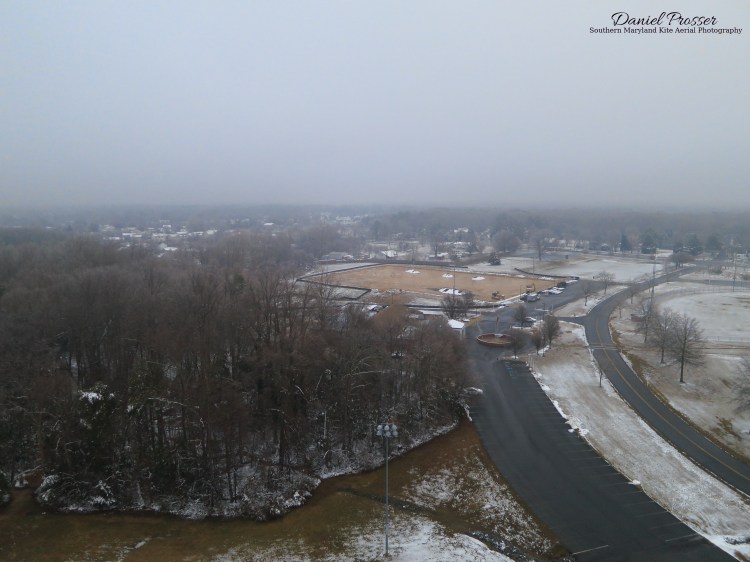
Here are a couple low-altitude shots near the launch site. It is pretty obvious from the second photo just 100 or 200 feet up that the visibility was going to be poor. From the ground, I could tell that there were low clouds, but I didn’t know how low. I would soon find out. 🙂
To add some more variety, I took a walk with the kite along the parking lot towards the building with a flag in front of it that can be seen in the second photo above. I let out more line as I went and carefully maneuvered the kite line over the stadium lights and trees. Once the kite reached approximately 400 feet above the ground, it started disappearing in the clouds! This was a new experience for me, and kind of fun! It is weird to have a kite line in my hand going up into the sky with nothing visible attached to the end of it, as if I were doing some sort of sky fishing.
Normally, flying a kite in the clouds is probably not a great idea, but considering how low they were and the really poor visibility, there was no chance of an aircraft flying by and hitting it. There was also no one else in the entire park — not surprisingly, given the weather — so if something happened to the kite while in the cloud and it ended up crashing, there wouldn’t be any injuries or property damage. Here are a couple images of the kite disappearing and reappearing in the clouds. I would have liked to get one just showing the line and KAP rig below the clouds, but it was pretty much impossible to get the camera to pick that up and focus on it.
The Barn Door kite disappearing and reappearing in the clouds
Obviously, with the lack of visibility, I wasn’t able to capture the snowy landscape how I wanted, but this was still fun and a bit different. The best pictures from the session were probably the lower altitude ones, like the one showing the baseball field below. The cover photo for this post is also reproduced as the second picture in the gallery below. I like this one because it is relatively clear but still gives an idea of how cloudy the conditions were that day. The third one shows the camera’s perspective when it was almost fully engulfed in the cloud. The kite, attached 200 feet beyond the camera, was certainly invisible at this point!
As I write this post, it is now March, and things are starting to warm up again, so it’s unlikely I’ll get a chance to capture the snowy landscape I was hoping for. Maybe next year!
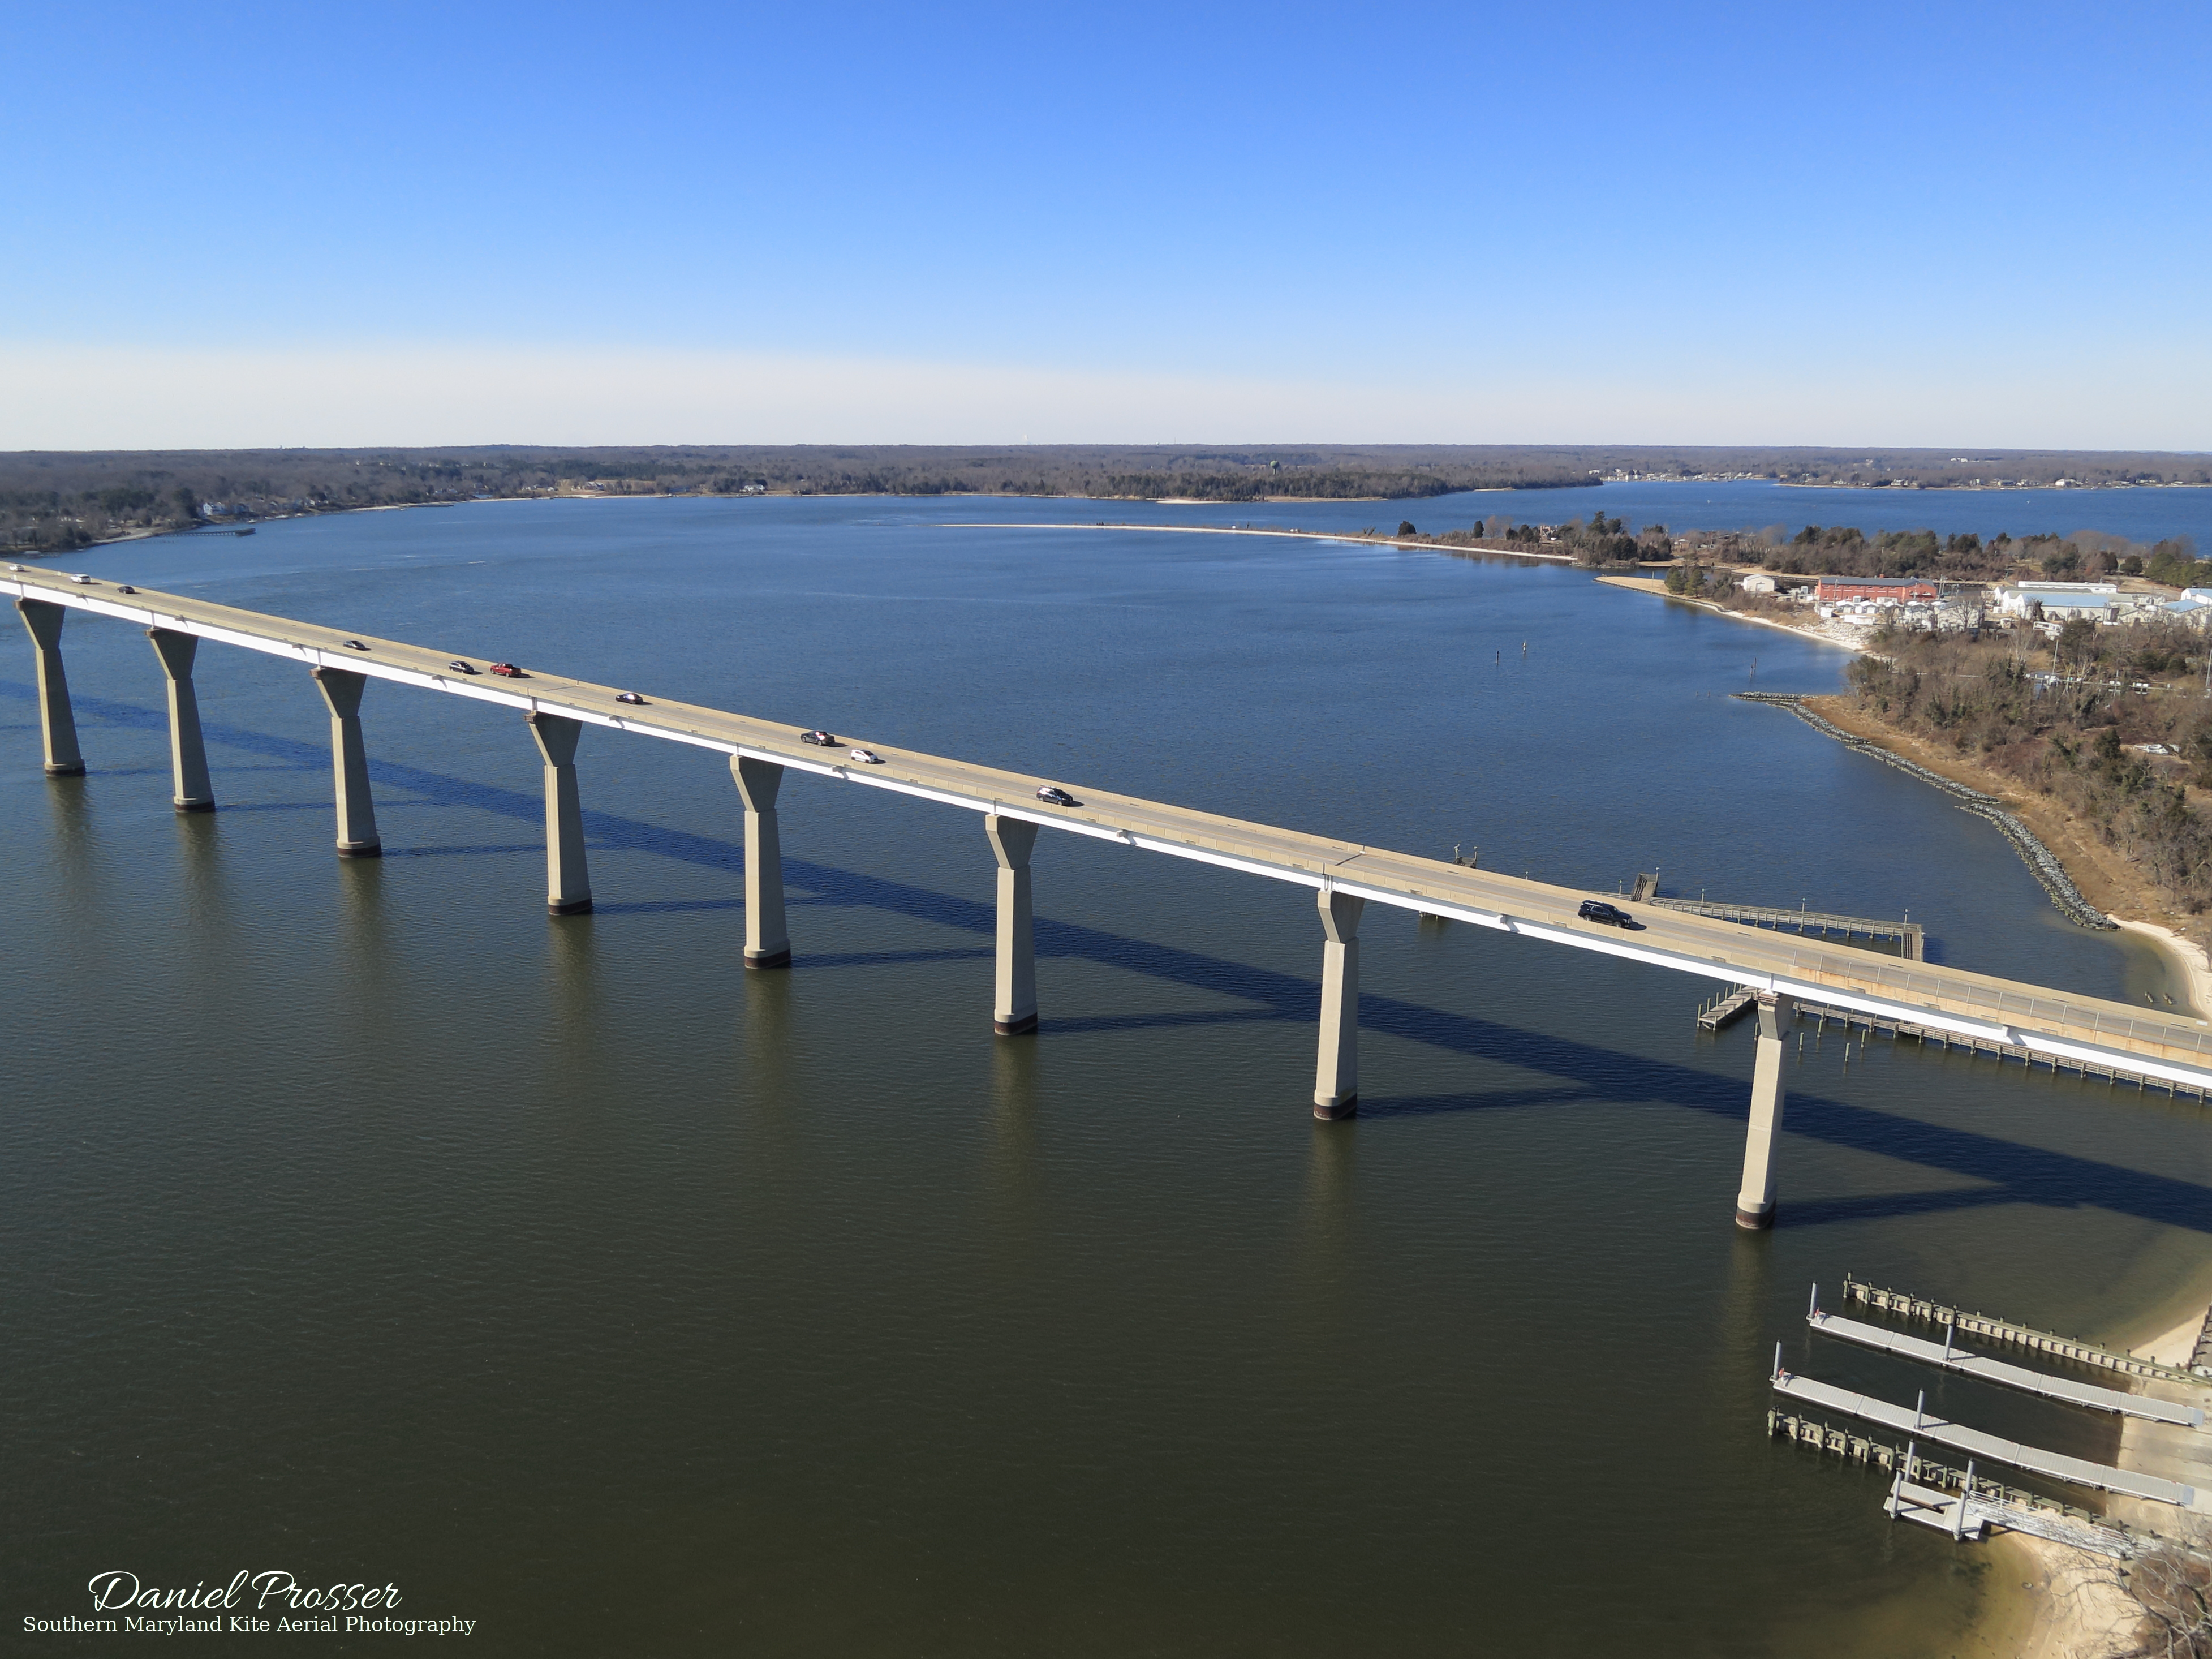
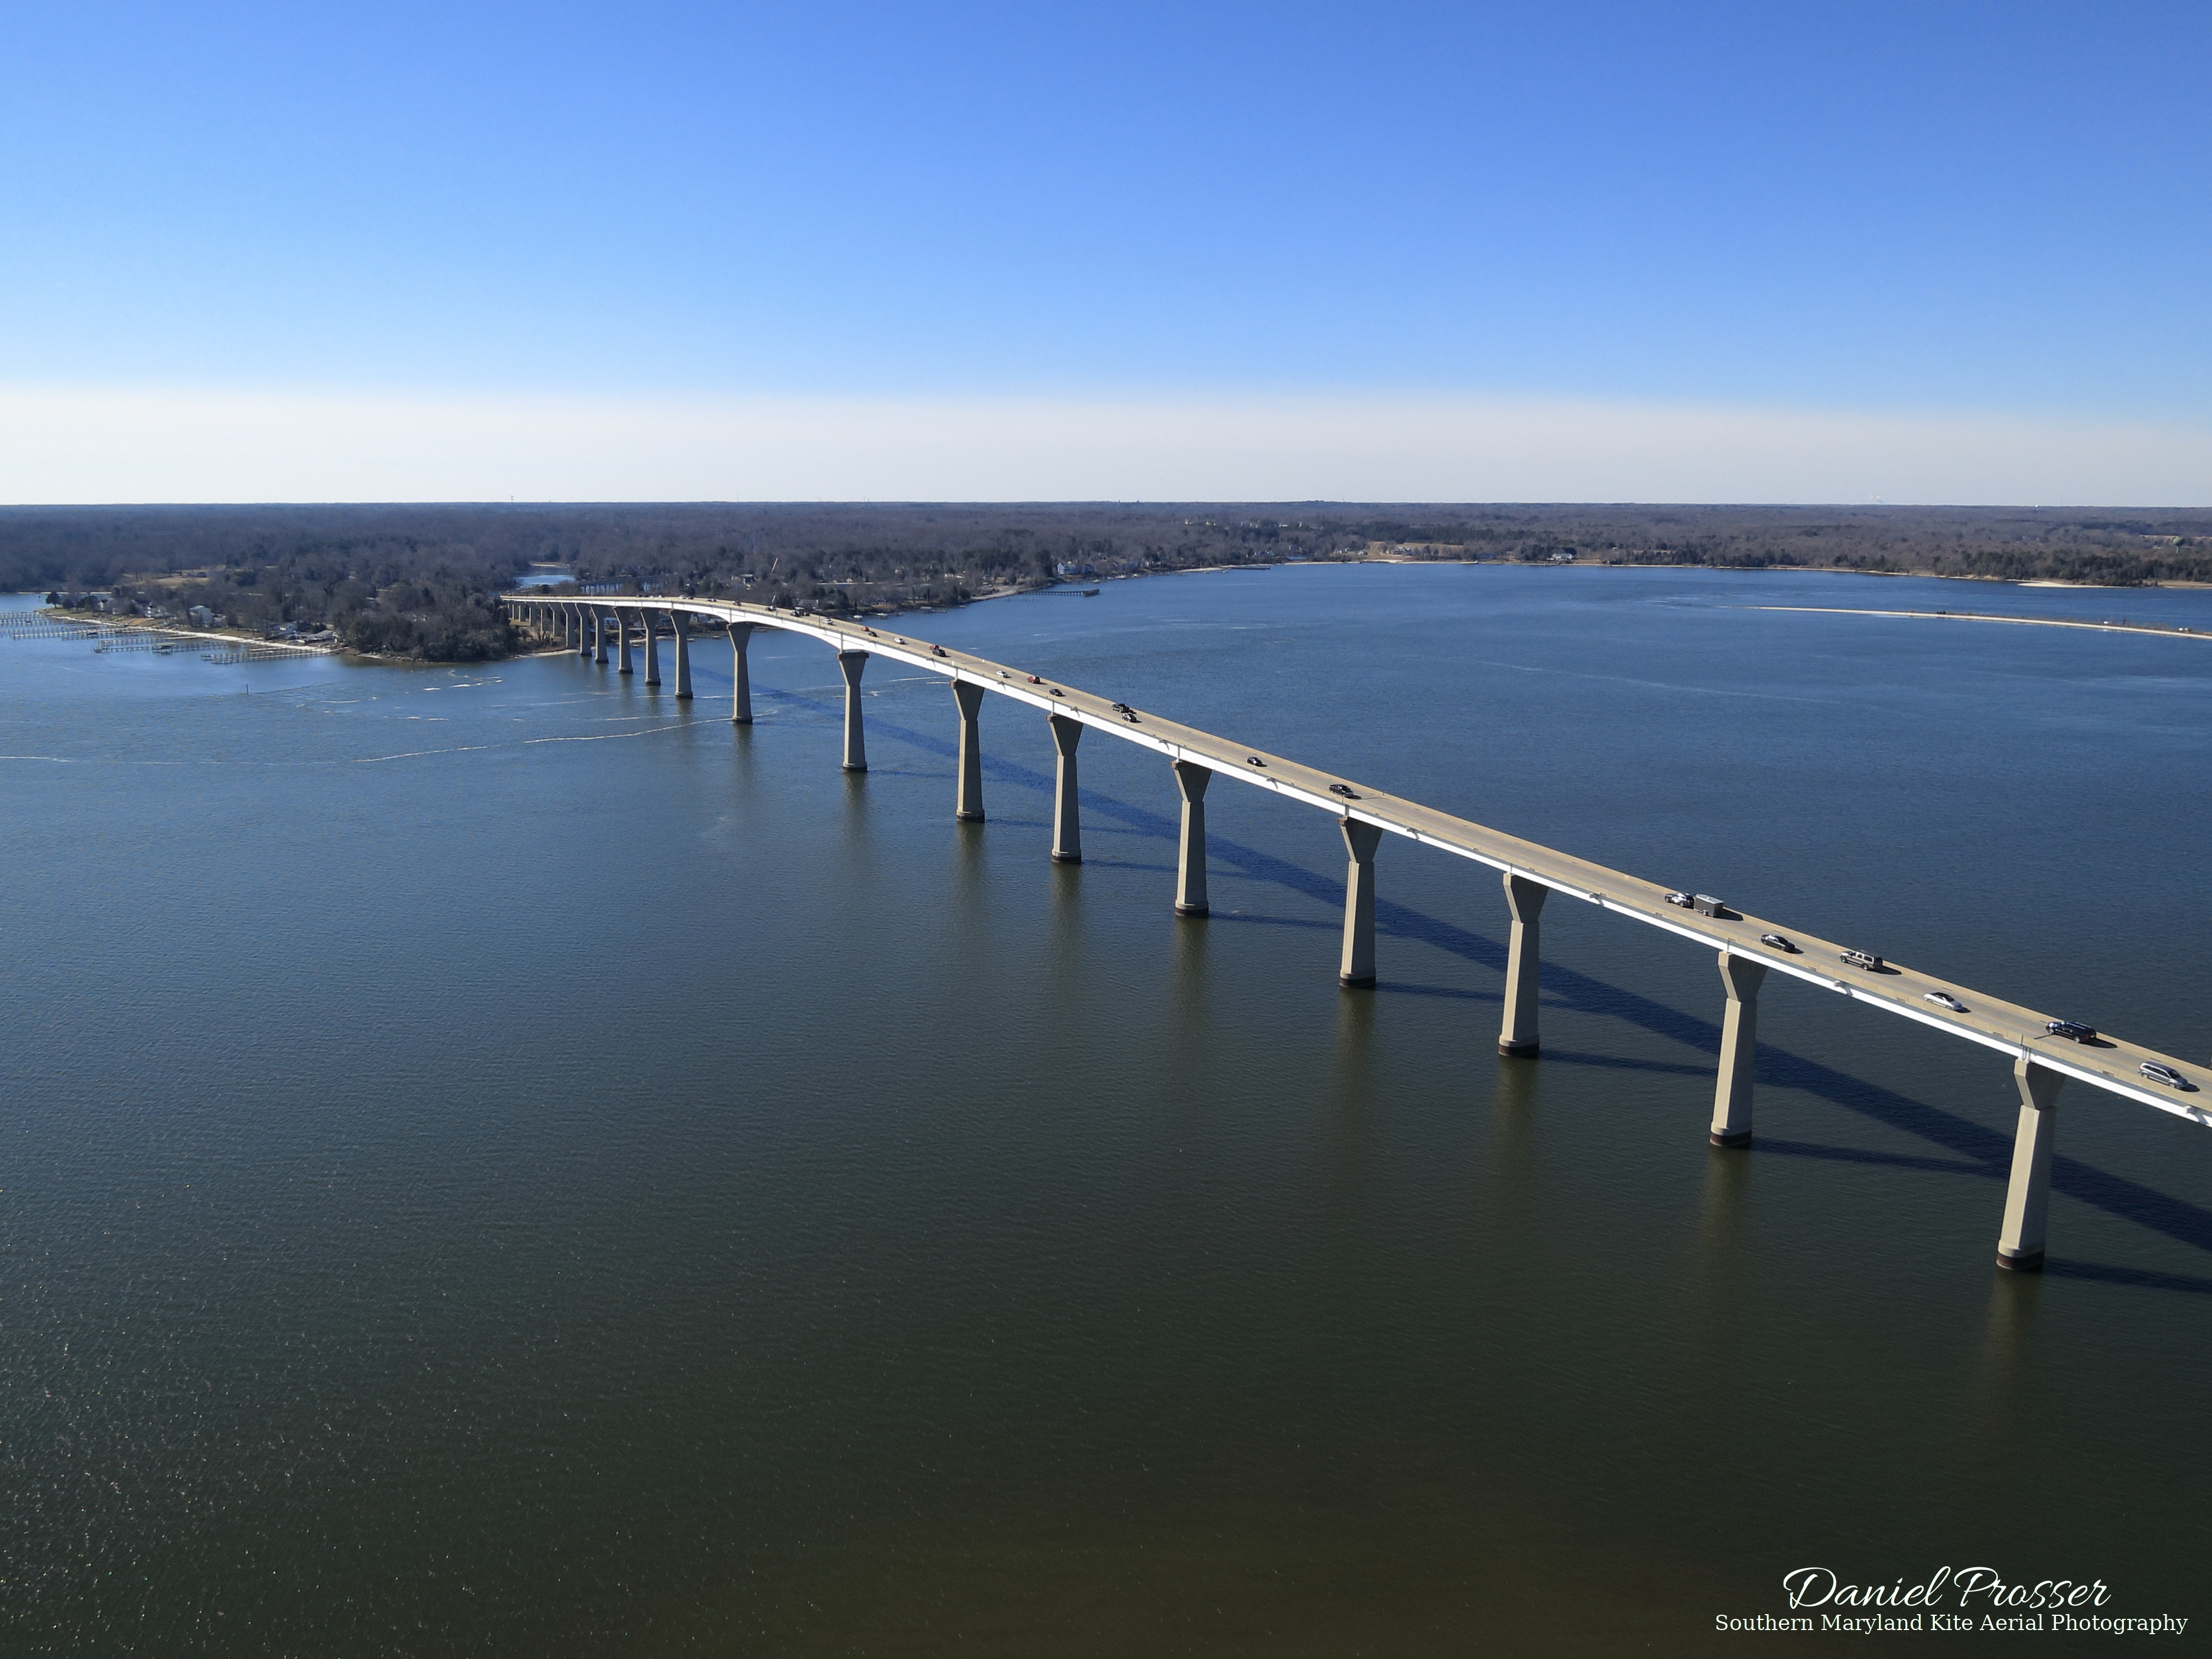
The Governor Thomas Johnson Bridge is one of the most recognizable landmarks of Southern Maryland. It crosses the Patuxent River, joining St. Mary’s County and Calvert County, the two southernmost counties in Southern Maryland. It also is fairly long and tall, making it visible from fairly long distances; as such, it has already appeared in a few of my aerial photo shoots from other locations. You can find it on the main cover page for this site, for example.
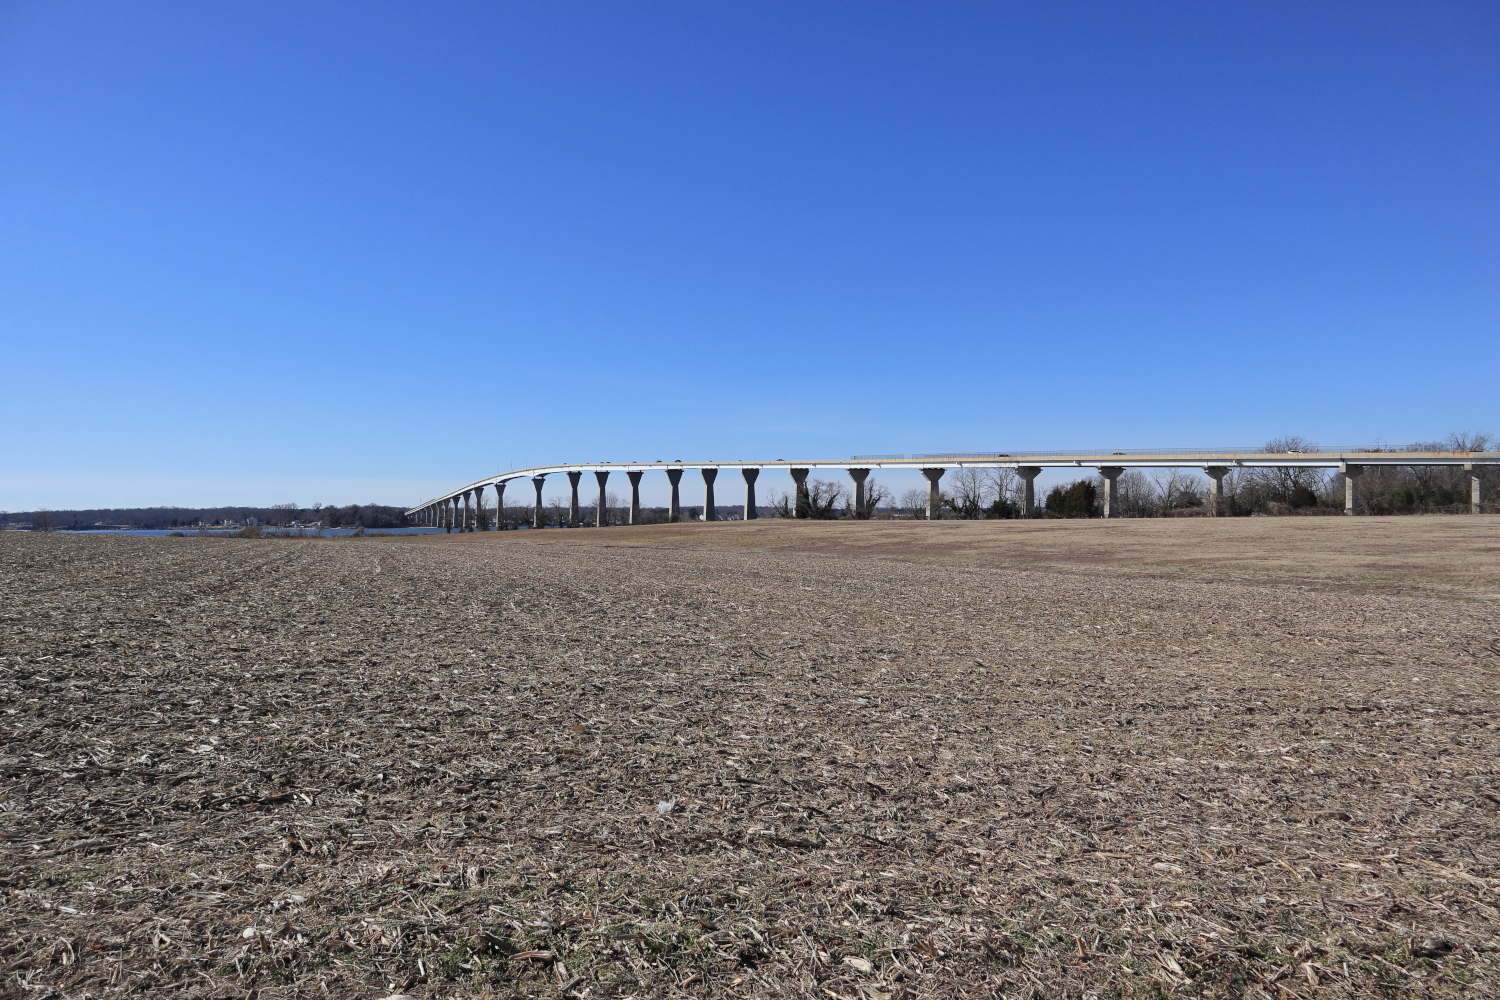
Some Google sleuthing revealed that there is a large empty field next to the bridge, which, as far as I can tell, is not private property. There is even a kite fly-in that normally occurs there every year, so it has to be a good place to fly kites. Here is what the flying site looked like from the road when I arrived:
Large empty field adjacent to the bridge
It was a bit of a walk from the road to the edge of the water where I wanted to fly, but it wasn’t too bad. The wind was kind of in-between the range of my two kites. It seemed like it might be somewhat of a struggle to get the Mini Dopero off the ground, but at treetop level it was blowing pretty steadily. I decided to fly the bigger Barn Door kite despite the fact that it might pull pretty hard at times, because I knew it would be easy to get in the air in this wind.
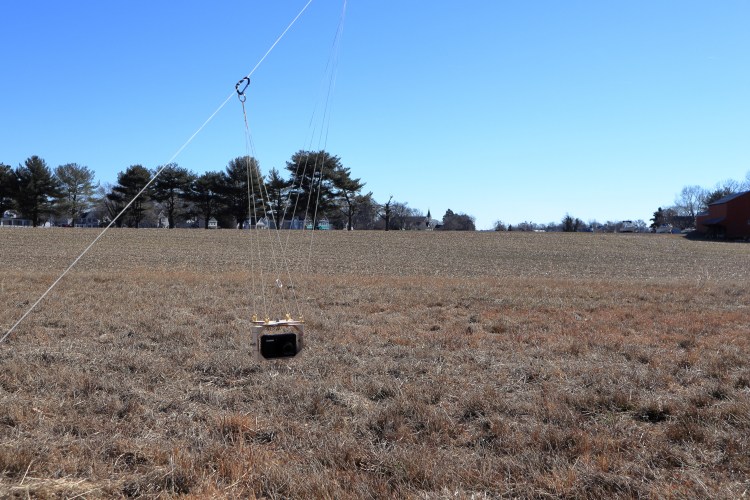
That estimation was correct. Soon after setting up the kite, it was flying steadily on 100 feet of line. The wind was blowing from the north, so flying on the south side of the bridge meant that there was no danger of the kite going over the bridge. I wouldn’t have minded an east wind to get the kite over the water and closer to the bridge, but this should do fine anyway. The kite was tending to pull to the right when the wind got stronger, so I brought it down and made a quick adjustment to the bridle. It turns out that I overdid it, because after that the kite wanted to pull to the left. That would be okay, though, because it meant that if the kite did get pulled down by a stronger wind, it would be safely over the spacious empty field. After launching the kite again, I attached my PowerShot S100 fixed autoKAP rig, started the CHDK script to take a picture every five seconds for a little over 30 minutes total, and sent it up.
PowerShot S100 fixed-angle autoKAP rig hanging from the kite line
I had a bit of a conundrum about how to aim the rig this time. The rig can be rotated in increments of 45 degrees. My desired framing is basically what you see at the top of the page: I wanted to get most of the bridge in the frame, including the end on the other side of the river. The wind was coming from the north, perpendicular to the bridge, so I ended up aiming the rig 45 degrees to my right (west) to hopefully get the bridge in most or all of the shots, and at least some with the desired composition. That ended up working out pretty well, though most of the images didn’t get the end of the bridge in the frame like I wanted. This is one of those cases where it would have been nice to have a radio controlled rig, but the fixed autoKAP rig still gets the job done in the end. Here are the pictures I like from the session, from a variety of different heights and angles (the second one is the cover photo above).
Flying was a bit of a challenge given the wind and how the kite was set up. Well, not really a challenge, but not as smooth as I would have liked. The kite was pulling pretty hard for much of the flight, and when that happens, this kite tends to go down to a low angle. It was also pulling to the left a lot due to my misadjustment of the bridle. That wasn’t all bad, though, because it resulted in some nice low altitude shots with the field and trees in the foreground, like the third one in the gallery above, which I probably wouldn’t have gotten otherwise. At times when the wind let up a bit, it managed to reach much higher angles and heights, like in the cover photo.
After awhile, I brought the camera and kite back down. While doing that, some other visitors joined my airspace, including a bald eagle and a drone, and, right as I was leaving, a whole flock of geese. This was a good outing, as it always is when the kite and camera return in one piece and you get some good pictures! I will definitely return here again, probably when there is an east wind and some green on the ground and trees. I’d also like to take some pictures of the rest of Solomon’s Island, which is to the south of where I flew this time. I’m not sure if there is another suitable flying field, but getting the kite nice and high from this site and taking pictures in that direction should work.
You can find my gallery of all images from this location here. For now, it only contains the pictures you’ve seen here, but I’m sure there will be more eventually.
Thanks for reading! If you enjoyed it and would like to read more KAP stories, feel free to subscribe to SOMD KAP by entering your email in the box on the main page.
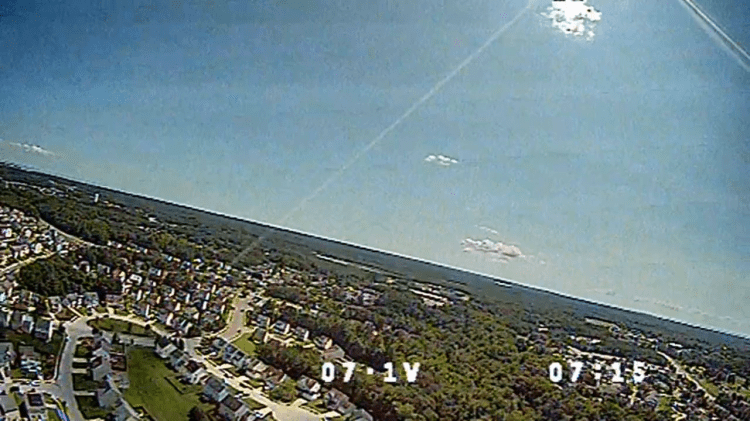
Ever since I started doing KAP last year, I’ve wanted to see what my neighborhood looks like from the air. Actually, I had a good idea already, since I’ve been flying my FPV (first-person view) radio-controlled airplane from an open area at the end of my road. But the camera only does low-resolution analog video, which is not well suited to making out details, and especially not distant objects. It’s also very wide-angle, which gives a somewhat distorted view of the world. I wanted to see what the neighborhood really looks like from above, not a low-resolution, distorted approximation!
Some sample pictures from the FPV camera on the plane are presented in the gallery below. The first one shows the flying site on the bottom right. The second one shows the type of view I hope to get from the kite, except, of course, higher quality and with a level horizon. The flight video is below that too, just in case you are interested. 🙂
Snapshots from FPV camera onboard a radio-controlled plane
Alright, that’s enough about R/C airplanes. Back to kites…
The area where I fly the plane is probably the largest open area in the neighborhood that has sufficient room to fly a kite without it going over houses. I wouldn’t want to creep people out by flying a kite with a camera over their house, and I especially wouldn’t want the kite or camera to crash into a house or end up with the line strung across someone’s property or the street. There are two problems with flying from that area, though: it is lower in elevation than the surrounding land (it is actually a drainage area), and it is mostly surrounded by large trees. Both make it difficult to fly a kite there.
I realized, though, that my chances successful kite flying are significantly improved during the winter. Since the trees have lost their leaves, wind is able to pass through much more easily than during the summer. If the breeze is in the right direction, it can result in wind near ground level that is steady enough to launch a kite and get it above the trees.
Well, a day came along with conditions that seemed workable. The wind was from the north, which meant it was relatively unobstructed by hills and also would allow the kite line to extend over the length of the drainage area. That gives the largest possible safety box and also keeps the kite away from houses. It was relatively strong and gusty, up to about 20 mph, but by this time I’d flown the Mini Dopero in similar winds and knew it was up to the task.
I set up the kite and did a long line launch. The first attempt resulted in the kite floating back to earth during a lull in the wind, but the second attempt was successful. Following my experience the last time I flew this kite at Elm’s Beach Park where it was pulling very hard, I had adjusted the tow point on the bridle forward by a couple centimeters. That seemed to be just about right, since the pull was much more manageable. I was also flying with a new, more colorful drogue (made out of spare blue and yellow ripstop nylon), since the last one had been lost in the Chesapeake Bay. About 150 feet of line were needed to get the kite safely above the turbulence produced by the trees. The next step was to attach the PowerShot S100 rig to the line and start the intervalometer, which happened without a hitch.
The flight really went about as well as I could have hoped for, given the conditions and location. Once again, the Mini Dopero handled the strong, gusty winds like a champ. Gusts and variable wind direction caused it to fly off to one side or another from time to time, but there were no near crashes or real scary moments. Nonetheless, I didn’t release all the line available, just because I didn’t want to push my luck.
The gusty behavior resulted in images captured over just about 180 degrees of view with the fixed rig, which I see as a benefit. Some of the best shots are shown above. The quality is definitely much better than the FPV camera, of course, and they show off some of the prominent features of the area. The most noticeable feature is the big white tower off to the east. Interestingly, I never even noticed this tower until I first started flying my R/C planes around with cameras attached. It’s very prominent from the air but somewhat obscured from the ground. That’s just one example aerial views really give a different and unique perspective. Farther to the east, the control tower for the Patuxent River Naval Air Station is visible miles away. There is a small pond in the neighborhood in the first image looking towards the north, a larger one in the last image towards the south, and an even larger one beyond the neighborhood farther to the south. I even got one good shot of the flying site from above:
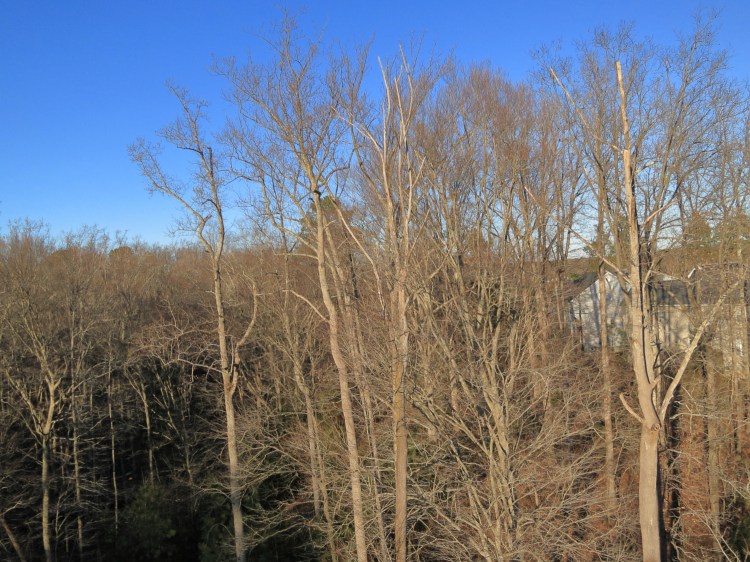
Bringing the kite back down was pretty uneventful too, except for near the ground where the turbulence from the trees caused some “interesting” kite behavior. My timing happened to be just right that the intervalometer script kept going just until I was about to land the kite, giving me some close-up images of trees:
Right after that, the script finished and the camera shut off. I detached the rig from the line and brought the kite down, being careful to keep it away from the hungry trees. Another success! I think I might be getting better at this kite-flying thing. It would be nice to try this again when there are some leaves on the trees, but I don’t know if it will be possible with the wind conditions. Anyway, you can see these and any other KAP pictures I may take from home at the My Neighborhood Aerial Photos Gallery page.
St. Mary’s River State Park is a beautiful area in Southern Maryland whose main feature is St. Mary’s Lake. There is a 7-mile walking trail around the lake, boat docks, places to fish, a playground, etc. I had visited the park several years before when I first moved to Southern Maryland, but now kite aerial photography was giving me a good reason to go back.
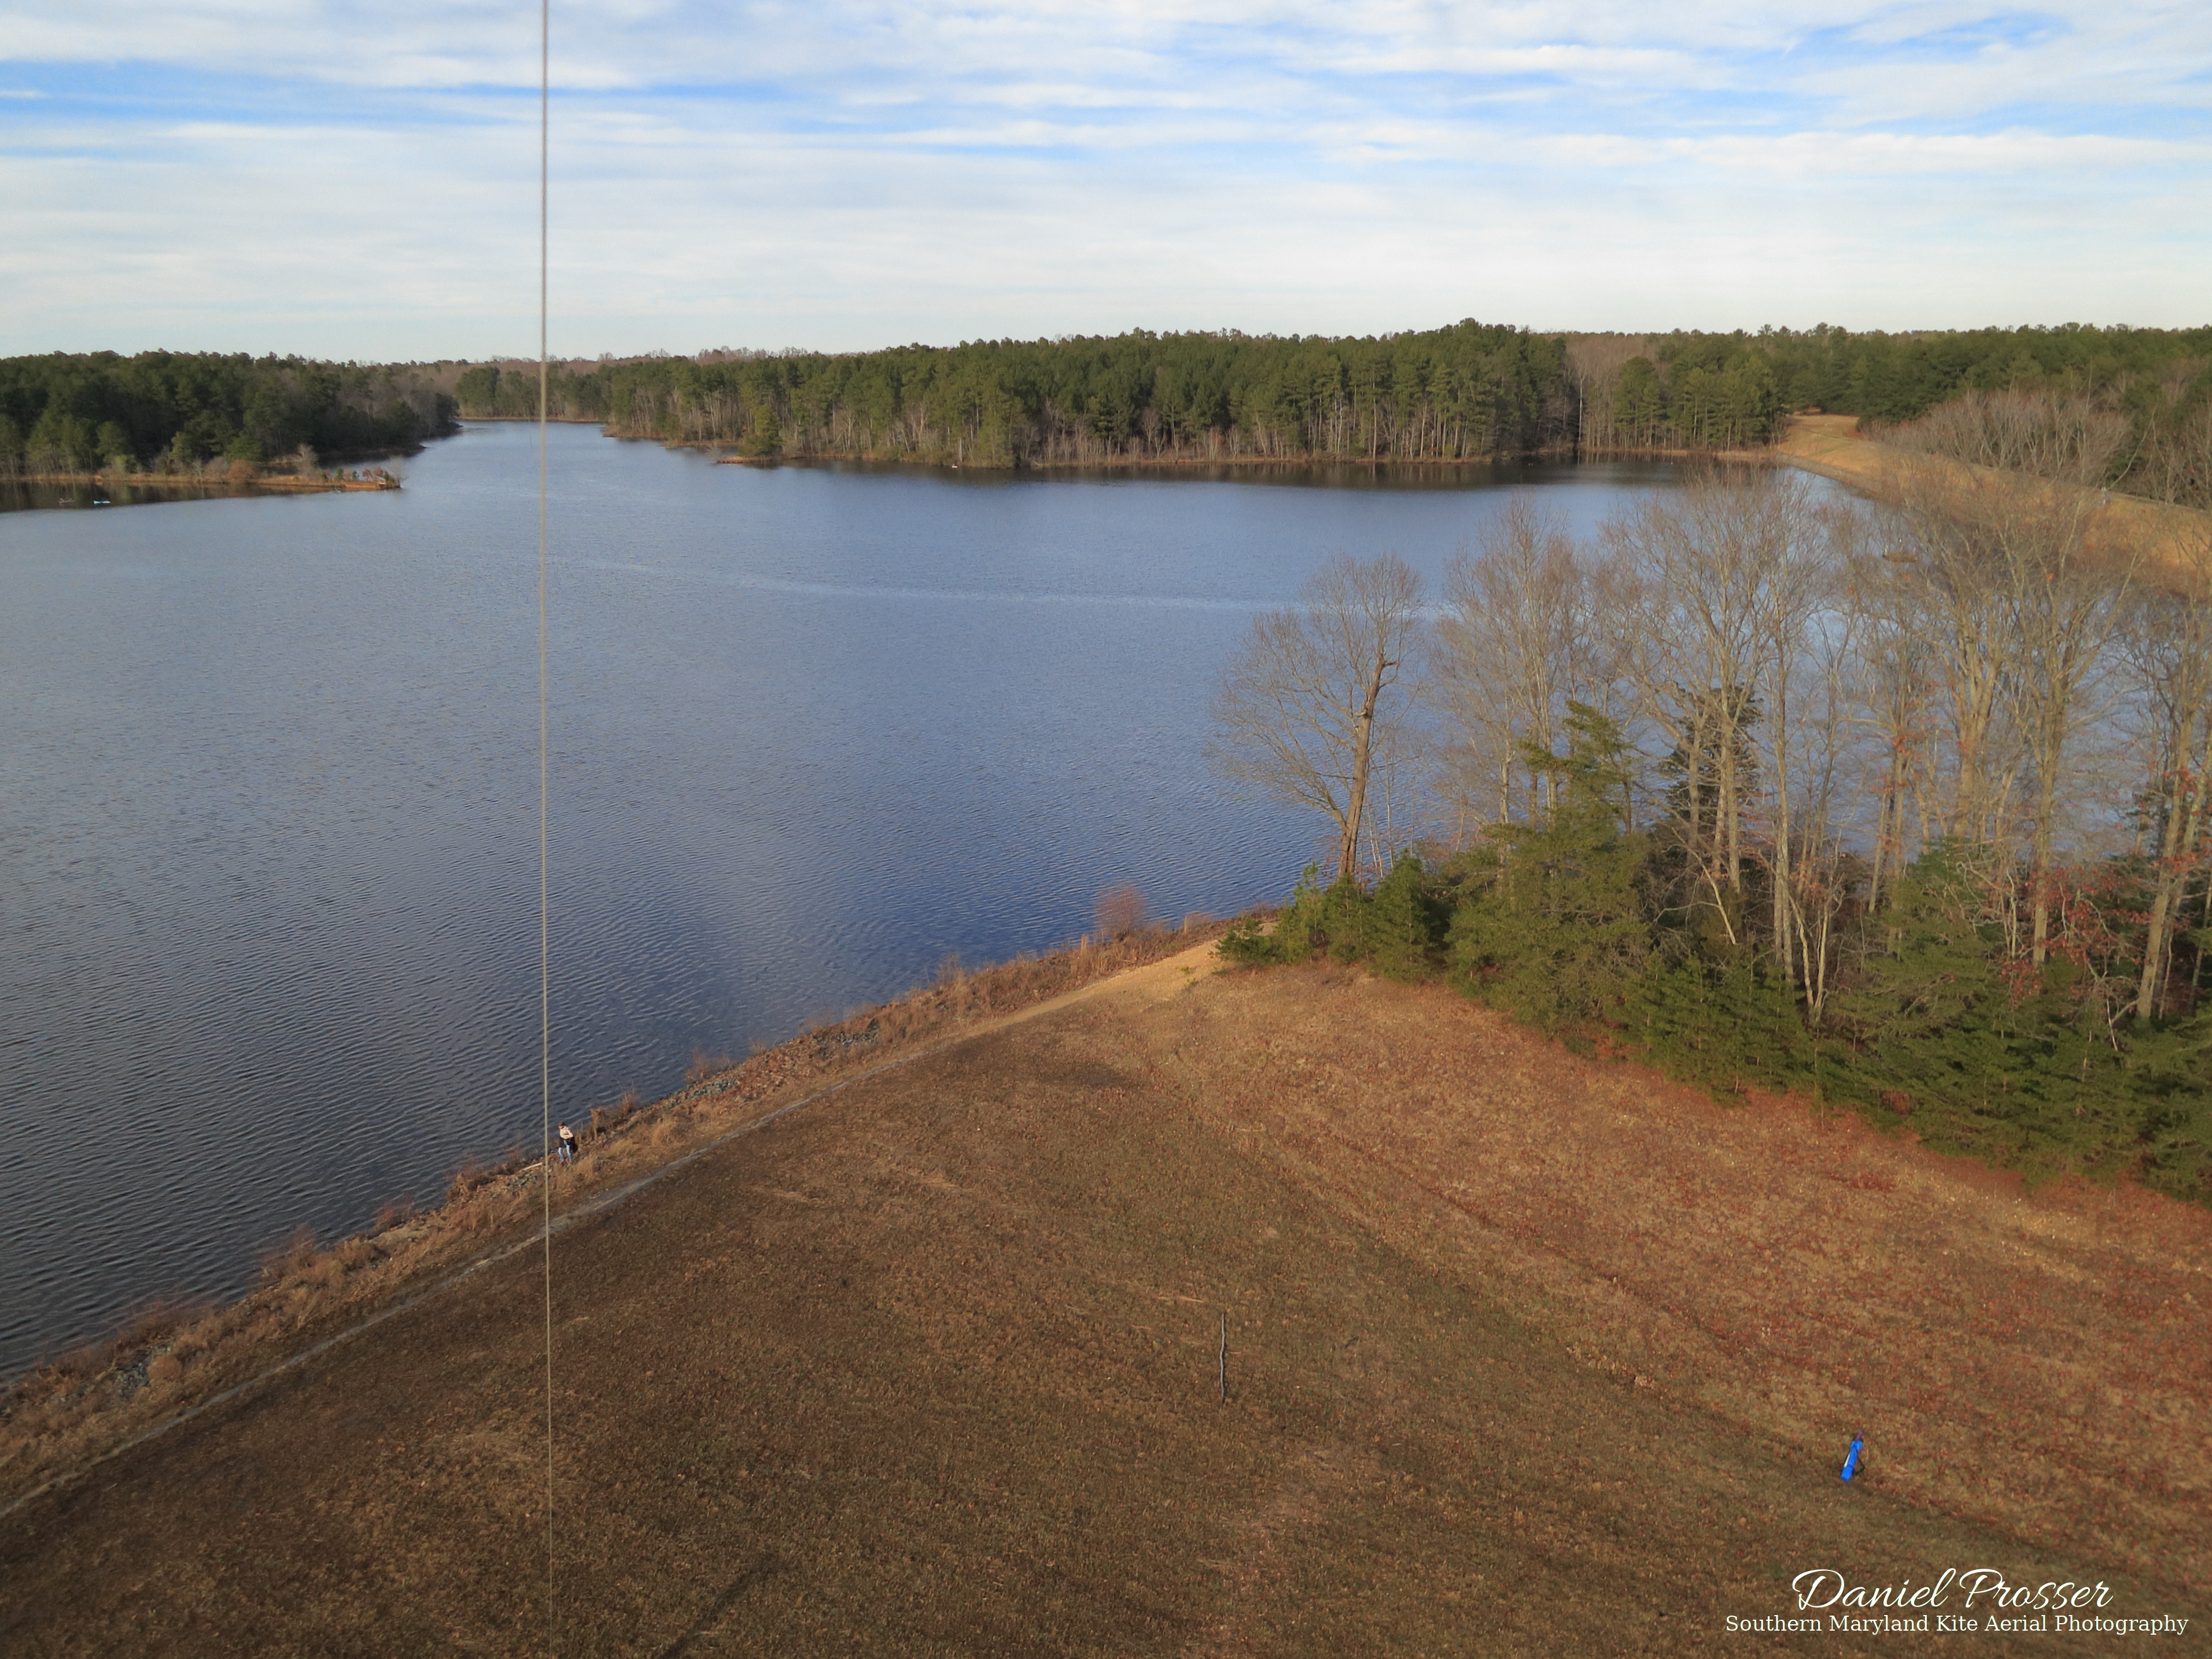
I had also gone to the park earlier in the week in hopes of flying but was stymied by a lack of wind (you know, that thing that kites need to fly). Since there was a $3 fee to enter, I didn’t want to let that go totally to waste, so I walked around and took some pictures. Here are a couple of them. Notice the reflections on the glass-smooth water in the second one — a sure sign of very little wind! One very beneficial outcome of that trip was that I located a very good flying site: a wide-open field about 300 feet wide and 700 feet long at the southeast end of the lake. This would be a perfect place to fly a kite.
The next Saturday, the wind was pretty calm most of the day but seemed to pick up suddenly in the early afternoon. After getting the go-ahead from the boss (my wife 🙂 ), I quickly packed up my kite stuff and hurried over to the park again. In my haste, I forgot to bring gloves, which I realized during the drive, but I decided not to go back for them. It turned out that I got lucky and didn’t need them because the wind was quite light, but generally speaking it’s not a good idea to not wear them when flying a big kite.
During the drive, I tried to judge the wind by looking at the tops of the trees, and it wasn’t looking too promising. The gentle-to-moderate wind I had observed at home was no longer apparent at all. When I arrived at the gate, I made the choice to go in, fully knowing I might be wasting my $3. The hike to the field didn’t do much to improve my outlook. Only rarely did I see the tops of some trees moving. It was looking like another disappointing attempt, but at this point I was definitely going to at least try.
If anything was going to fly, it would be the big Barn Door kite. I set it up as quickly as I could at the field, which is still about a ten-minute endeavor. Despite my misgivings, in the open field there was definitely a noticeable light breeze. Surprisingly, it remained steady enough to get the kite into the air with no running needed. I let out the line as quickly as I could while periodically pausing to let the kite pull up to a higher angle, knowing full well that a light breeze can quickly disappear. The best bet is to get the kite well above the treetops as quickly as possible where the wind is generally less likely to suddenly vanish. With the PowerShot S100 pointed towards the north, the rig was soon attached and on its way up. That’s a relief!
The picture above from about a hundred feet up gives a nice view of the flying field, the northeast end of the lake, and some hikers passing by. Since it was a very nice day by winter standards, the park was recently reopened, and it was a weekend, there was plenty of traffic. I got some comments, mainly from kids (as usually is the case), and had some brief socially-distanced discussions about the kite. No doubt the big blue and yellow kite could be seen from quite some distance.
The flight turned out to be just perfect for the Barn Door kite. I don’t think the wind ever got much higher than the light range. That allowed the kite to fly at a high line angle; it didn’t get pulled down at all as it tends to in stronger winds. There wasn’t a lot of pull on the line, but it was still plenty to lift my 300-gram picavet rig. To introduce a little bit of variety into the shots, I walked back and forth along the width of the flying field. Some variability in the wind direction provided views of both ends of the lake, and also some looking down towards me.
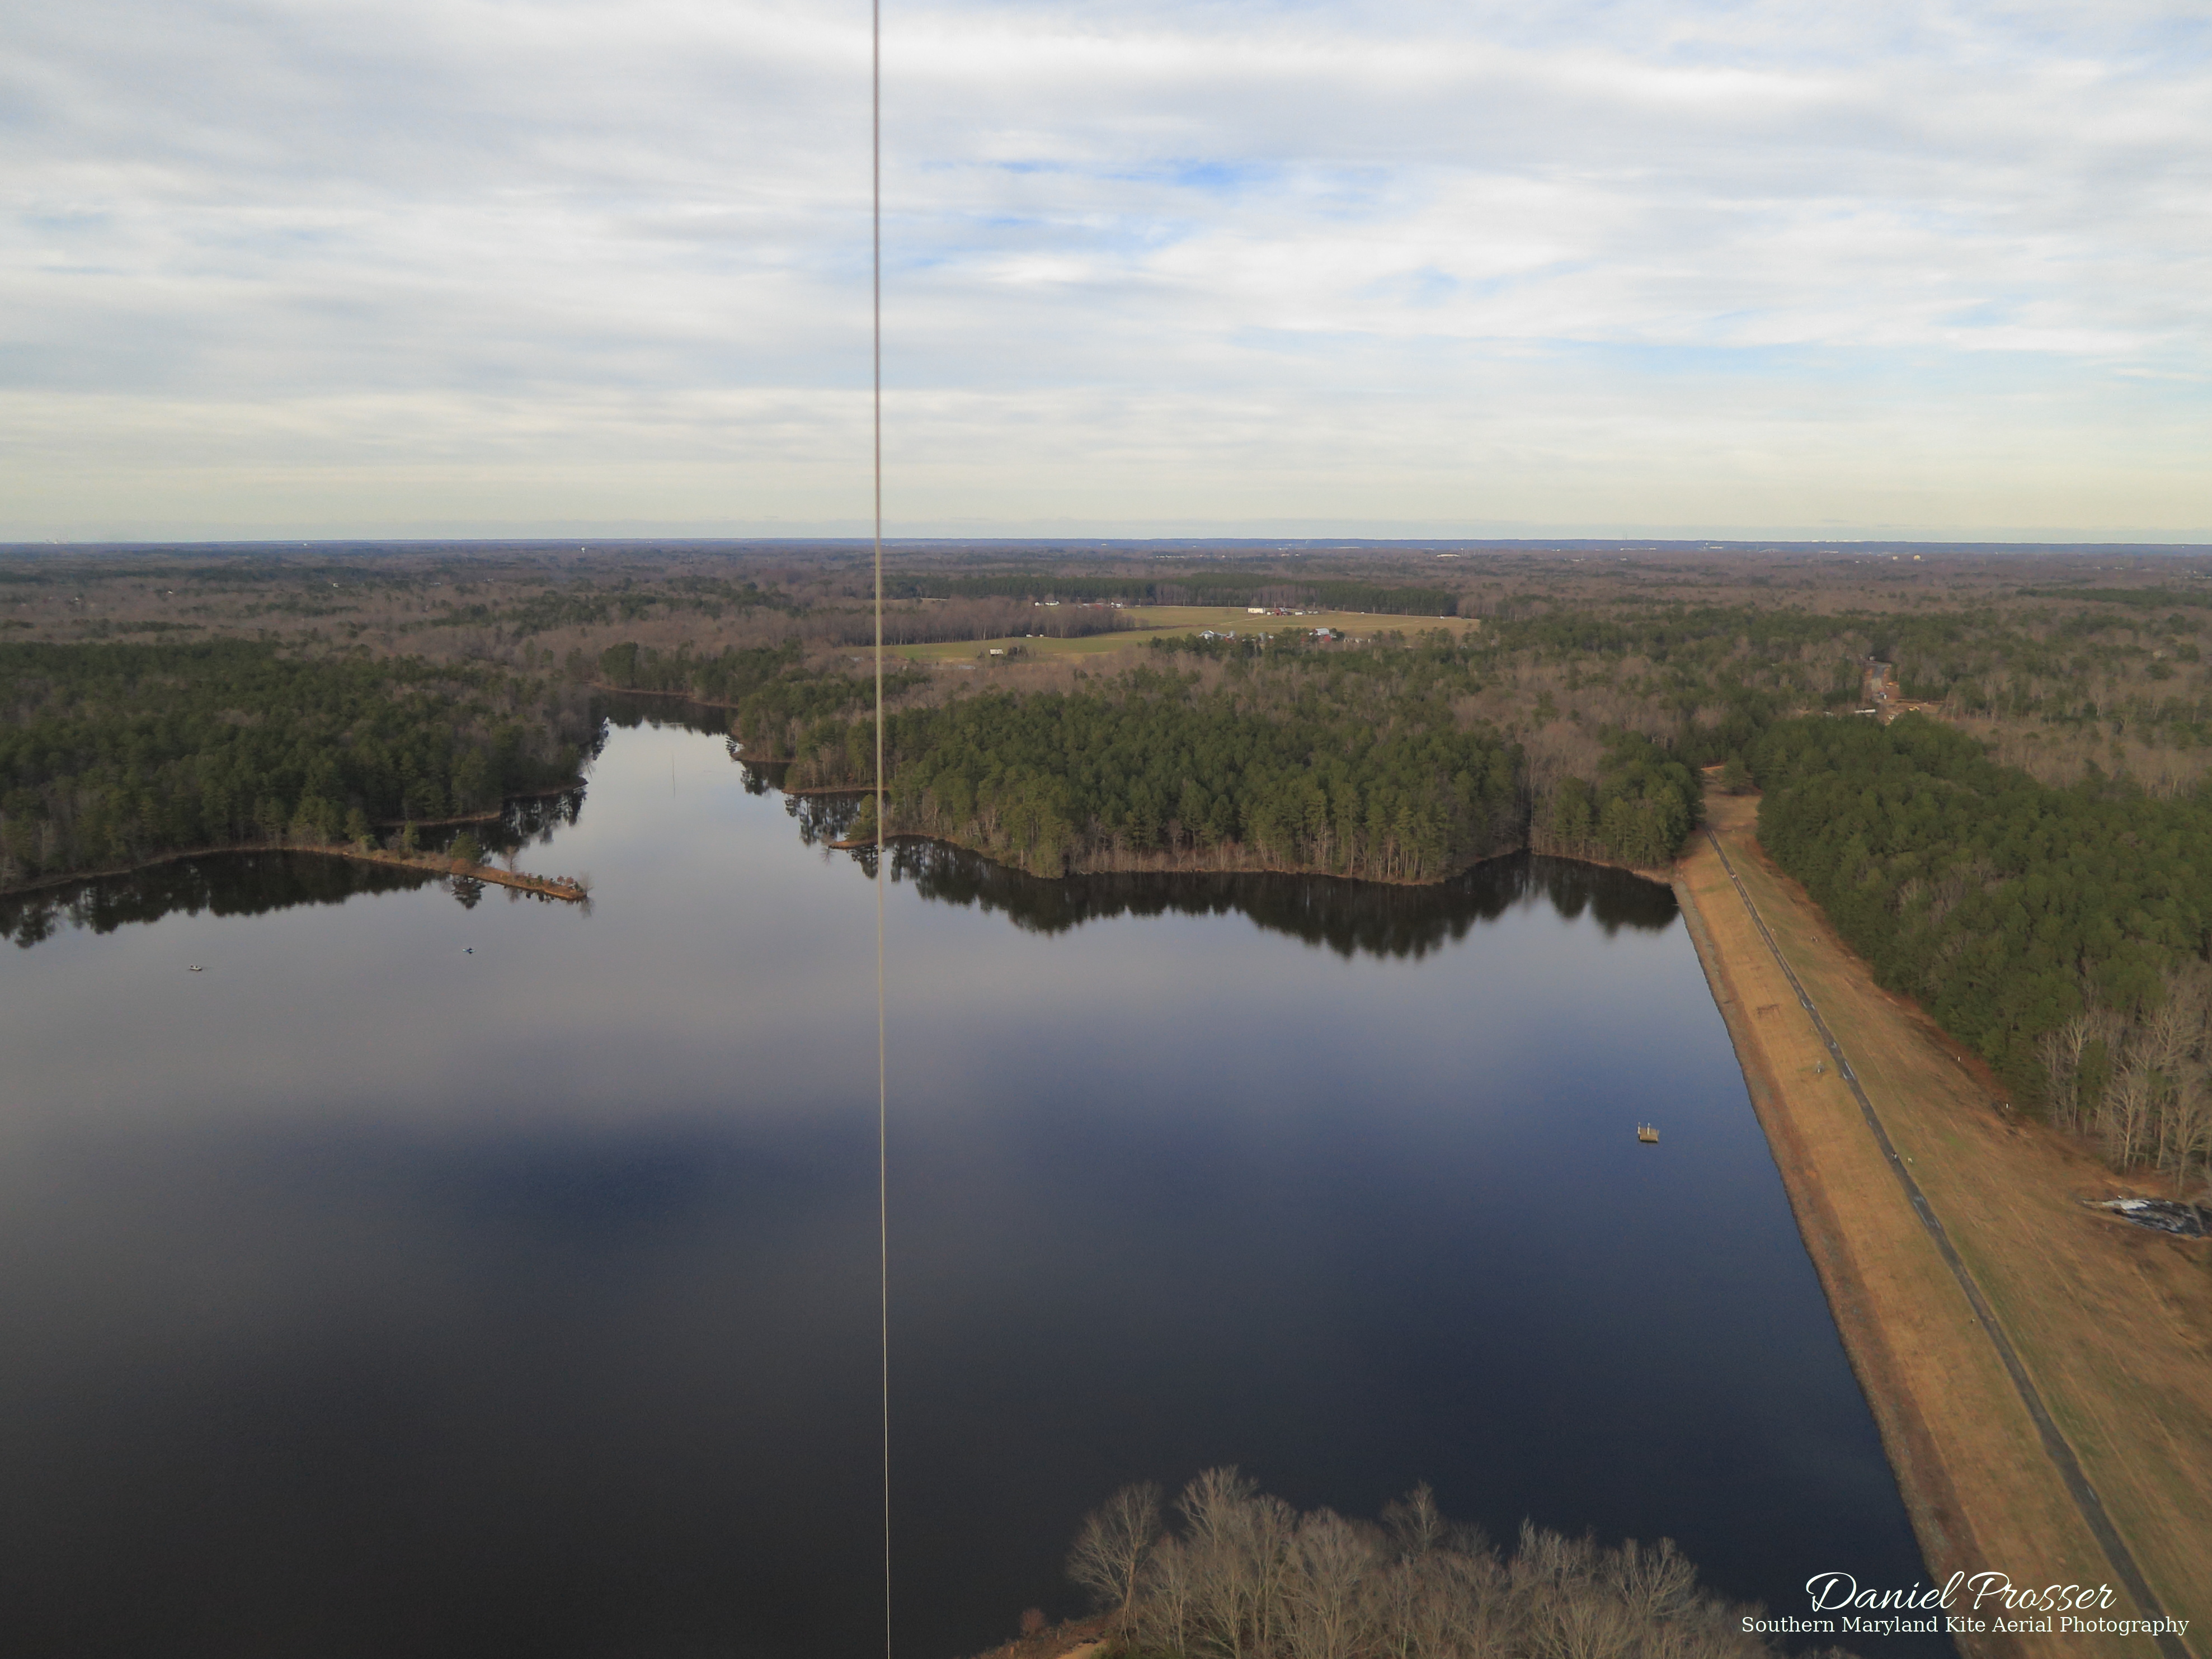
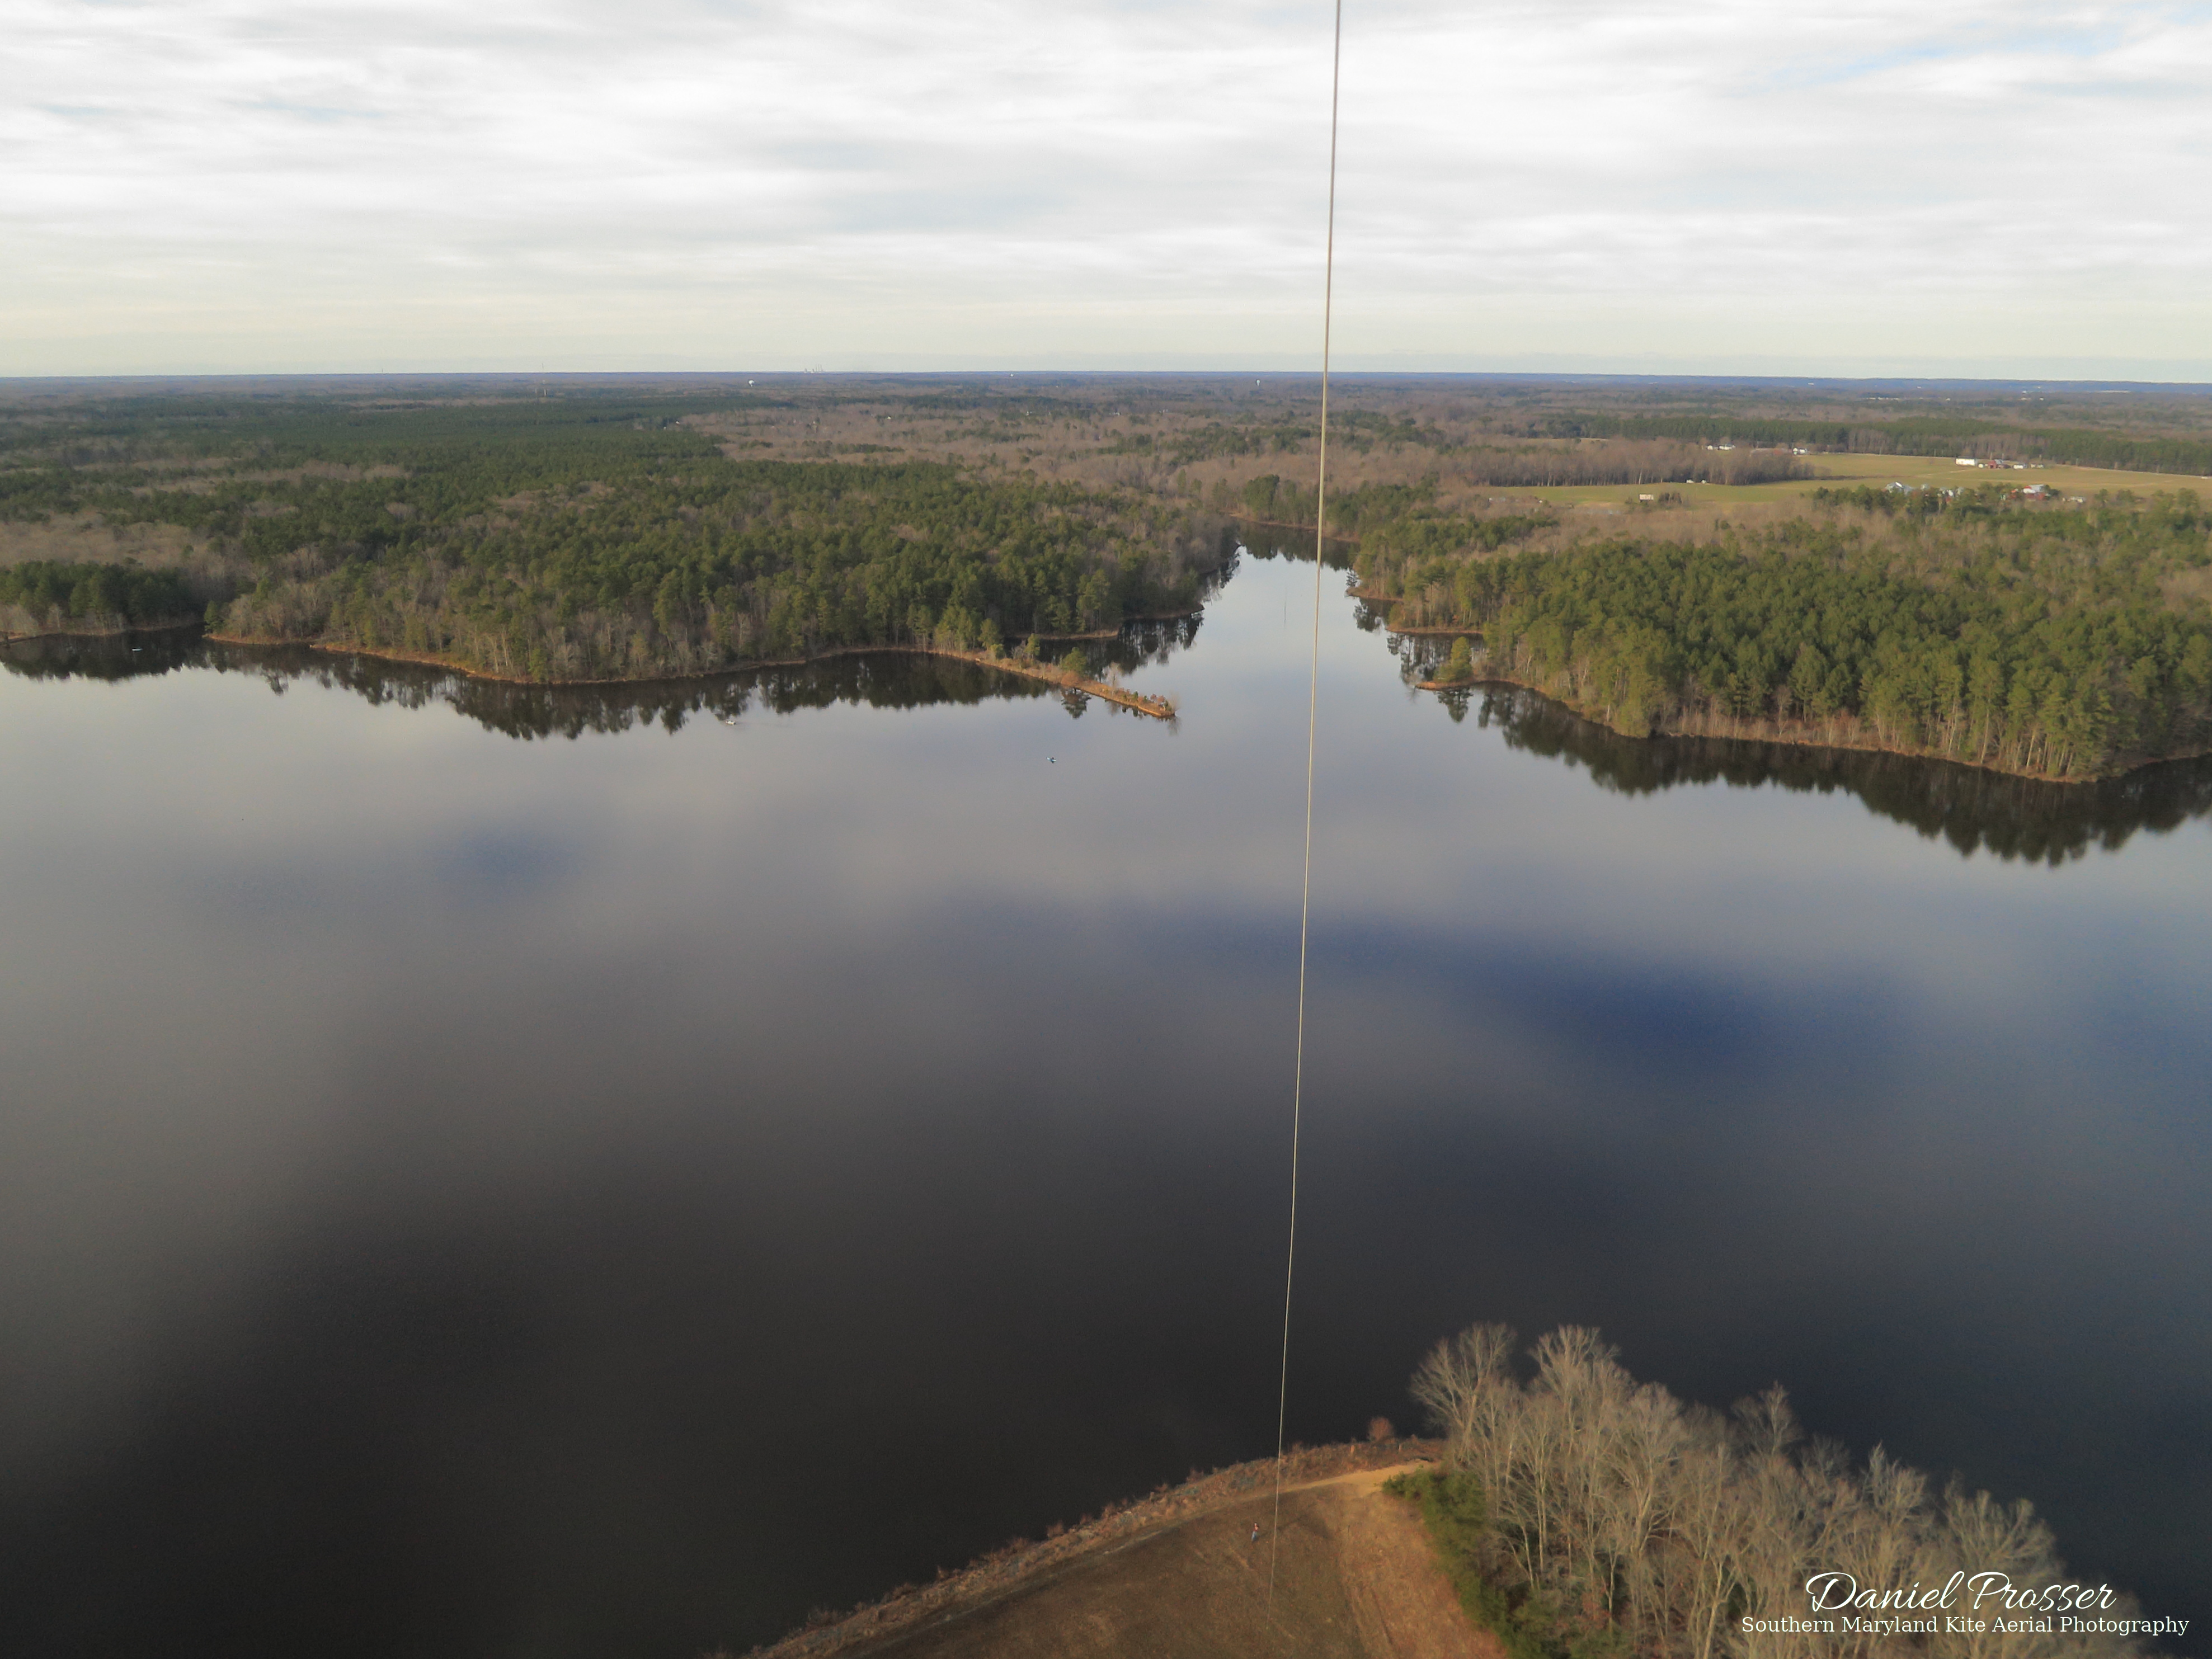
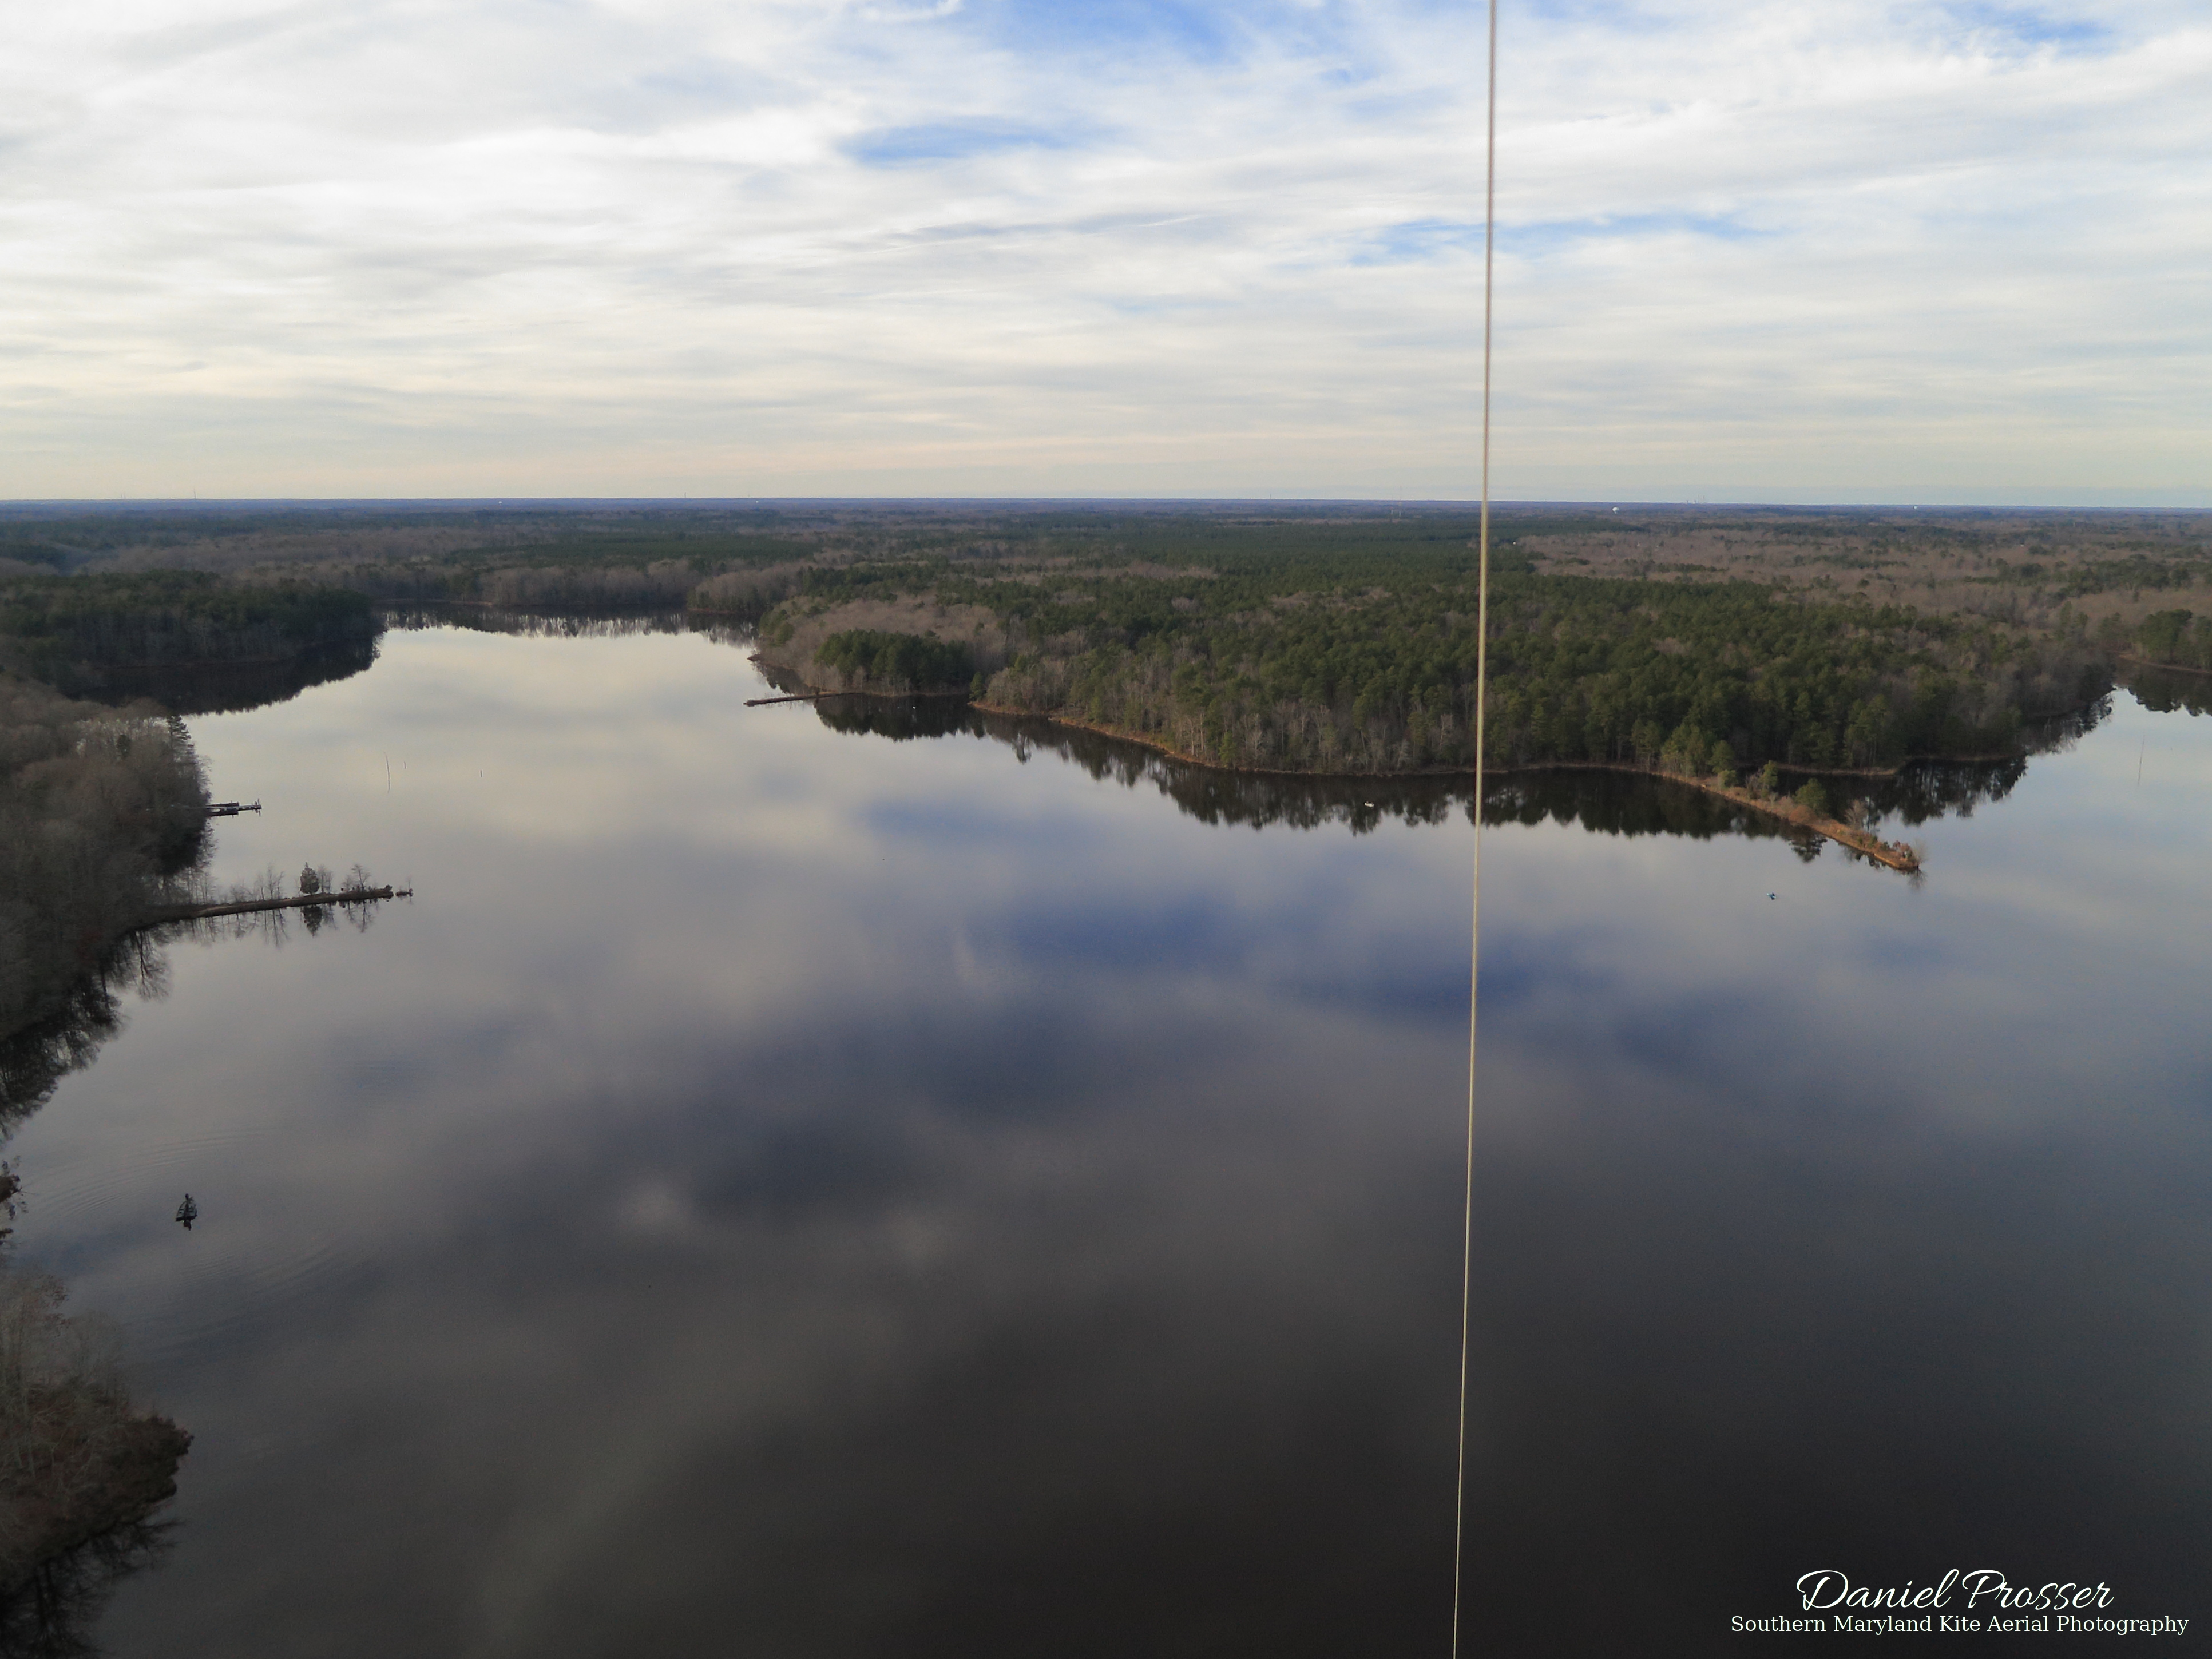
Actually, with the wind so light and the camera nominally pointed towards the kite line, many of the shots ended up focusing on the line rather than the landscape. I haven’t really had that problem much before. In the gusty breezes typically encountered, the camera normally moves around enough that the line doesn’t end up directly in the center of the frame too often, even when the camera is nominally pointed towards it. Next time, I may try manually focusing the camera to infinity if the camera is pointed that way. Nonetheless, there were still plenty of good shots out of the 400 taken. Having some focused on the line actually made it easier to narrow down the “keepers.” Some of my favorites are posted below. They really show off the serenity of the lake and the beauty of the surrounding area.
After 30 minutes of flying, the breeze had died down to just about nothing on the ground. The images above are in chronological order, revealing that the lake was taking on an increasingly mirror-like appearance as the wind died down. If you view the last one full-size, you should even be able to make out circular ripples surrounding the boat in the lower-left corner. As is often the case, there was still a breeze at altitude, but I sensed that this too was starting to decrease. Once below 200 feet, the wind definitely dropped off. By the time the rig was down to ground level, the kite had lost all lift, so there was no way to detach the rig from the line with it still flying, and I was left just tugging on the line as the kite descended to make sure it stayed clear of the trees. It looks like my timing was just right, because I definitely wouldn’t have been able to launch again at that point. I packed up and went home with that sense of satisfaction that only a relaxing kite flying session can bring. Not bad for the first one of the new year!
You can see all my aerial photos from St. Mary’s River State Park at this page. Thanks for reading!