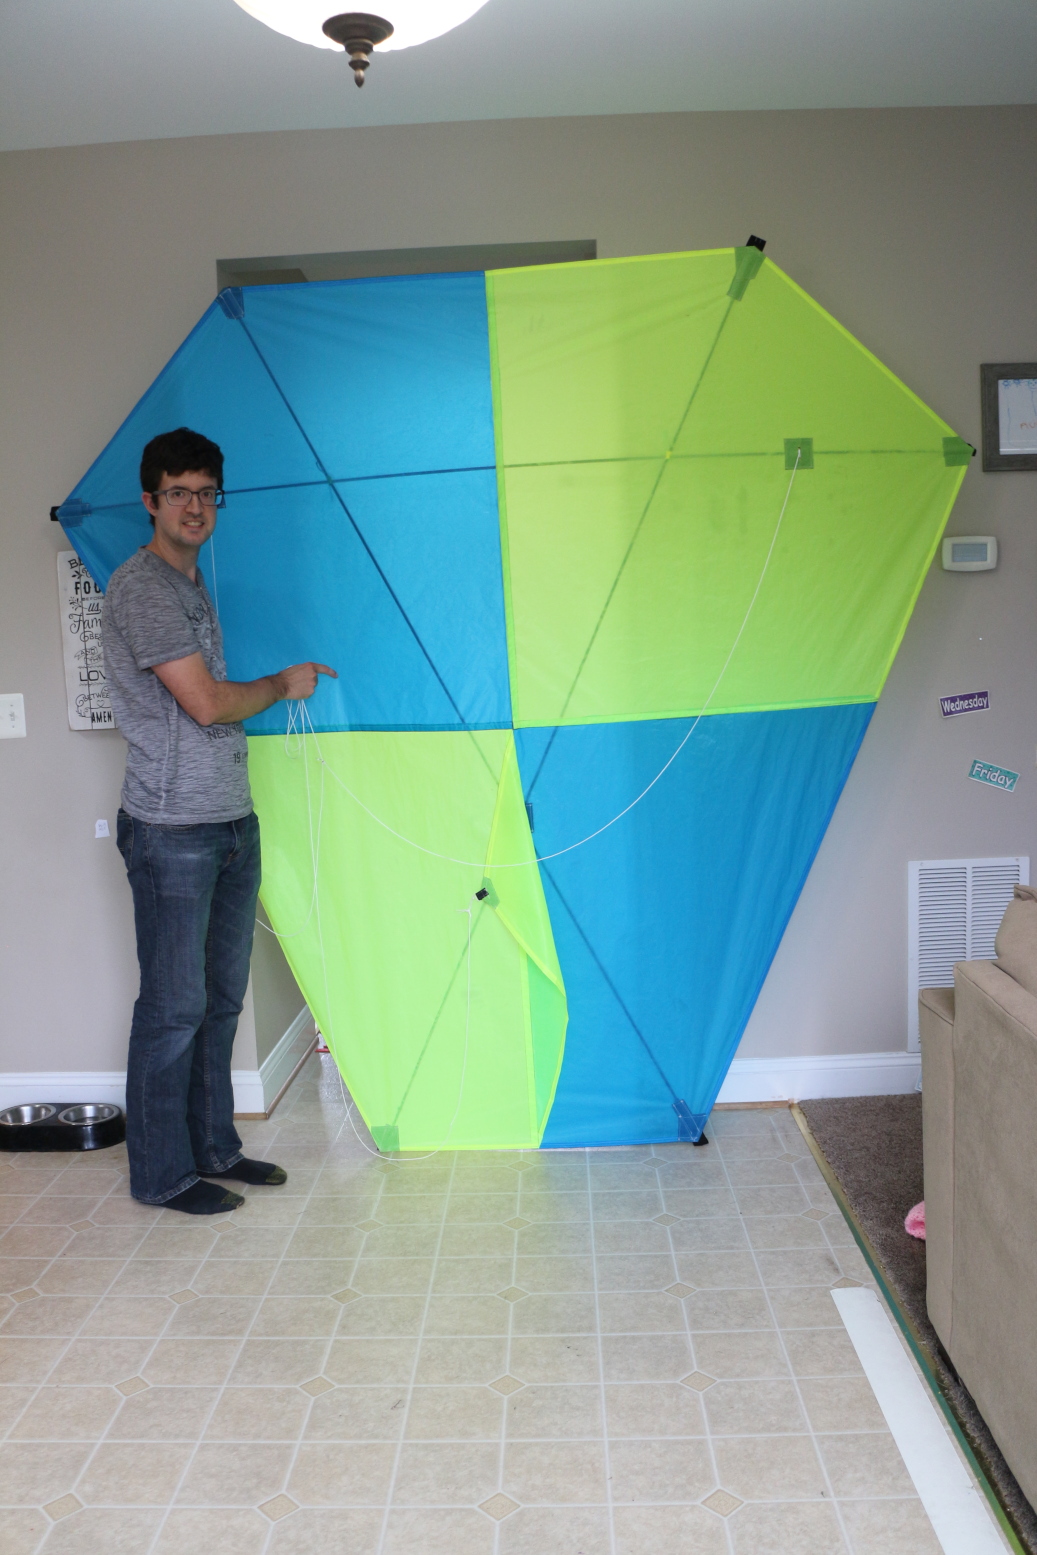
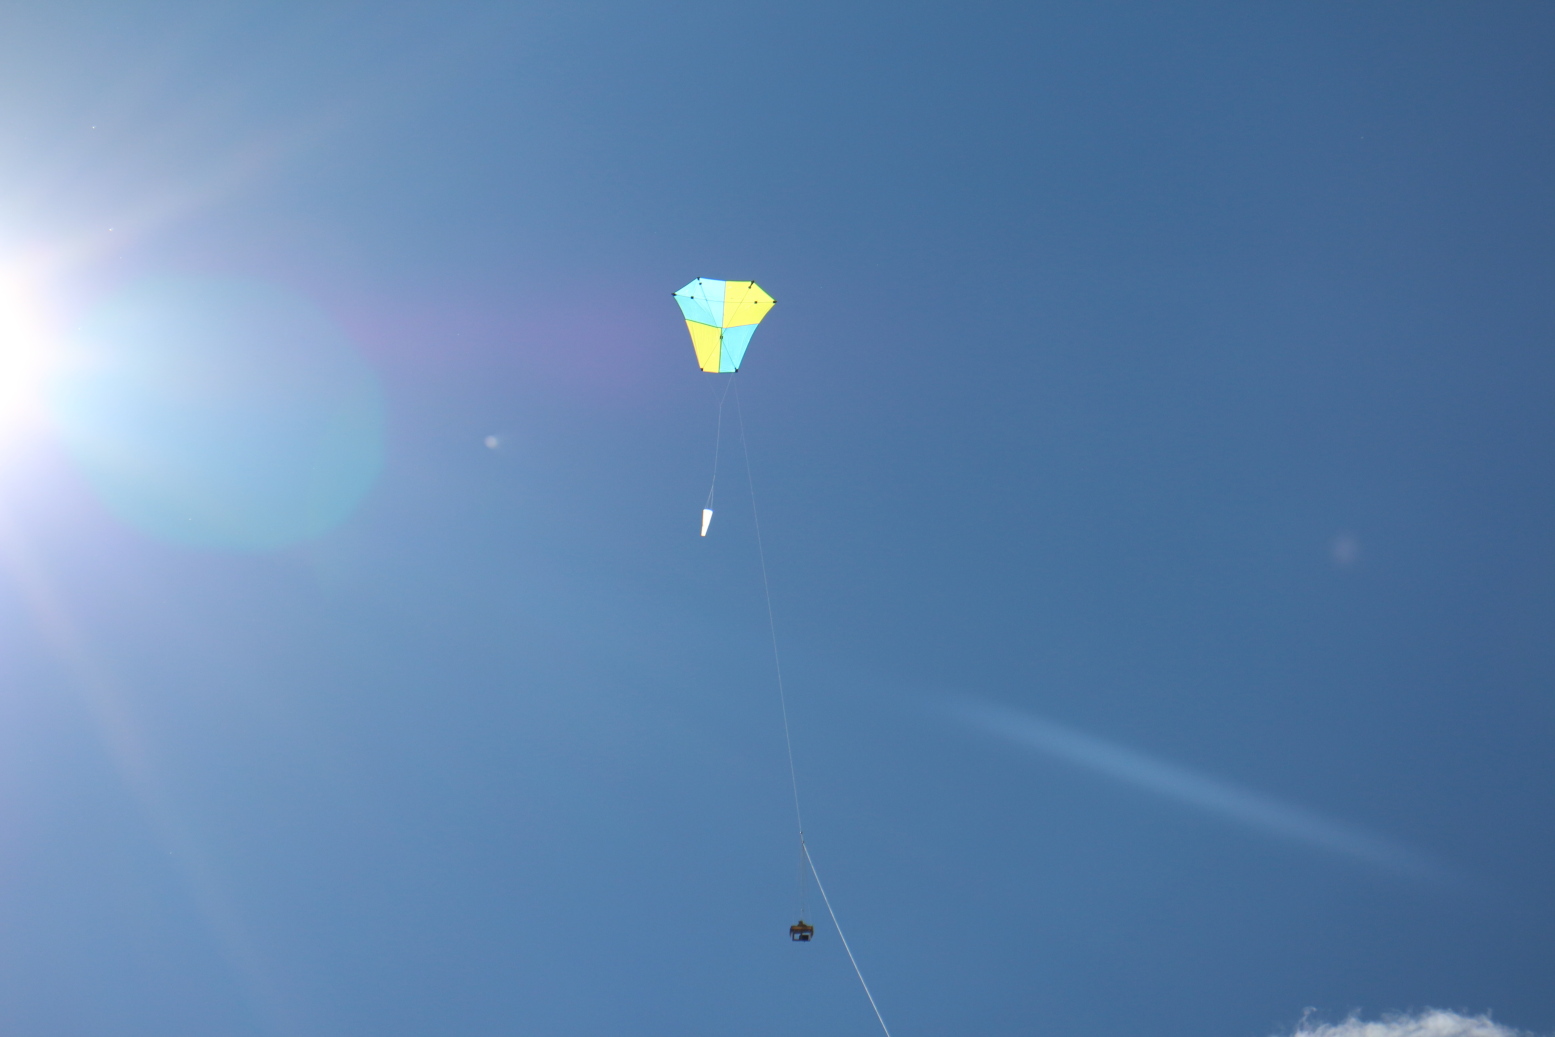
The Barn Door kite is a big, lightweight framed kite designed to lift a camera rig in light winds that would make most other kites fall back to earth. With a maximum width of over eight feet and height over seven feet, it’s a very impressive kite on the ground or in the air. Though it is at its best in light winds, it can handle winds bordering on moderate without a problem. I normally pull it out when the wind feels too light for my Mini Dopero. For such a big kite, it is fairly simple to build and fly, being basically a variation on the popular diamond shape, just with three spars instead of two.
Please note: due to some bad tendencies when the wind gets a little stronger than gentle, I have stopped using this kite in favor of the Rokker. Part of the reason for the problem is the size and flexibility; a smaller, stiffer version of this kite would probably work better. Nonetheless, I think the Rokker is better suited for KAP.
| Height | Width | Area | Weight | Approximate Wind Range |
| 88 in | 97.5 in | 41 sq ft | 18 oz | 5-14 mph (Bft 2-3) |
Construction Tips
Below are some tips for building the Barn Door kite. It’s not a full set of step-by-step instructions, mind you, but it should be enough to get you going.
Like the Mini Dopero, the design for this kite was scaled up from a design on another excellent kite website:
https://www.my-best-kite.com/make-a-barn-door-kite.html
If you don’t have a lot of experience building kites, I would strongly recommend you build that one and maybe some others. They use very cheap materials and will teach you the basics of building, trimming, and flying kites. The original design on that site has a max width of 48 inches, so this one is scaled up to more than twice that size, and more than four times the area. The 97.5-inch width of this one is a result of making each spar out of three Sky Shark P4X carbon tubes, joined together with internal carbon ferrules. I glue the ferrules only to the middle tube of each spar, so that they can each break down into three pieces, resulting in a very small package of less than three feet when broken down.
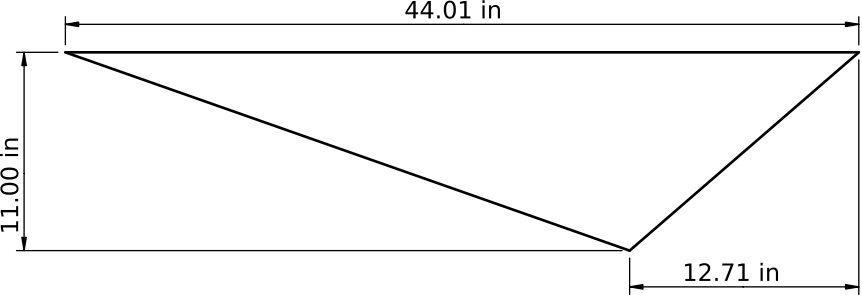
Like the Mini Dopero, the sail is made of 0.75 oz ripstop nylon. Other than the materials, the only real deviation from the original plan is the addition of a keel on the lower half of the kite, which is used to attach the lower bridle point and maybe add a little bit of stability. This avoids having to put a hole in the sail and tie the bridle to the diagonal spars where they cross, as it’s done in the original plan. Here is a diagram of the keel that will be useful if you plan to build this kite:
It’s worth pointing out that on the my-best-kite website linked above, if you buy the full plans for a couple dollars, as a bonus you will get plans for a similarly sized large barn door kite, but made with the same inexpensive plastic sail and wooden dowels for spars. That might be a good option if want to get into KAP, but you don’t want to spend much money at all on the kite, or you’re hesitant to learn how to use a sewing machine. Importantly, those plans also show the layout of the 5-point bridle, which I recommend for this big kite because it distributes the loads more evenly across the frame and reduces flexing.
Most of the sewing tips discussed on the Mini Dopero page apply here too. Since this kite has a large, one-piece sail, it will need to be made out of more than multiple pieces of fabric and sewn together. I chose to make mine out of four pieces, each with the same height. The top pieces are significantly bigger in surface area, since the top of the sail is wider than the bottom. Here is a picture of the four pieces plus the keel laid out on the floor.

With a four-piece sail, four seams are needed to join it all together. The keel is sewn into the bottom seam. If you read the Mini Dopero page, you’ll know that the seams are the trickiest part to sew, because the ripstop nylon likes to slip around. Using plenty of pins and going slowly and carefully will give the best results. After making one or two seams, lay the pieces on the floor again and make sure everything still lines up correctly. If you didn’t do it perfectly, you may need to adjust the remaining lines slightly to compensate (that happened to me). As long as the error isn’t too large, it’s not going to make a difference in how well the kite flies; just try to keep everything as symmetrical as possible as you finish the seams.
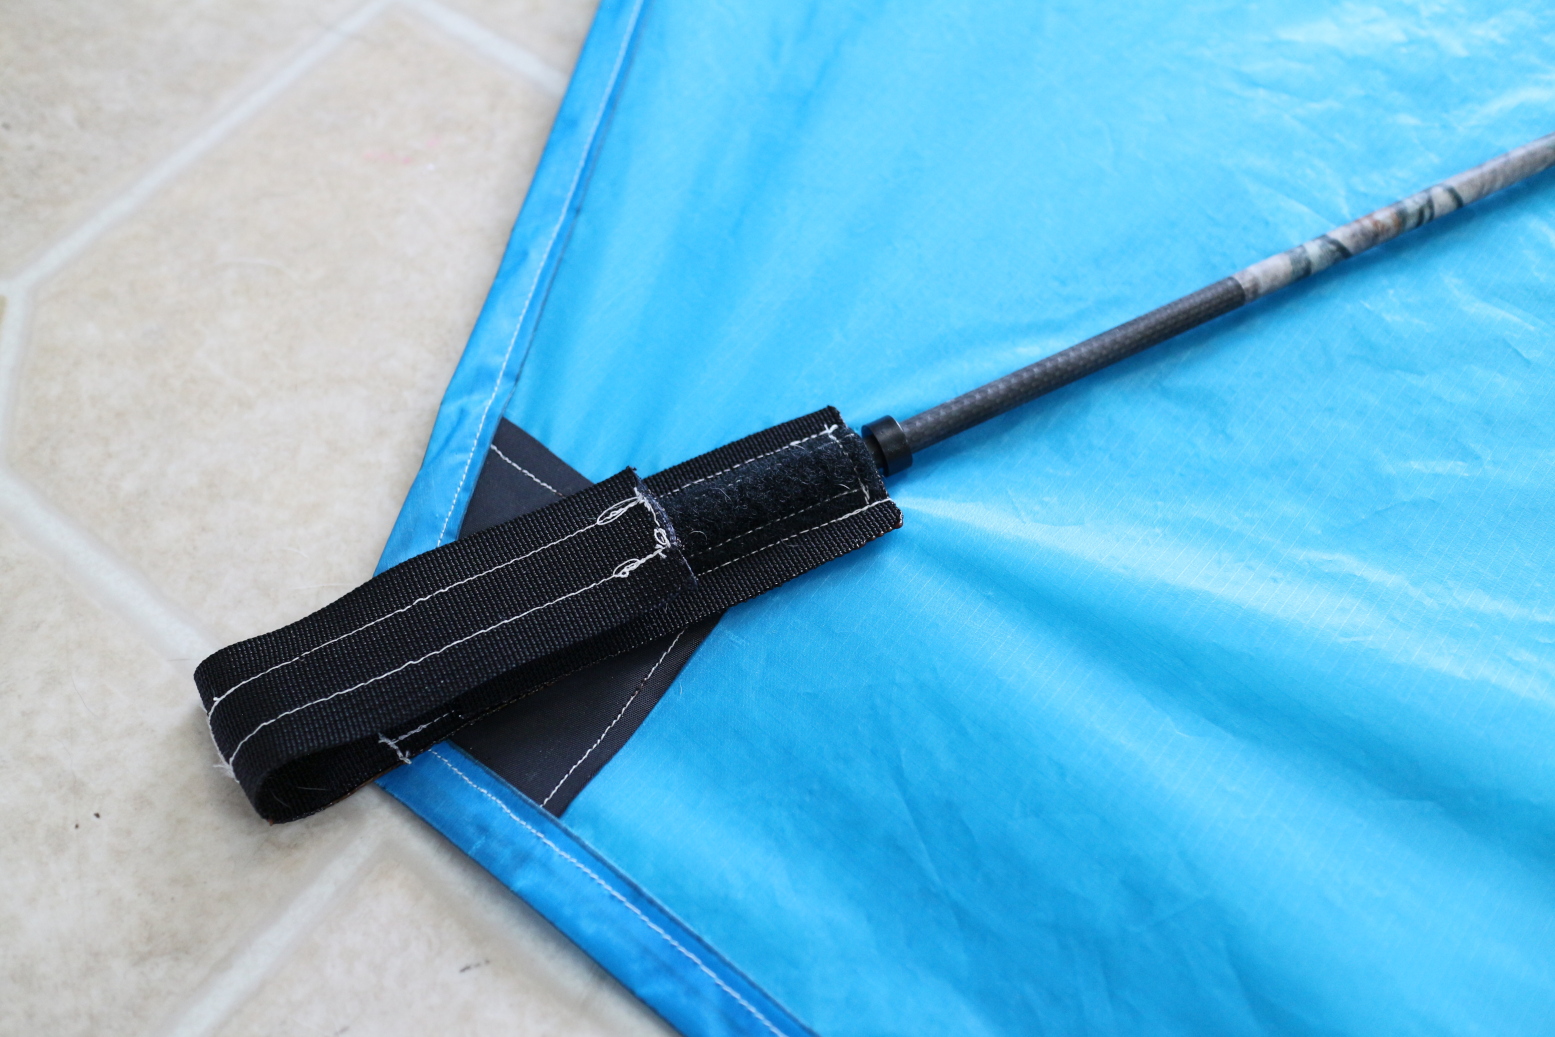
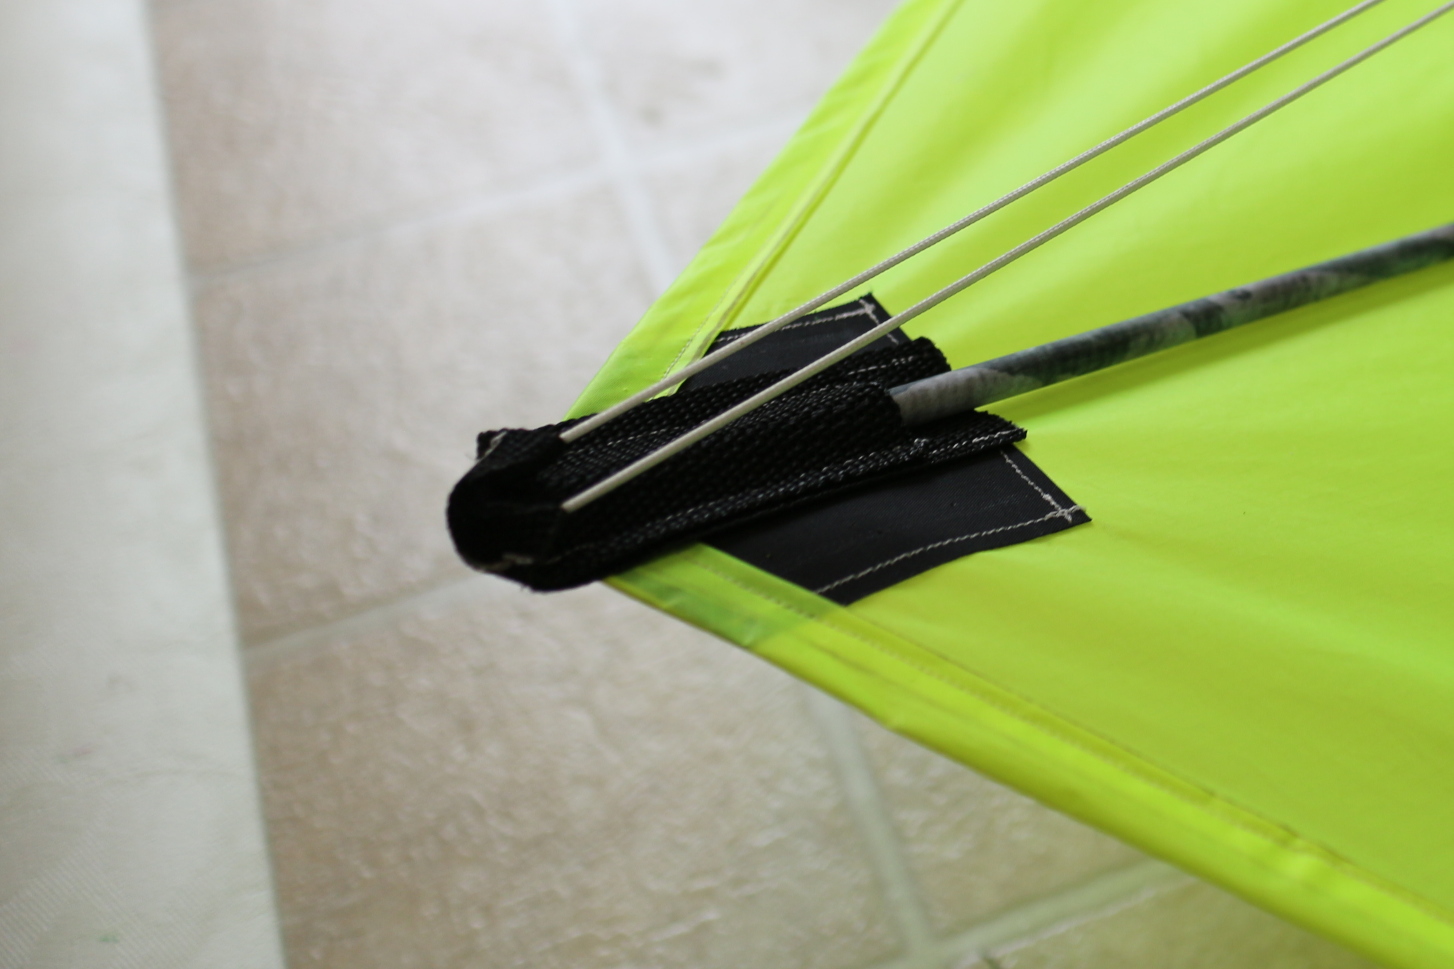
In a departure from how I made the Mini Dopero, I chose to use pockets instead of elastic cords to attach the spars to the sail. The pockets are made out of webbing — kind of like thin seatbelt or backpack strap material — sewn onto patches of dacron tape. The thought process here was that these might be stronger than the elastic cord solution, which seemed wise given that this kite is a lot bigger. In practice, since then I’ve flown the Mini Dopero in stronger winds where it generates at least as much pull as the Barn Door does in lighter winds, and the elastic cord has held up fine, so I’m not really sure if there’s an advantage to the pockets other than being more adjustable. But anyway, both solutions work just fine. Here is a picture of one of the pockets.

Making one of these pockets is fairly simple. Before doing any of the pockets, the sail should already be sewn together and hemmed, with dacron patches sewn onto each corner. Cut a piece of webbing 15 cm long by 4 cm wide. Use a match or quickly pass the cut edges through the flame of a gas stove to sear them, which will keep them from fraying. Line up about 8-9 cm of this piece on the dacron patch, sewing it down on all four sides. Then fold the remaining webbing back over to create a pocket and sew it down only on the long edges to create a pocket. (I also sewed it down on the far short edge, as you can see in the picture above, but in retrospect I think it might have been better not to do that.)
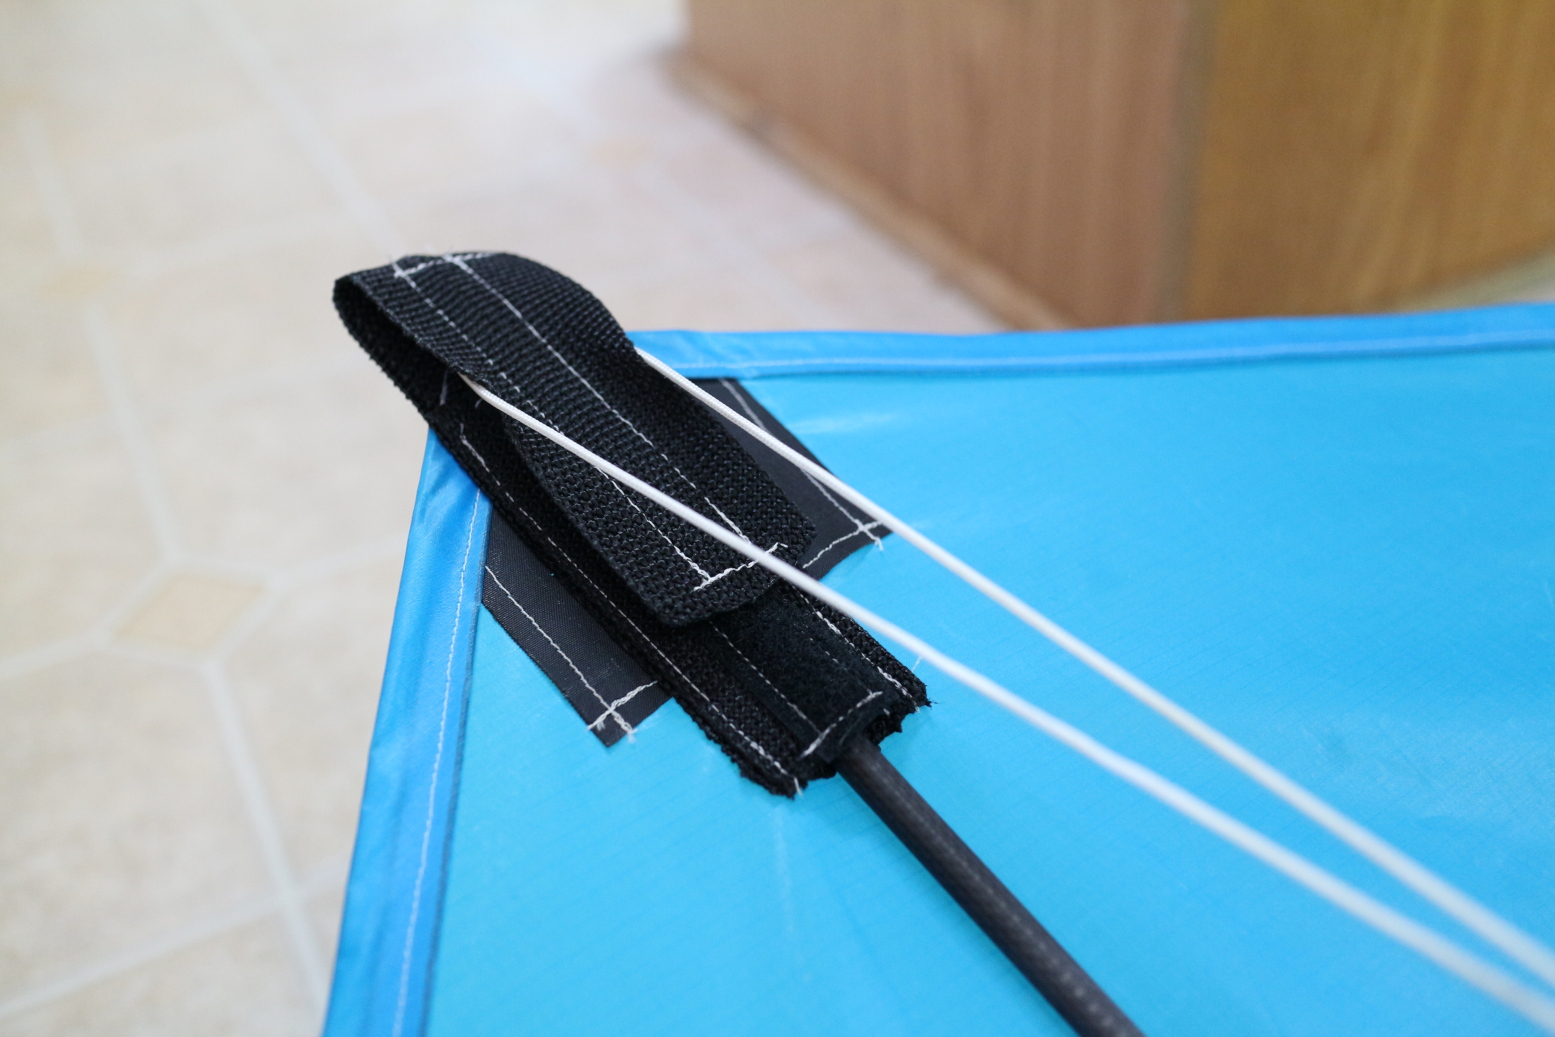
Each spar will need to have one simple fixed pocket as described above and one adjustable pocket. Adjustable pockets allow the spar to slide through during setup and then are secured with velcro, which tensions up the sail. These are a little more complicated than the fixed pockets. Let’s start off with another picture to give the idea:
To make one of these, start off with a 25 cm piece of webbing, about half on and half off the sail. On the part that will be hanging off the sail, sew a 10 cm piece of velcro. The velcro must be sewn onto the side of the webbing that is facing up, so that when it is folded over it will be facing down to mate with the opposite piece. After sewing the velcro onto the webbing and lining it up correctly on the sail, sew it down on all four sides. Now, take another 10 cm piece of webbing and sew the opposite piece of velcro onto it. Sew this piece down on top of the first one, sewing on the long edges only to create a channel that the spar can pass through. Now, when you fold the free half of the first piece (the strap) down on top of the second piece, the velcro will stick and the spar will be secured. In case those instructions were not clear enough, there is a good video on this other kite blog that should help explain it even better:
https://andrewnewtonkap.blogspot.com/2013/06/kite-sewing-videos.html
The horizontal spar must be bowed to curve the sail and add some stability in flight. I use some spare 200 lb braided dacron flying line for the bow line. The Mini Dopero page describes how to use a bow line toggle to hold the needed tension in the line. Put a large loop knot in one end of the line; this loop will be attached to one end of the horizontal spar using an arrow nock. (The arrow nock is on the side with an adjustable pocket, as shown in the first image below.) On the other end, a small modification to the spar pocket is required so that the line can be fed through. After sewing down the bottom piece of the pocket and folding it over, make a straight stitch across the width of the pocket about 1/4 inch from the edge, creating a small channel. I also made this pocket a little longer than the standard fixed pocket, using 20 cm of webbing instead of 15. See the second image below for an illustration.
The last little construction detail to point out is how the spars are attached to the sail and each other, other than with the pockets. Where the diagonal spars cross the horizontal spars, use some small lengths of rope secured to the diagonal spars with stretchy electrical tape. After inserting all the spars, the horizontal spar is tied to the diagonal spars using these lengths of rope. Make sure when tying the ropes that they wrap underneath and around the diagonal spars, so that the electrical tape isn’t bearing the connection load.
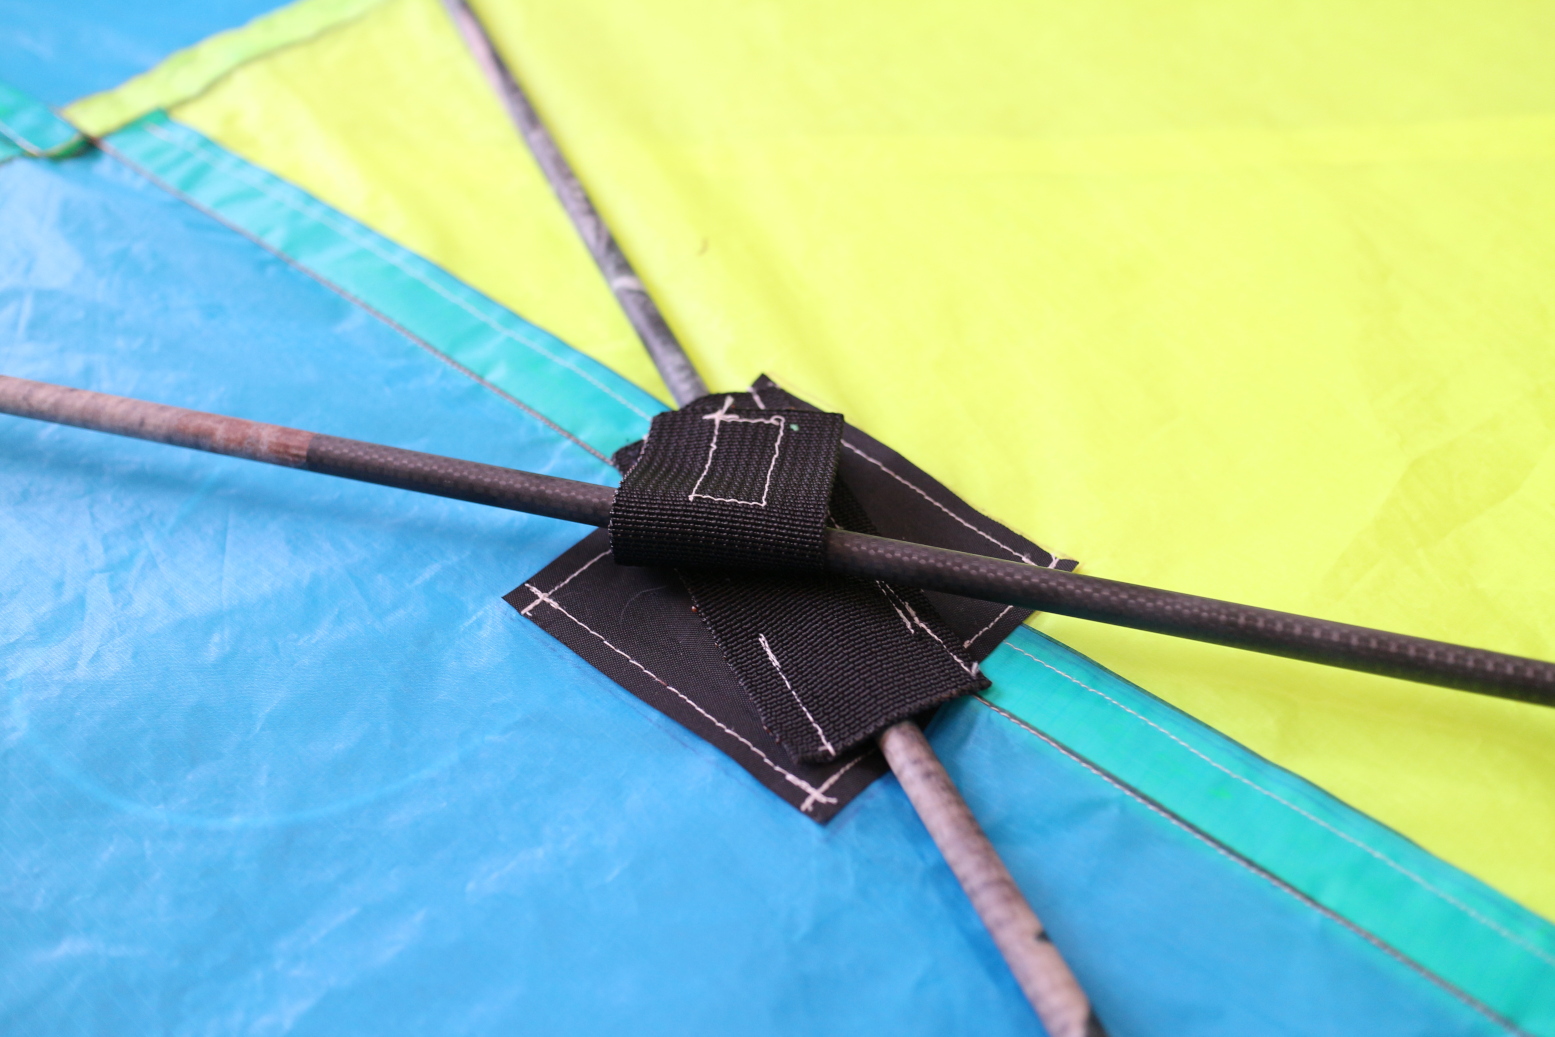
The diagonal spars cross on the lower half of the sail. They need to be secured to each other and the sail. To accomplish that, sew down a length of webbing onto a dacron patch, only sewing along the two long edges to create a channel. One diagonal spar will pass through this channel. On top of this piece, sew another length of webbing at an angle with some velcro attached, and then the opposite length of velcro on top of the lower piece of webbing. The top piece of webbing will fold over and attach to the velcro to hold down the other diagonal spar. Of course, the top piece of webbing and velcro must be sewn on top of the lower piece before sewing the lower piece to the kite, which makes creating the lower channel a little tricky to accomplish. I certainly didn’t do a perfect job on mine, but it’s serviceable at least. Another tricky part is that the keel is right underneath, so when sewing the webbing down to create the lower channel, be very careful to move the keel out of the way of the needle so it doesn’t get sewn down (yes, I made that mistake too, despite my best efforts, and had to remove some stitches to fix it). As usual, a picture is worth a thousand words…
Trimming and Flying
The Barn Door kite takes a little more time to set up than the Mini Dopero, mainly because it’s larger and the spars all have to be taken apart to pack it down into a small size (and therefore need to be put back together to set it back up). But it’s still not too difficult; it usually takes me about 5-10 minutes.
Put the spars together first, being aware that the tubes with the small lengths of rope attached belong on the top sections of the two diagonal spars, while the tube with an arrow nock belongs to the horizontal spar. Insert the lower diagonal spar first, through the channel on the lower part of the sail, through the slip knots securing the bridle, and into the pockets. Slide it through the adjustable pocket with the velcro undone, pushing it far enough so that the other end can fit into the fixed pocket. Then secure the velcro of the adjustable pocket, pulling a bit of tension in the sail as you go. Repeat the process for the other diagonal spar.
Next, assemble the horizontal spar, placing it on top of the diagonal spars, through the other set of slip knots for the bridle, and into the pockets. Remember that the side with the arrow nock needs to go in the adjustable pocket. Once the spar is in place, attach the bow line to the arrow nock and tighten down the adjustable pocket.
At this point, you’re almost there. Tie the diagonal spars to the horizontal spar using the lengths of rope. Then slide the bow line toggle towards the end of the horizontal spar with the nock to tension it up and bow the spar. I usually shoot for about 10 inches of bow in the middle of the spar; a little bit more if flying towards the top end of the wind range, and a little bit less near the bottom. Now just attach the flying line to the bridle with a lark’s head knot, and you’re ready to fly!
The Barn Door kite has a 5-point bridle with four prusik knots, but you’ll only use two of them for trimming. The one on the top part of the kite that slides left and right can be adjusted if the kite isn’t flying straight. It works intuitively: if the kite tends to pull to the right, adjust the knot left, and vice versa. Only small adjustments of a couple centimeters at a time are usually needed. The prusik knot closest to the flying line can slide up and down to adjust the angle of attack. In windier conditions, you will want to slide this up a bit to lower the angle of attack and reduce the force that the kite produces. In light winds, slide it down a bit for the opposite effect. If you move it too far down, it will pull but have trouble rising, because it will be producing mostly drag. Too far up, and it will tend to pitch forward and lose lift during gusts.
Launching methods for the Barn Door are pretty much the same as for the Mini Dopero, with a couple differences. For long-line launches, its base on the ground is not quite as stable as the Mini Dopero’s, so you might have to prop it up against a hill or a fence to make sure it rises straight into the air. Another option is actually to lay it face down on the ground, with the top end of the kite facing towards you. When you give it a pull, it will slide towards you along the ground kind and then lift up into the air.
Since this kite is bigger and more flexible than the Mini Dopero, long-line launches are a little bit trickier. Pulling on the line will make it go up, but the response is slower, and it requires more force on your part if the breeze is intermittent. With some patience and effort, though, it should eventually rise above the treetops into smoother air in light wind conditions.
Many of the things to watch out for during flying are also the same as the Mini Dopero; for example, how to deal with thermals and over-fly situations and how to recover from a dive or loop. There are also some differences, though. While the Mini Dopero tends to make wide swings to the left and right when the wind is strong and gusty, the Barn Door more often does a short-period “nodding” motion, even in light winds (you may have noticed that in the video at the top of the page). When the winds get stronger, the spars flex and the sail billows increasingly, causing a lot of drag. It is actually pretty stable in such conditions, but the large amount of drag can pull the kite down, risking getting the line caught in trees or other obstacles. Try to determine if this situation is arising before putting the camera on the line and/or releasing a lot of line from the winder and adjust as necessary, either by moving the tow point a bit farther forward or switching to a kite better suited for the wind if it’s really too strong. This issue has cropped up many times during my flying sessions with this kite, once resulting in the destruction of a rig and camera. That is the main reason I eventually stopped using this kite, switching to the Rokker for light winds instead. As mentioned near the top of this page, a smaller, stiffer version of this kite should have less trouble with that issue.
To pack up the kite, just undo everything you did to set it up, take the spars apart into nine tubes, fold the kite along the centerline, and roll up the tubes in the sail as tightly as you can. When you’re done, you can wrap the bridle and bow line around to hold everything tight. You’ll end up with a surprisingly small package for such a large kite, easy to take with you on vacations, to the grocery store, the doctor’s office, work meetings… (okay, maybe I’m getting a little carried away here).
You can never have too many videos, so above is another video of the Barn Door flying in a light breeze.
